
COURSE TOUR
#1
#2
#3
#4
#5
#6
#7
#8
#9
HOLE #1
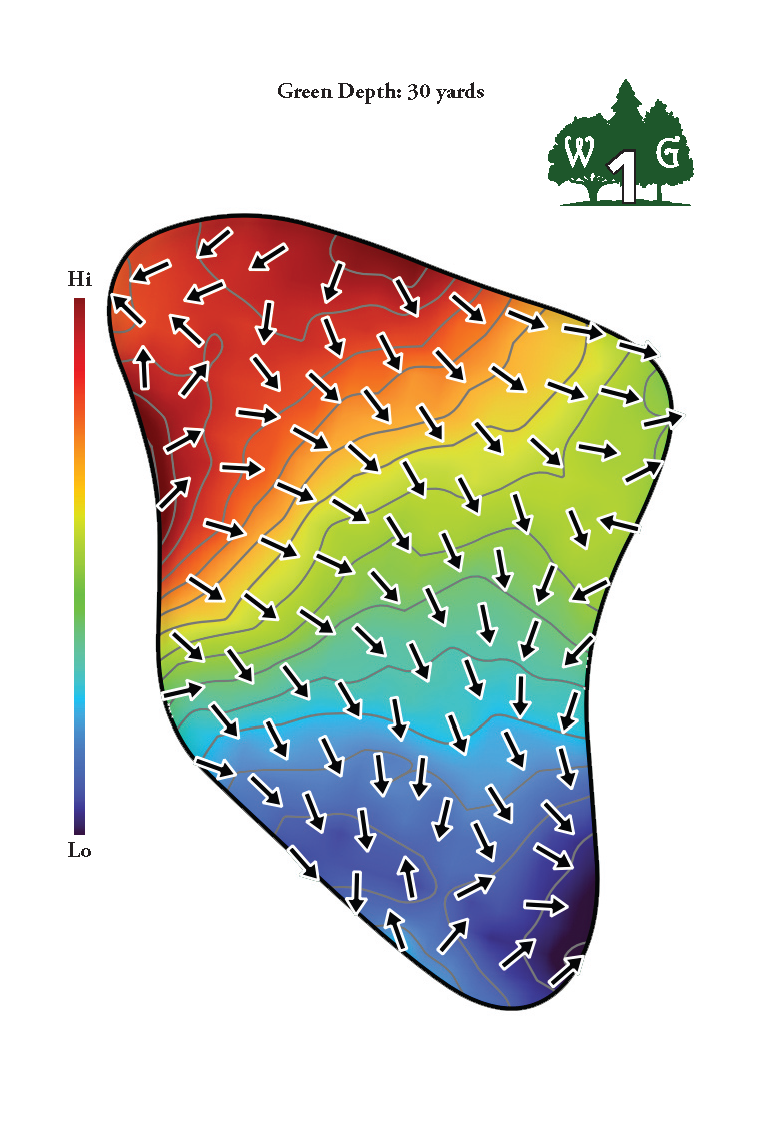
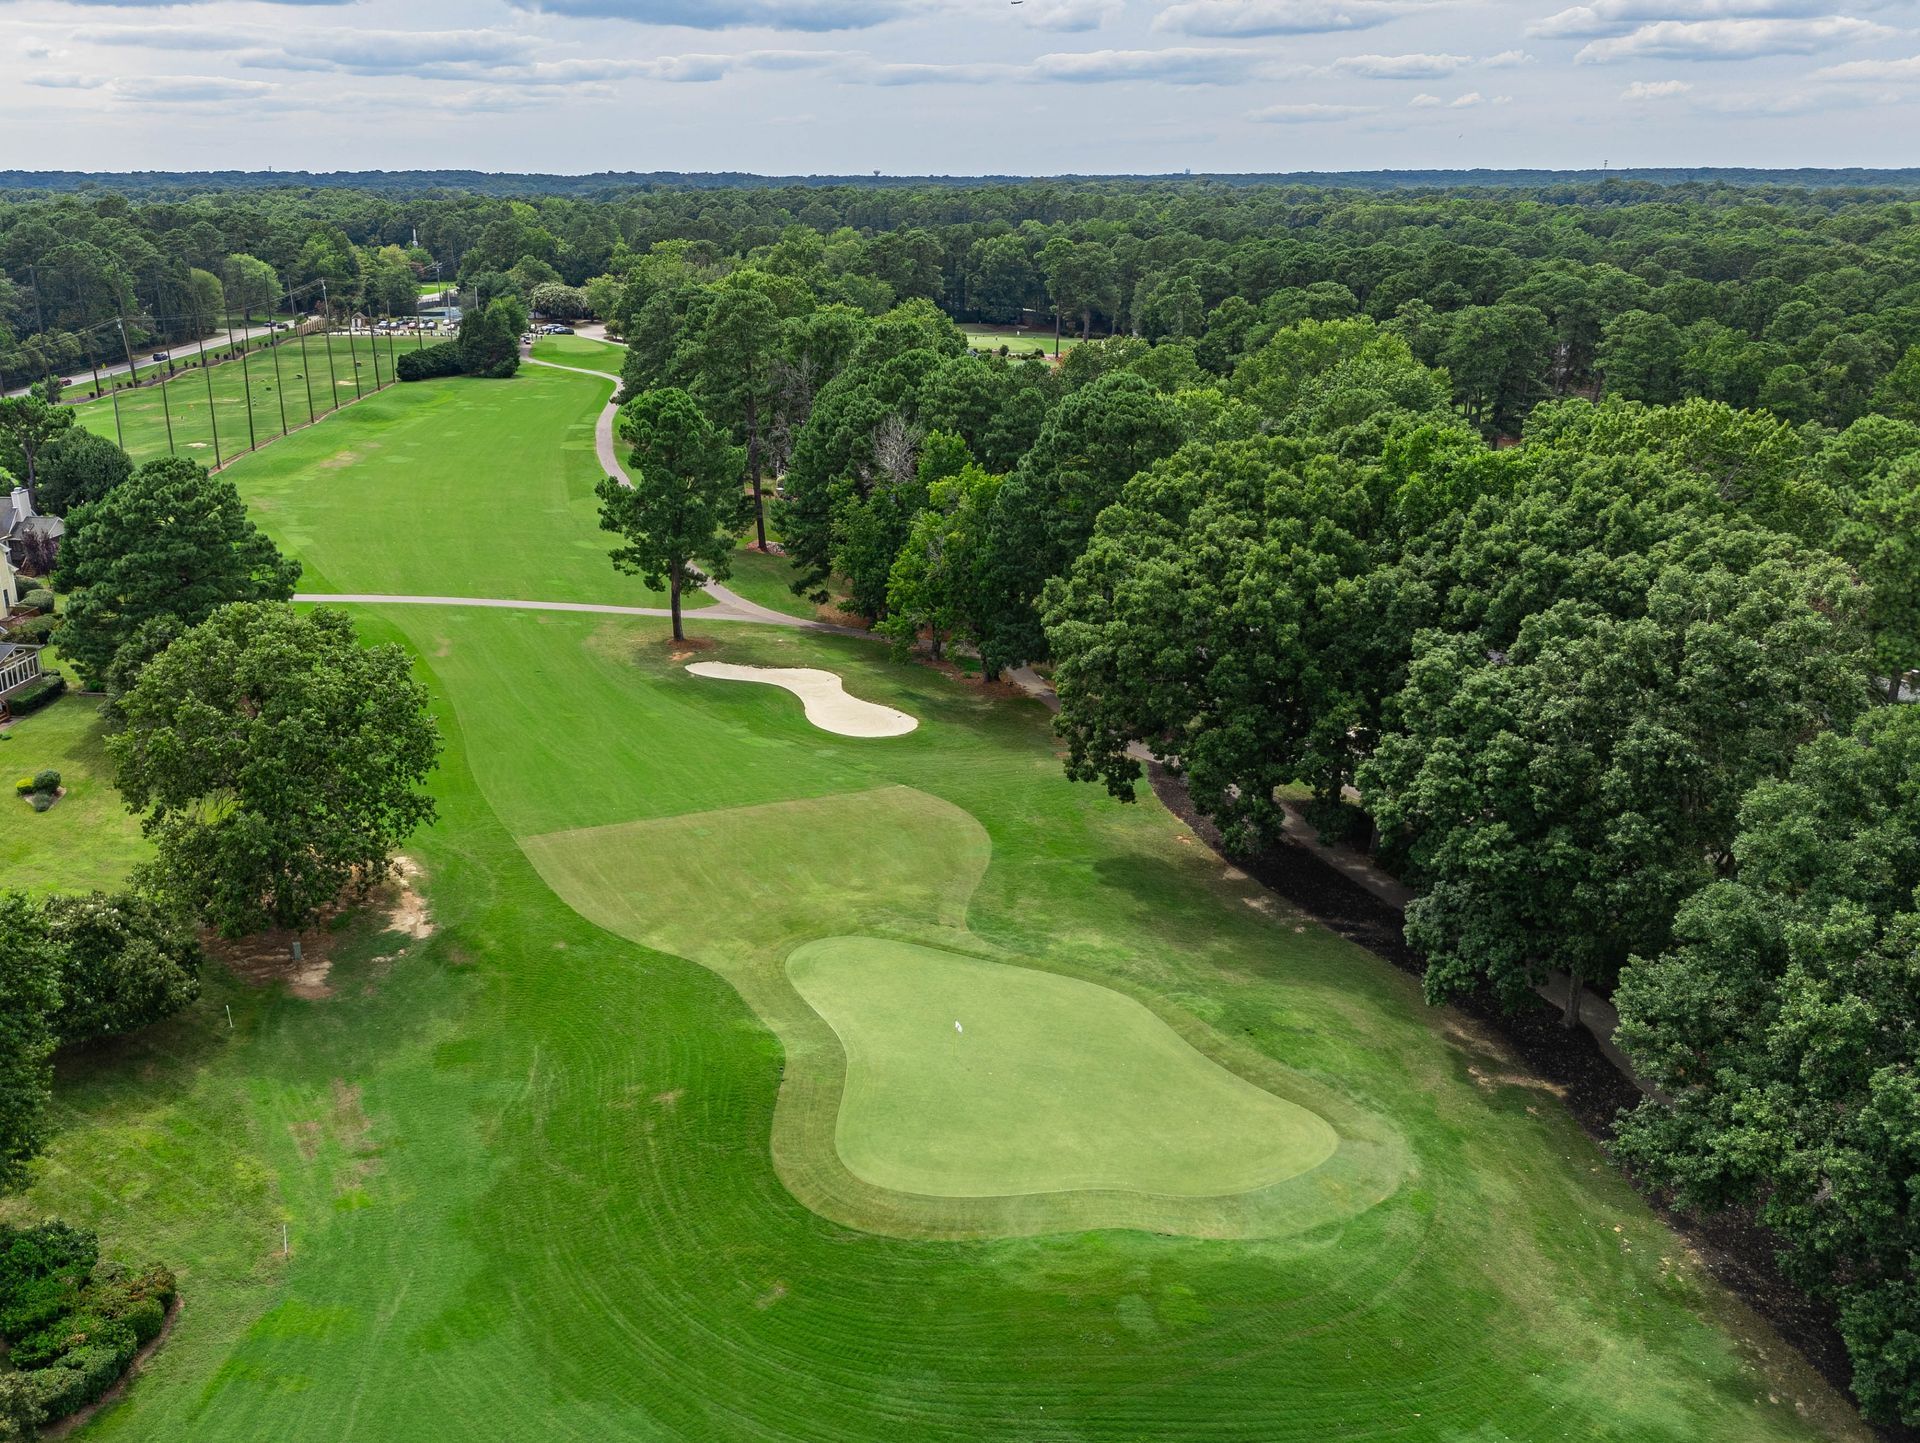
Pretty much a straight forward hole with Out of Bounds left and on the right side. A large tree blocks the left side of the hole, so a tee shot down the right side of the fairway gives you the best looking approach shot. The driving range is considered out of bounds for balls hit over the nets. White PVC pipe defines the out of bounds along the nets.
| PAR | BLUE | WHITE | YELLOW | GREEN | RED |
|---|---|---|---|---|---|
| 4 | 413 | 394 | 382 | 370 | 323 |

HOLE #2
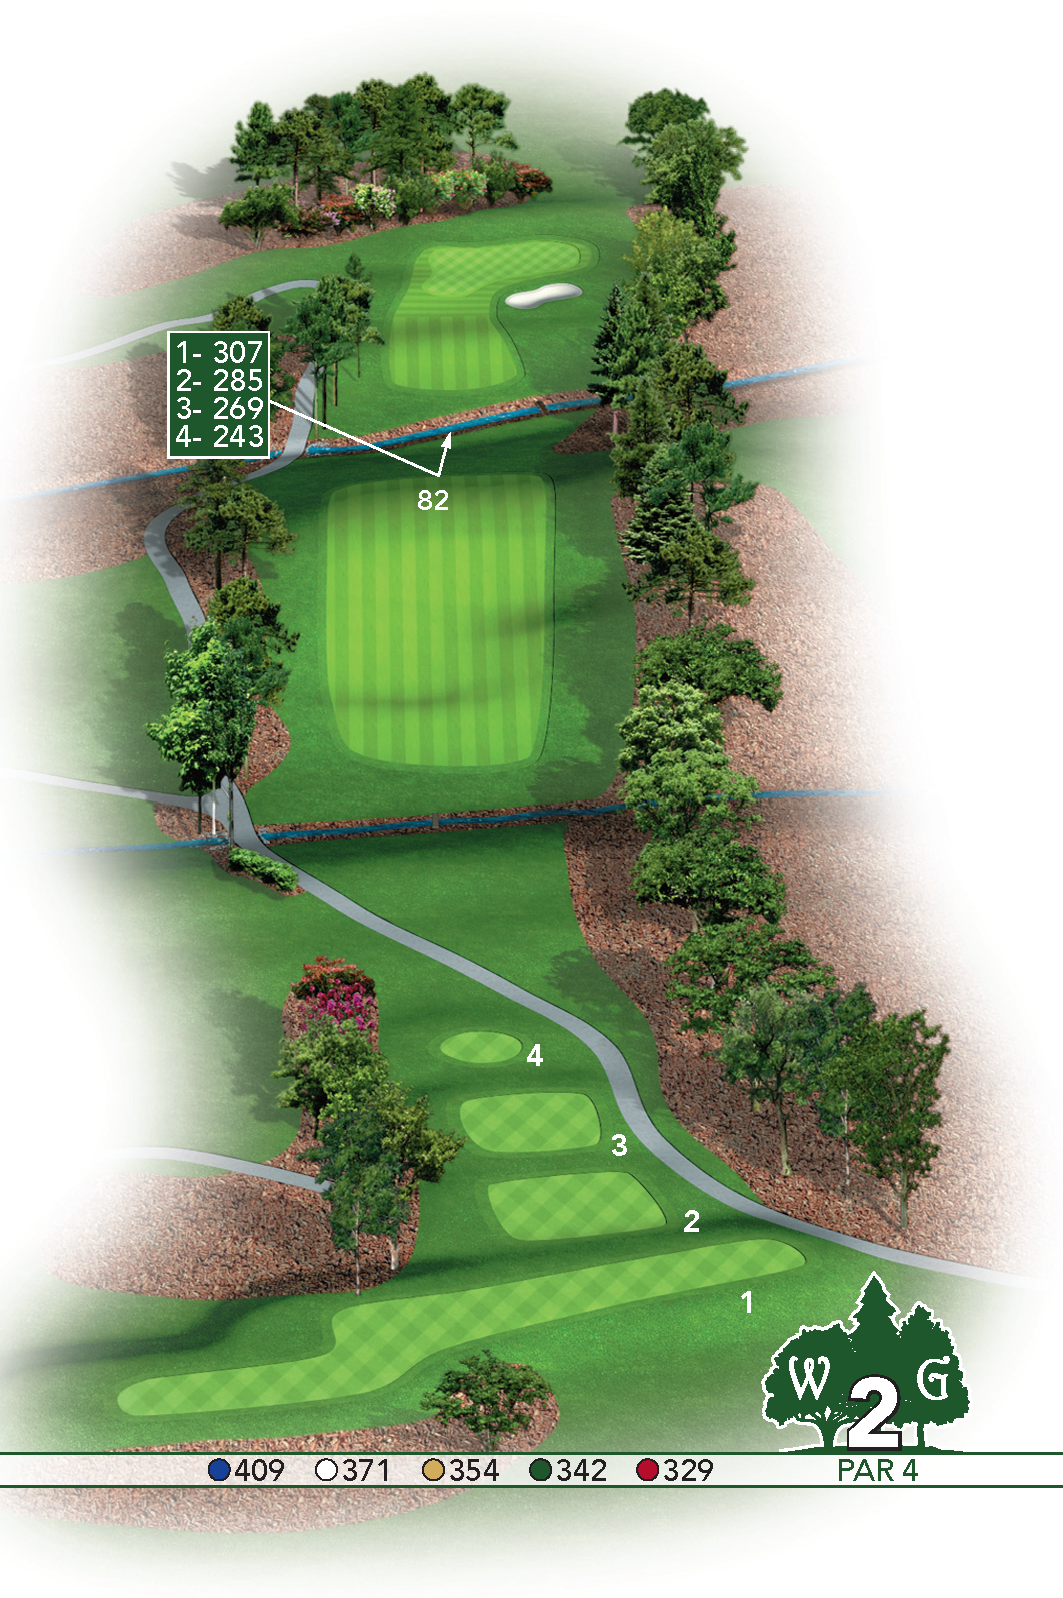
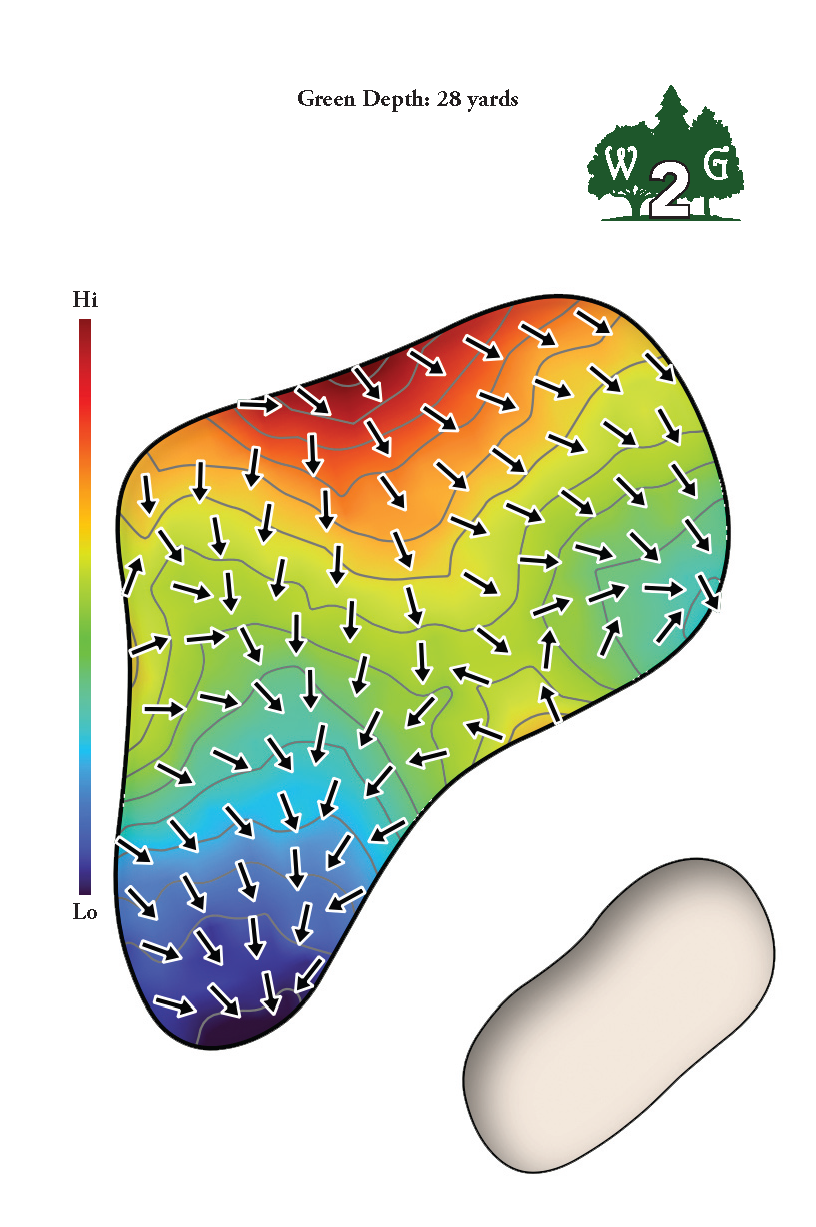
An accurate tee shot is critical. Trouble left and right, but don’t hit it too far as a creek runs across the fairway on the other side of the hill. 2nd shot is tough, as you need to avoid the bunker on the front right side. Once you reach the green you may still have a long way to go. Out of bounds runs the entire right-hand side of the hole and is marked with white stakes or white PVC pipe. When the creek(s) meets out of bounds, two stakes will be present. When there are two stakes present, both white and red, the line from red stake to red stake will define the end of the penalty area.
| PAR | BLUE | WHITE | YELLOW | GREEN | RED |
|---|---|---|---|---|---|
| 4 | 409 | 371 | 354 | 342 | 329 |
HOLE #3
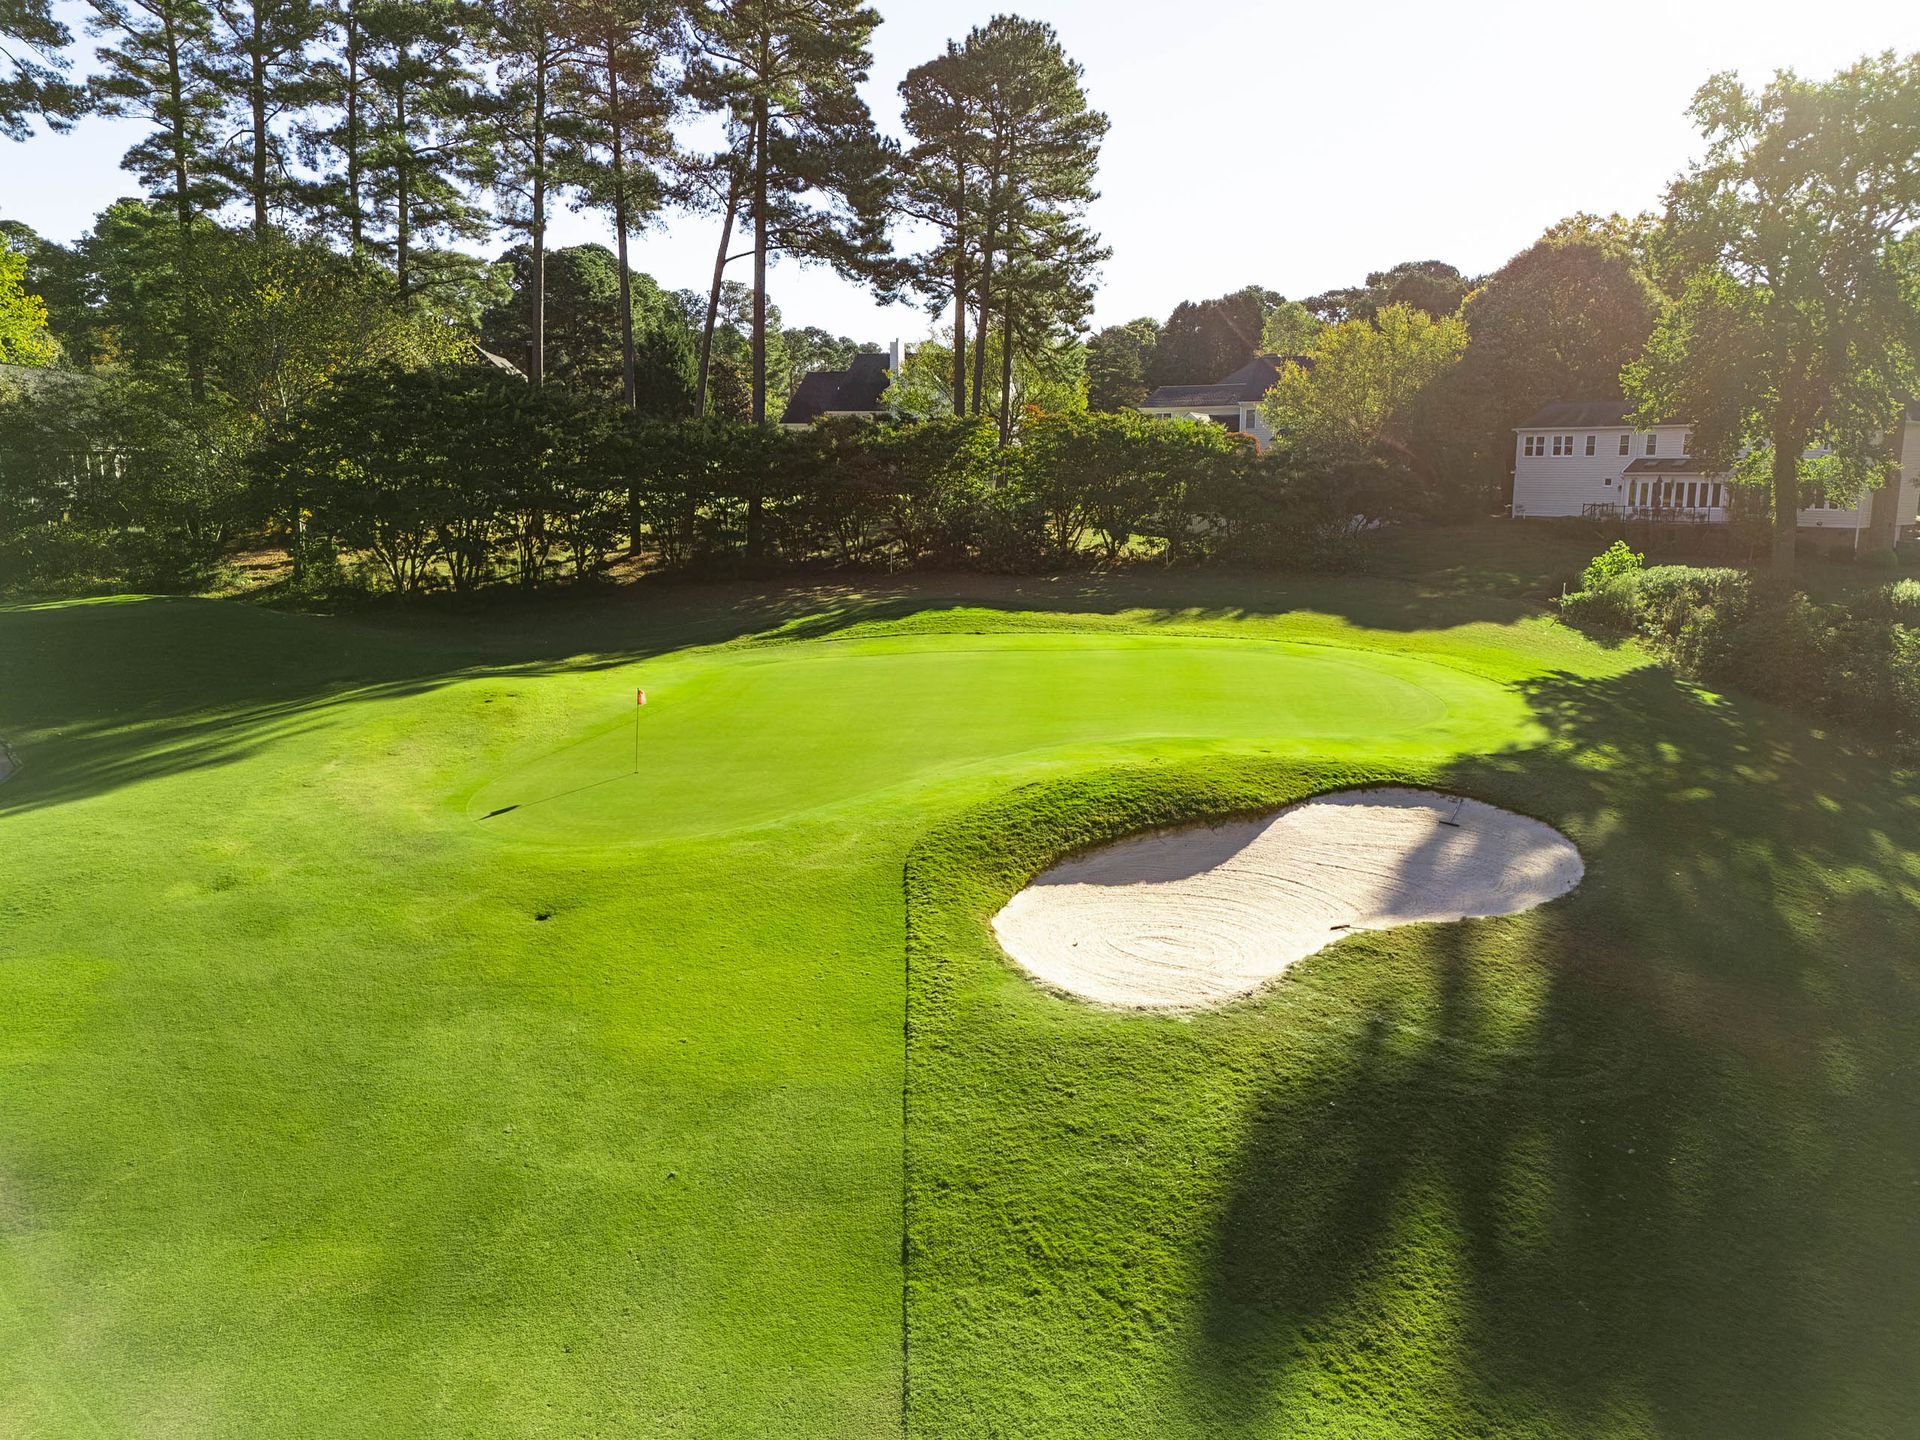
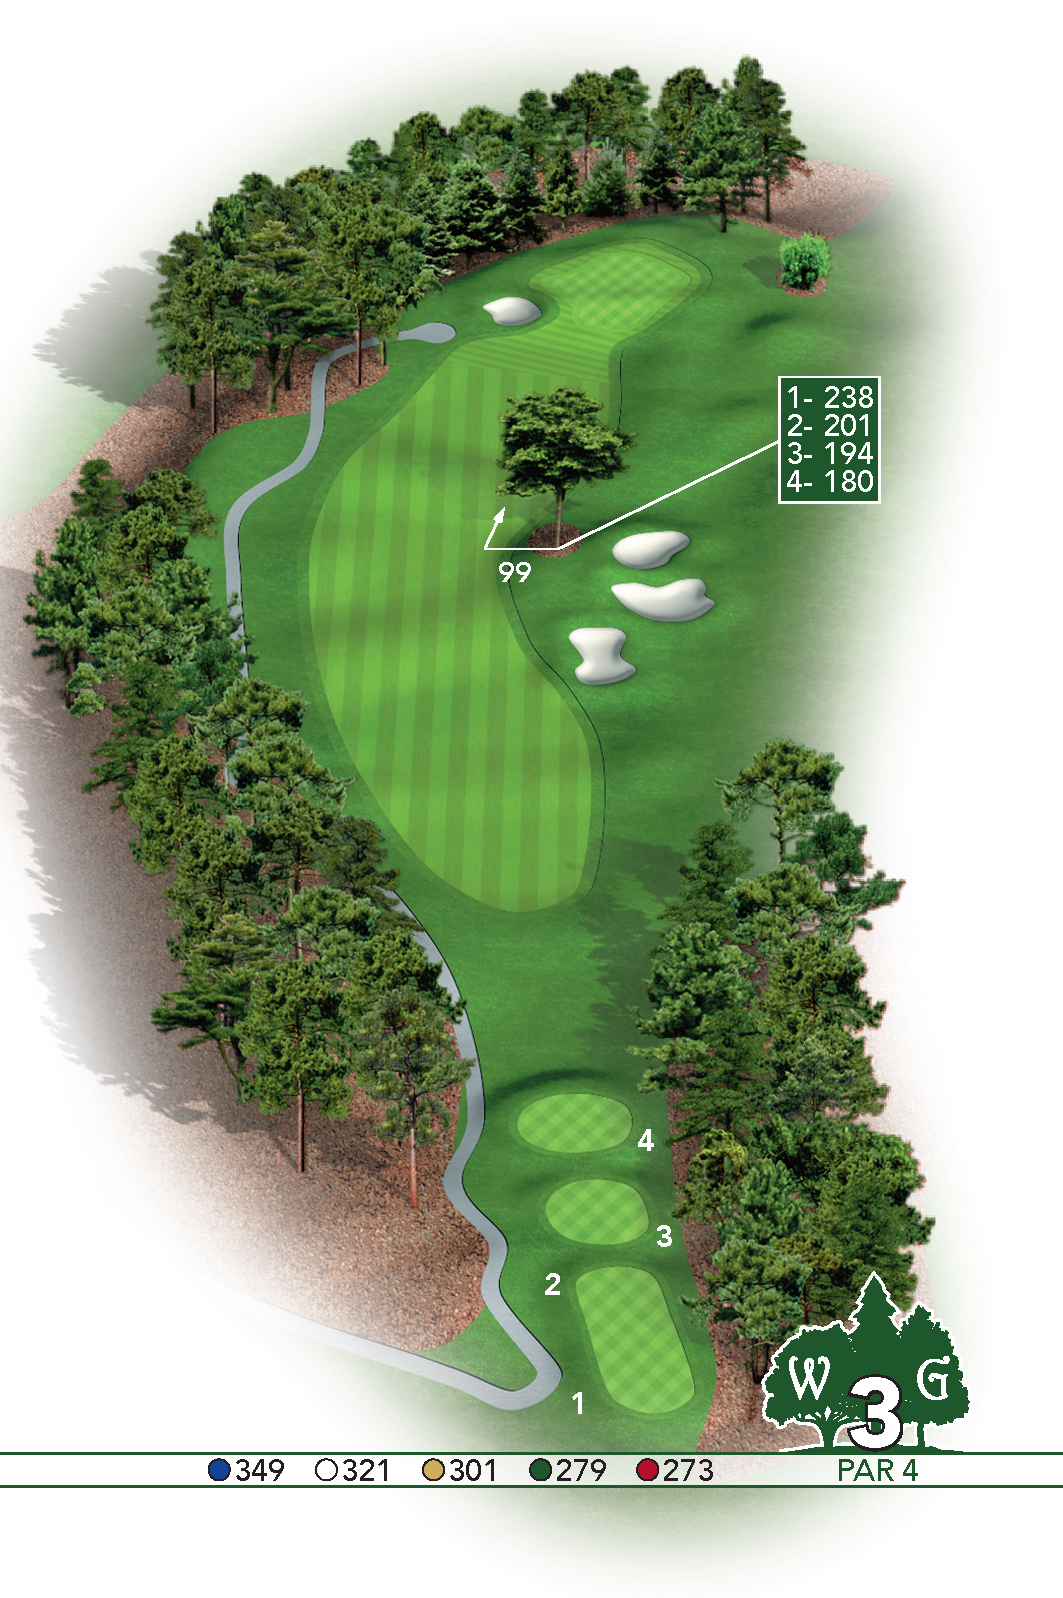
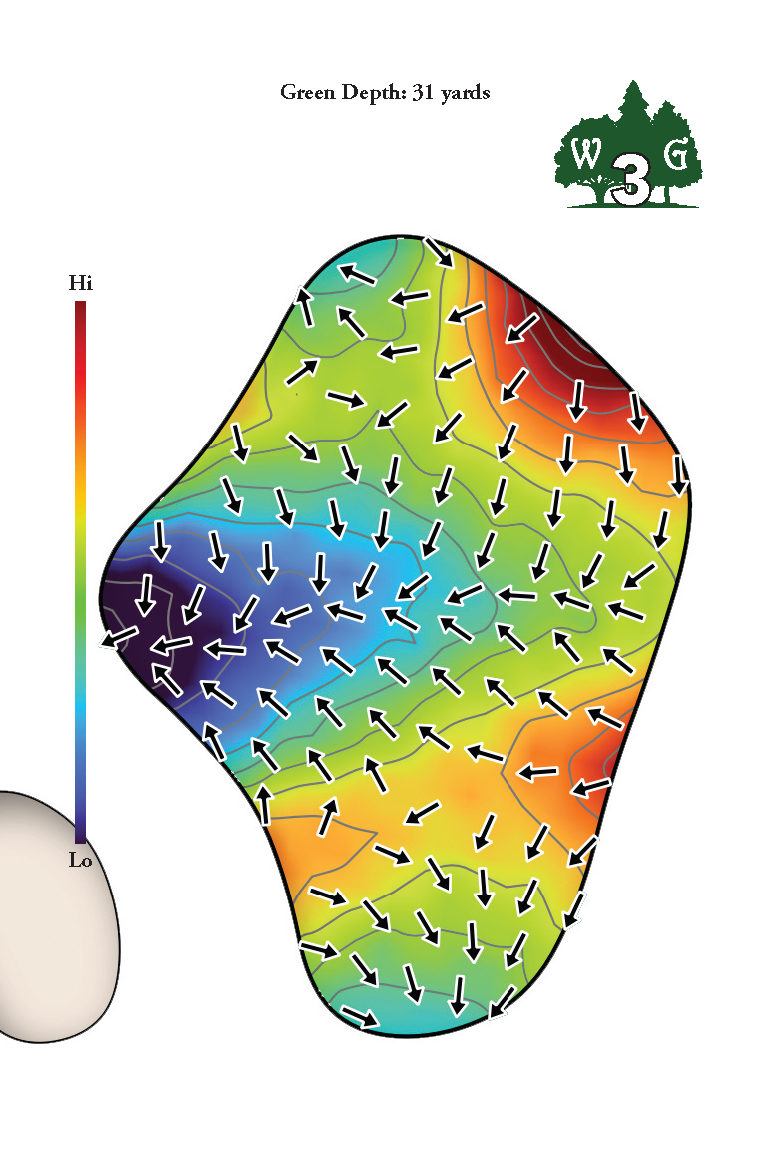
This fairway slopes from right to left so expect a hard kick left with a solidly struck tee shot. Avoid the tree and fairway bunkers on the right side of this hole to ensure a clear shot to the green. If the fairway is hit, a short approach shot is awaiting, but don’t hit your second shot long and left or you may not find it! Out of bounds runs the entire right-hand side of the hole meeting a penalty area that begins at the back-right hand corner of the hole behind the green. The penalty area extends into the woods towards #5 green and to the left towards #4 tee. The trees behind the green are considered a penalty area. When the penalty area meets out of bounds, two stakes will be present.
| PAR | BLUE | WHITE | YELLOW | GREEN | RED |
|---|---|---|---|---|---|
| 4 | 349 | 321 | 301 | 279 | 273 |
HOLE #4
💧 WATER STATION
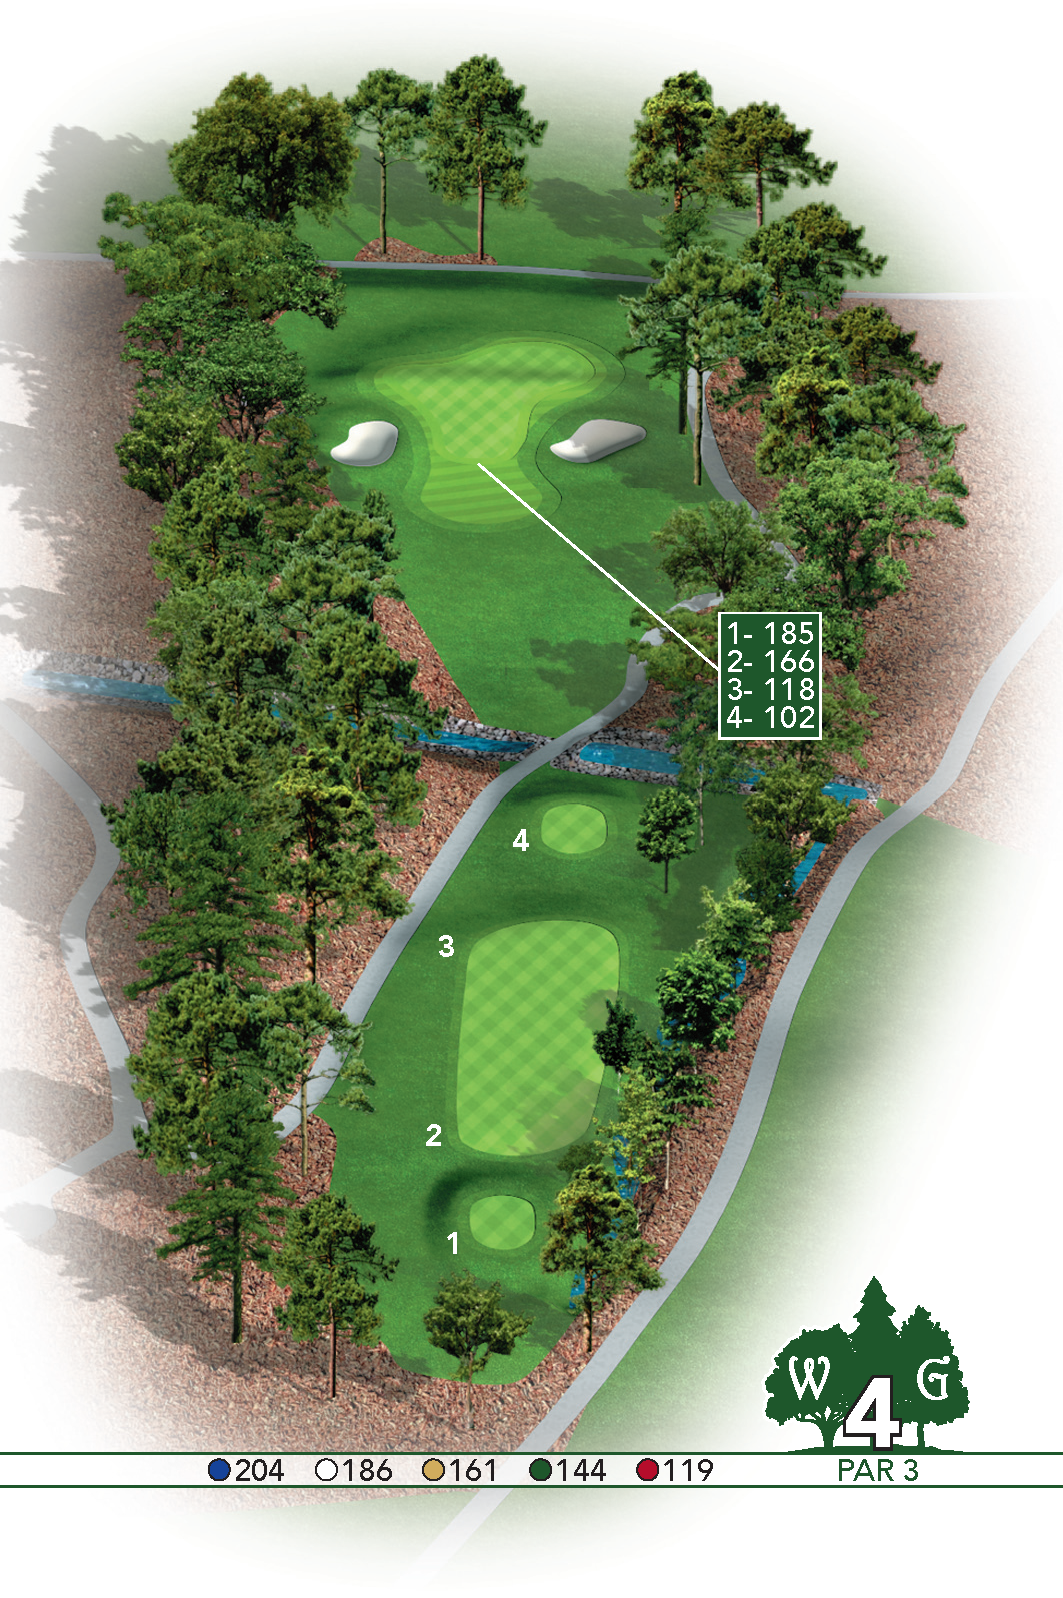
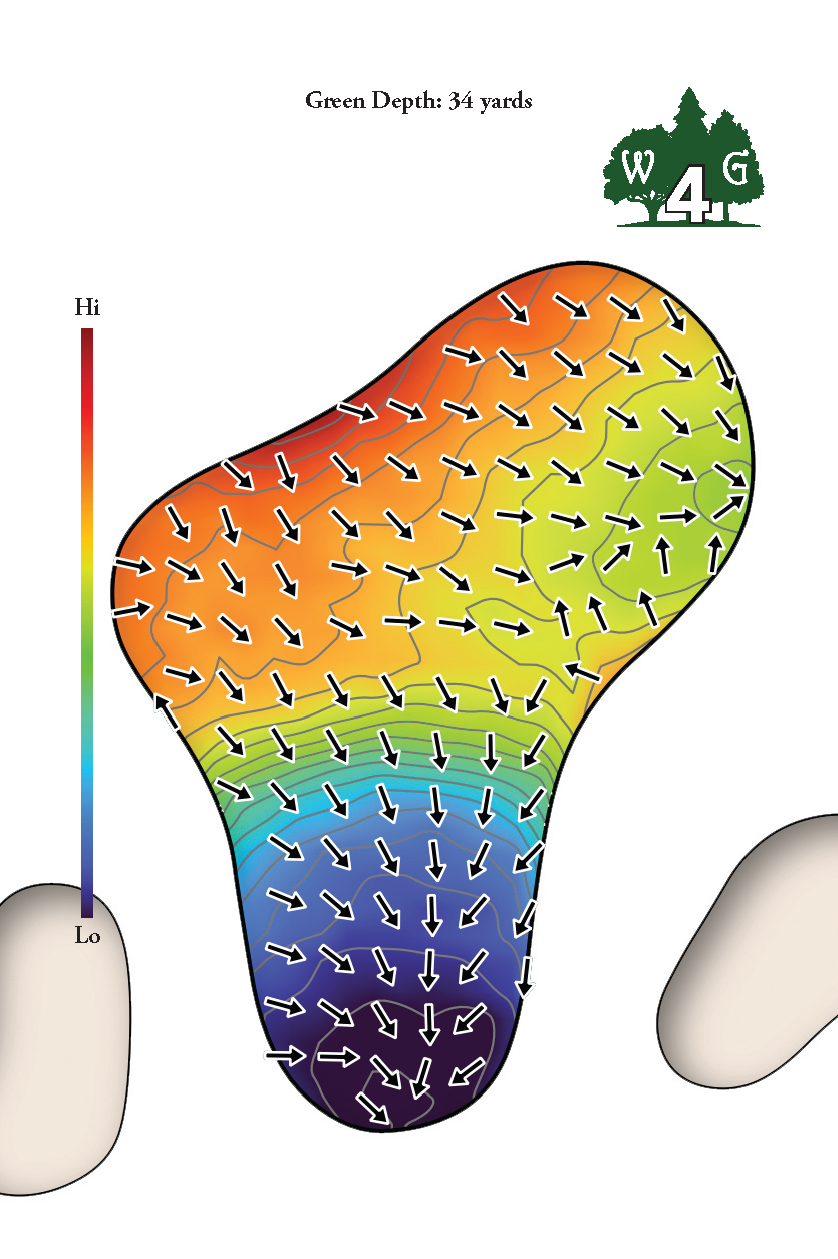
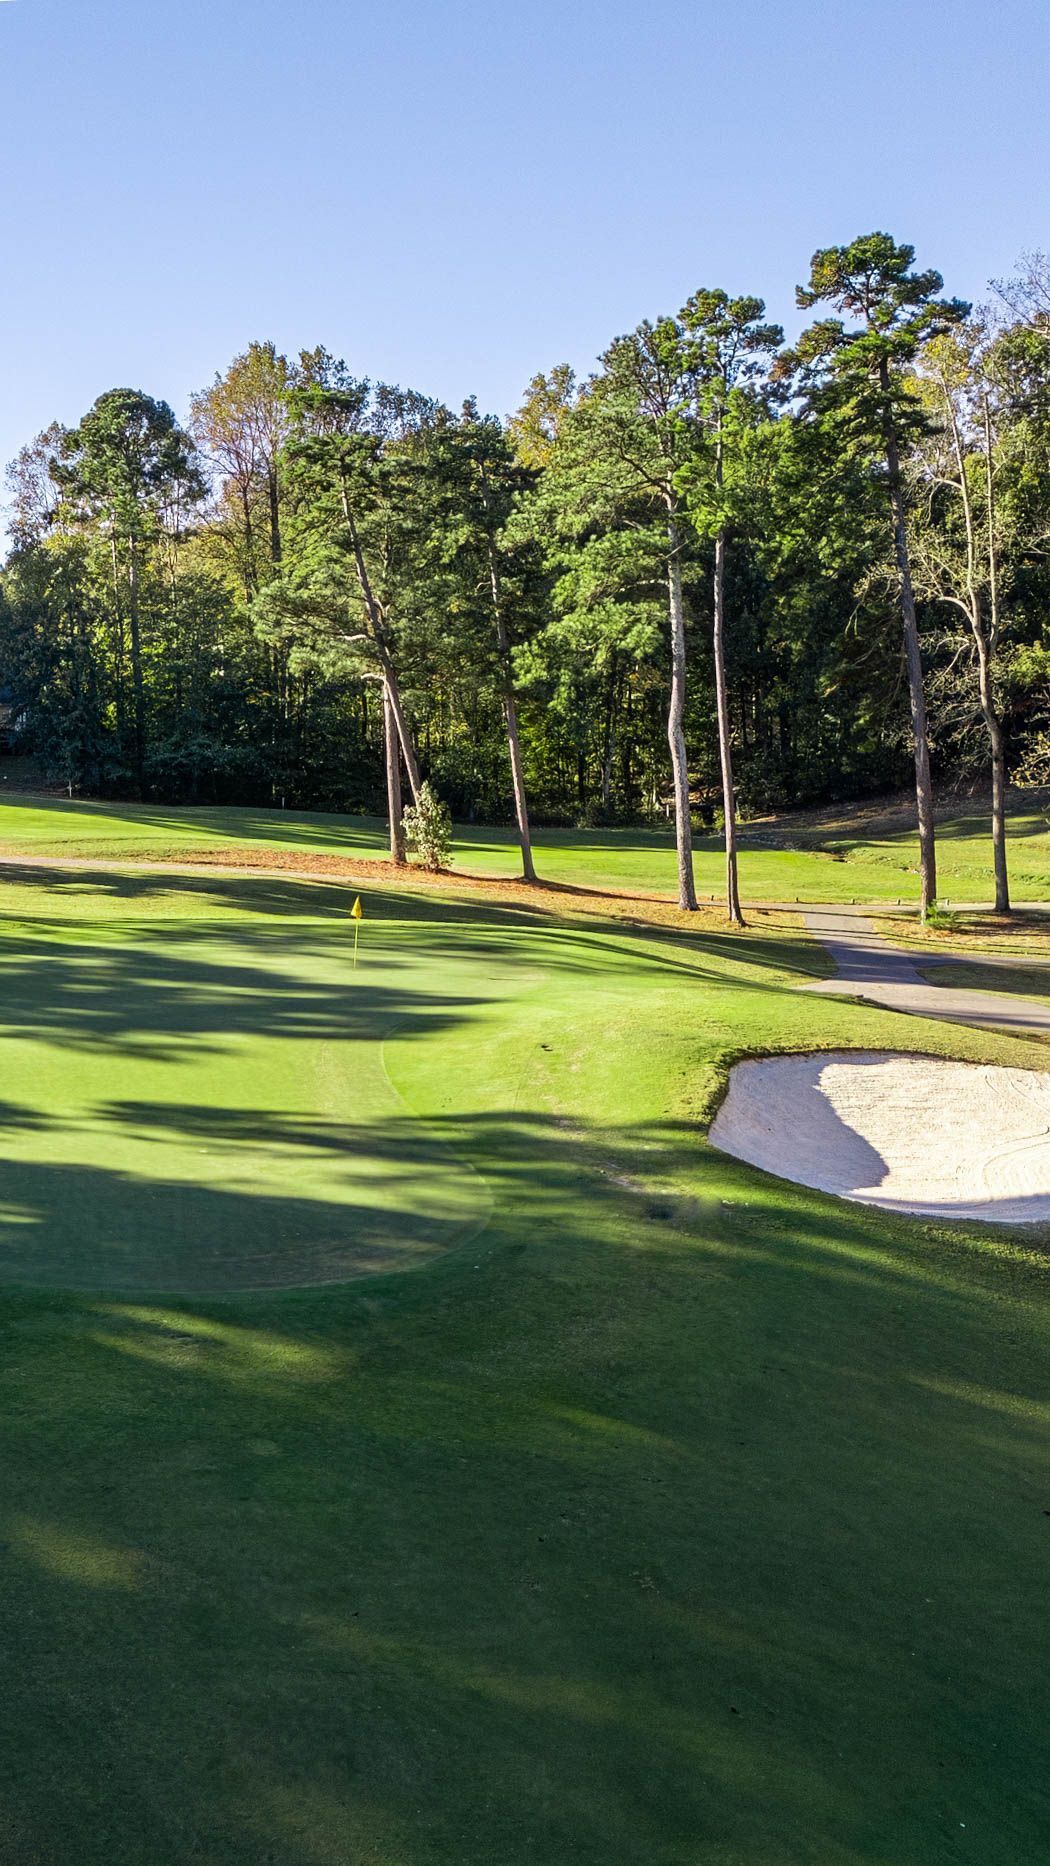
A long uphill par 3 with a two-tier green. If you miss the green right or left, you may hope to find the bunkers, as the alternative could be much worse. A 3 here, is a good score.
| PAR | BLUE | WHITE | YELLOW | GREEN | RED |
|---|---|---|---|---|---|
| 3 | 204 | 186 | 161 | 144 | 119 |
HOLE #5
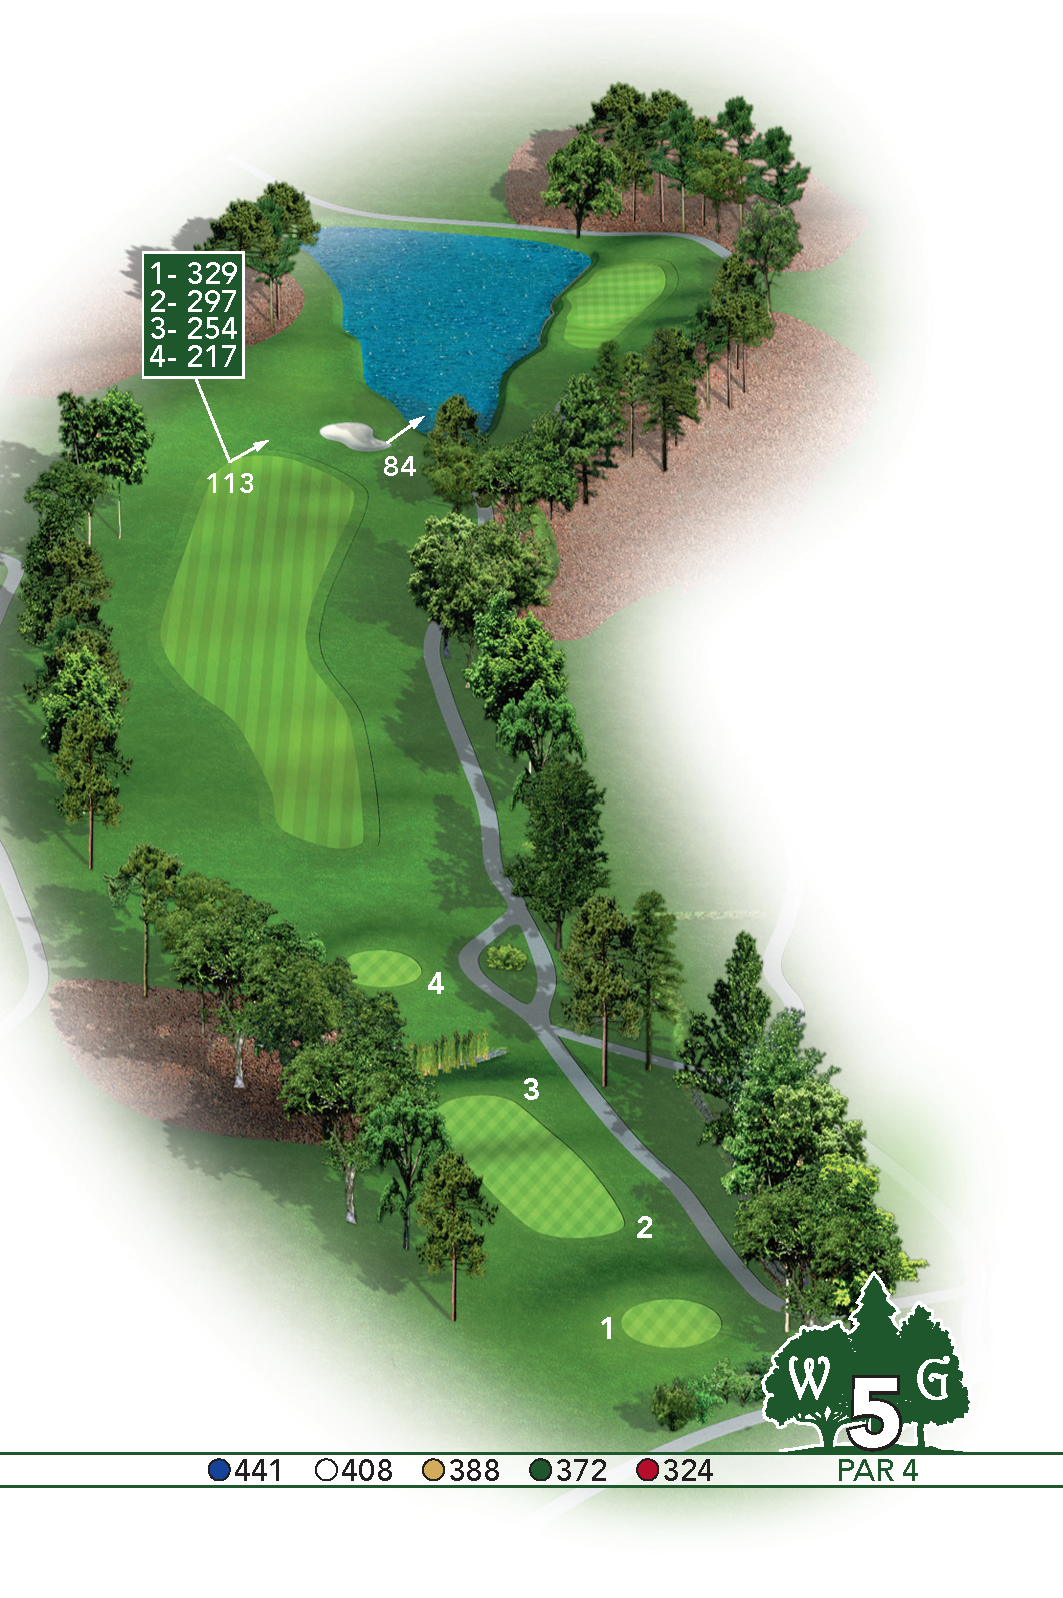
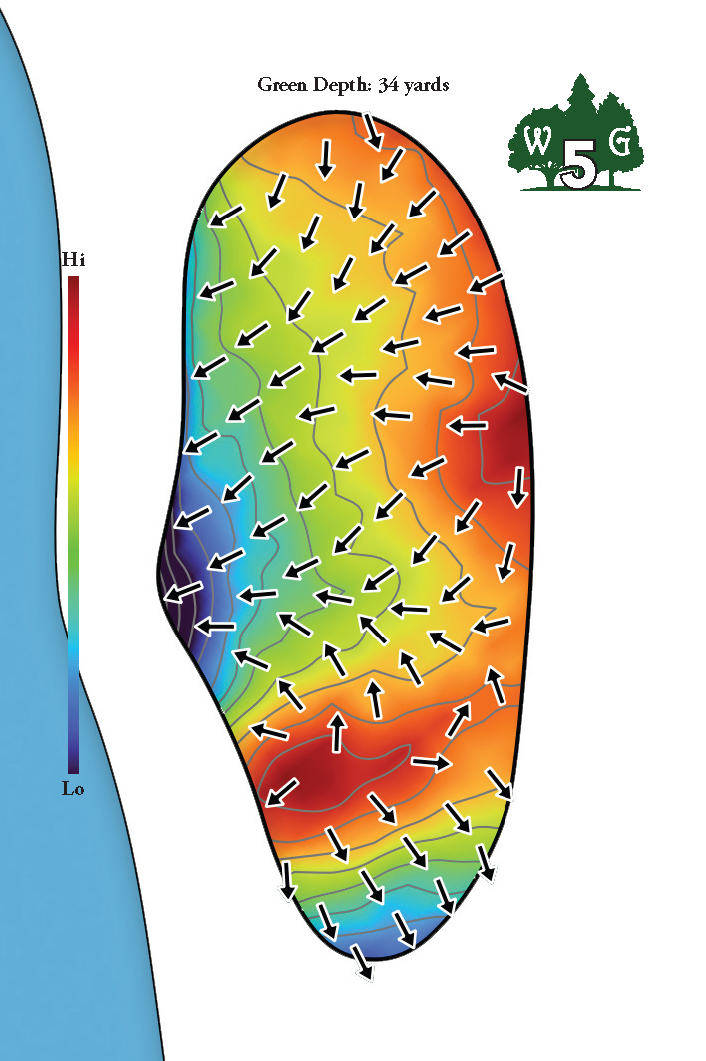
Although it is ranked the toughest, it seems to be a favorite of many. A creek lines up the entire right side of the fairway and the entire hole slopes to the right. Tee shots almost certainly kick to the right. A tough 2nd shot from a sidehill lie over water to a long and narrow green can be quite intimidating! Penalty area begins near the tee and runs the length of the entire right side of the hole. The drain in between #5 fairway and #13 fairway is deemed as ground under repair.
| PAR | BLUE | WHITE | YELLOW | GREEN | RED |
|---|---|---|---|---|---|
| 4 | 441 | 408 | 388 | 372 | 324 |
HOLE #6
🚻
RESTROOM 💧
WATER STATION
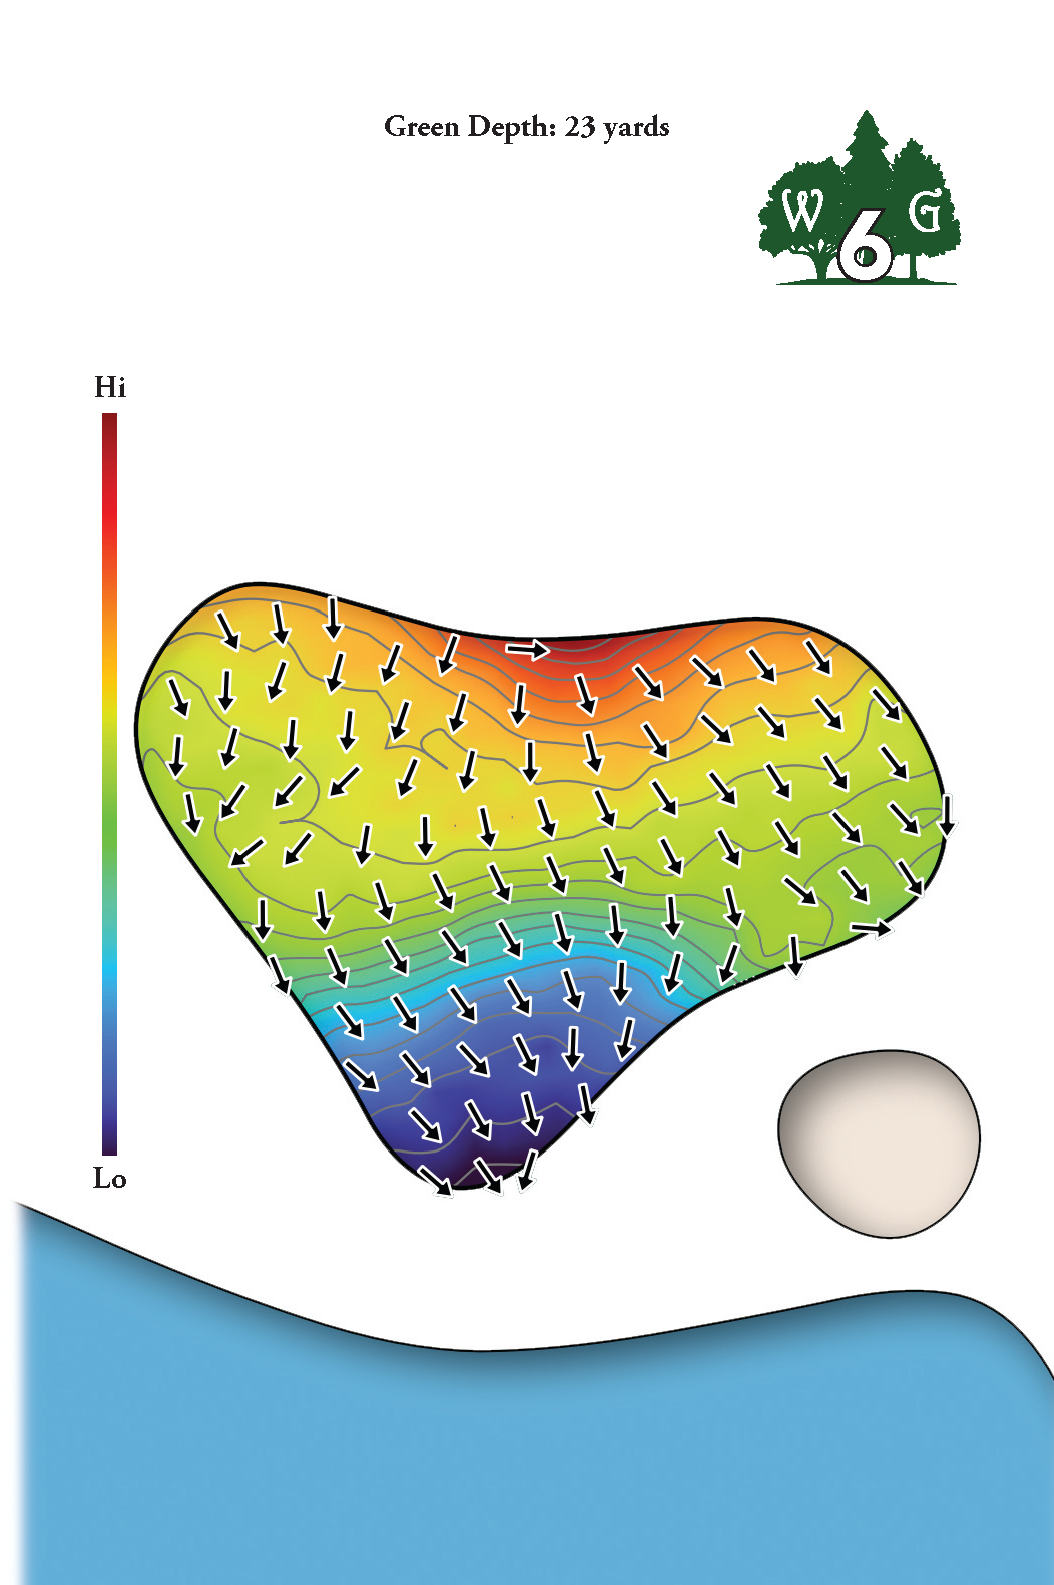
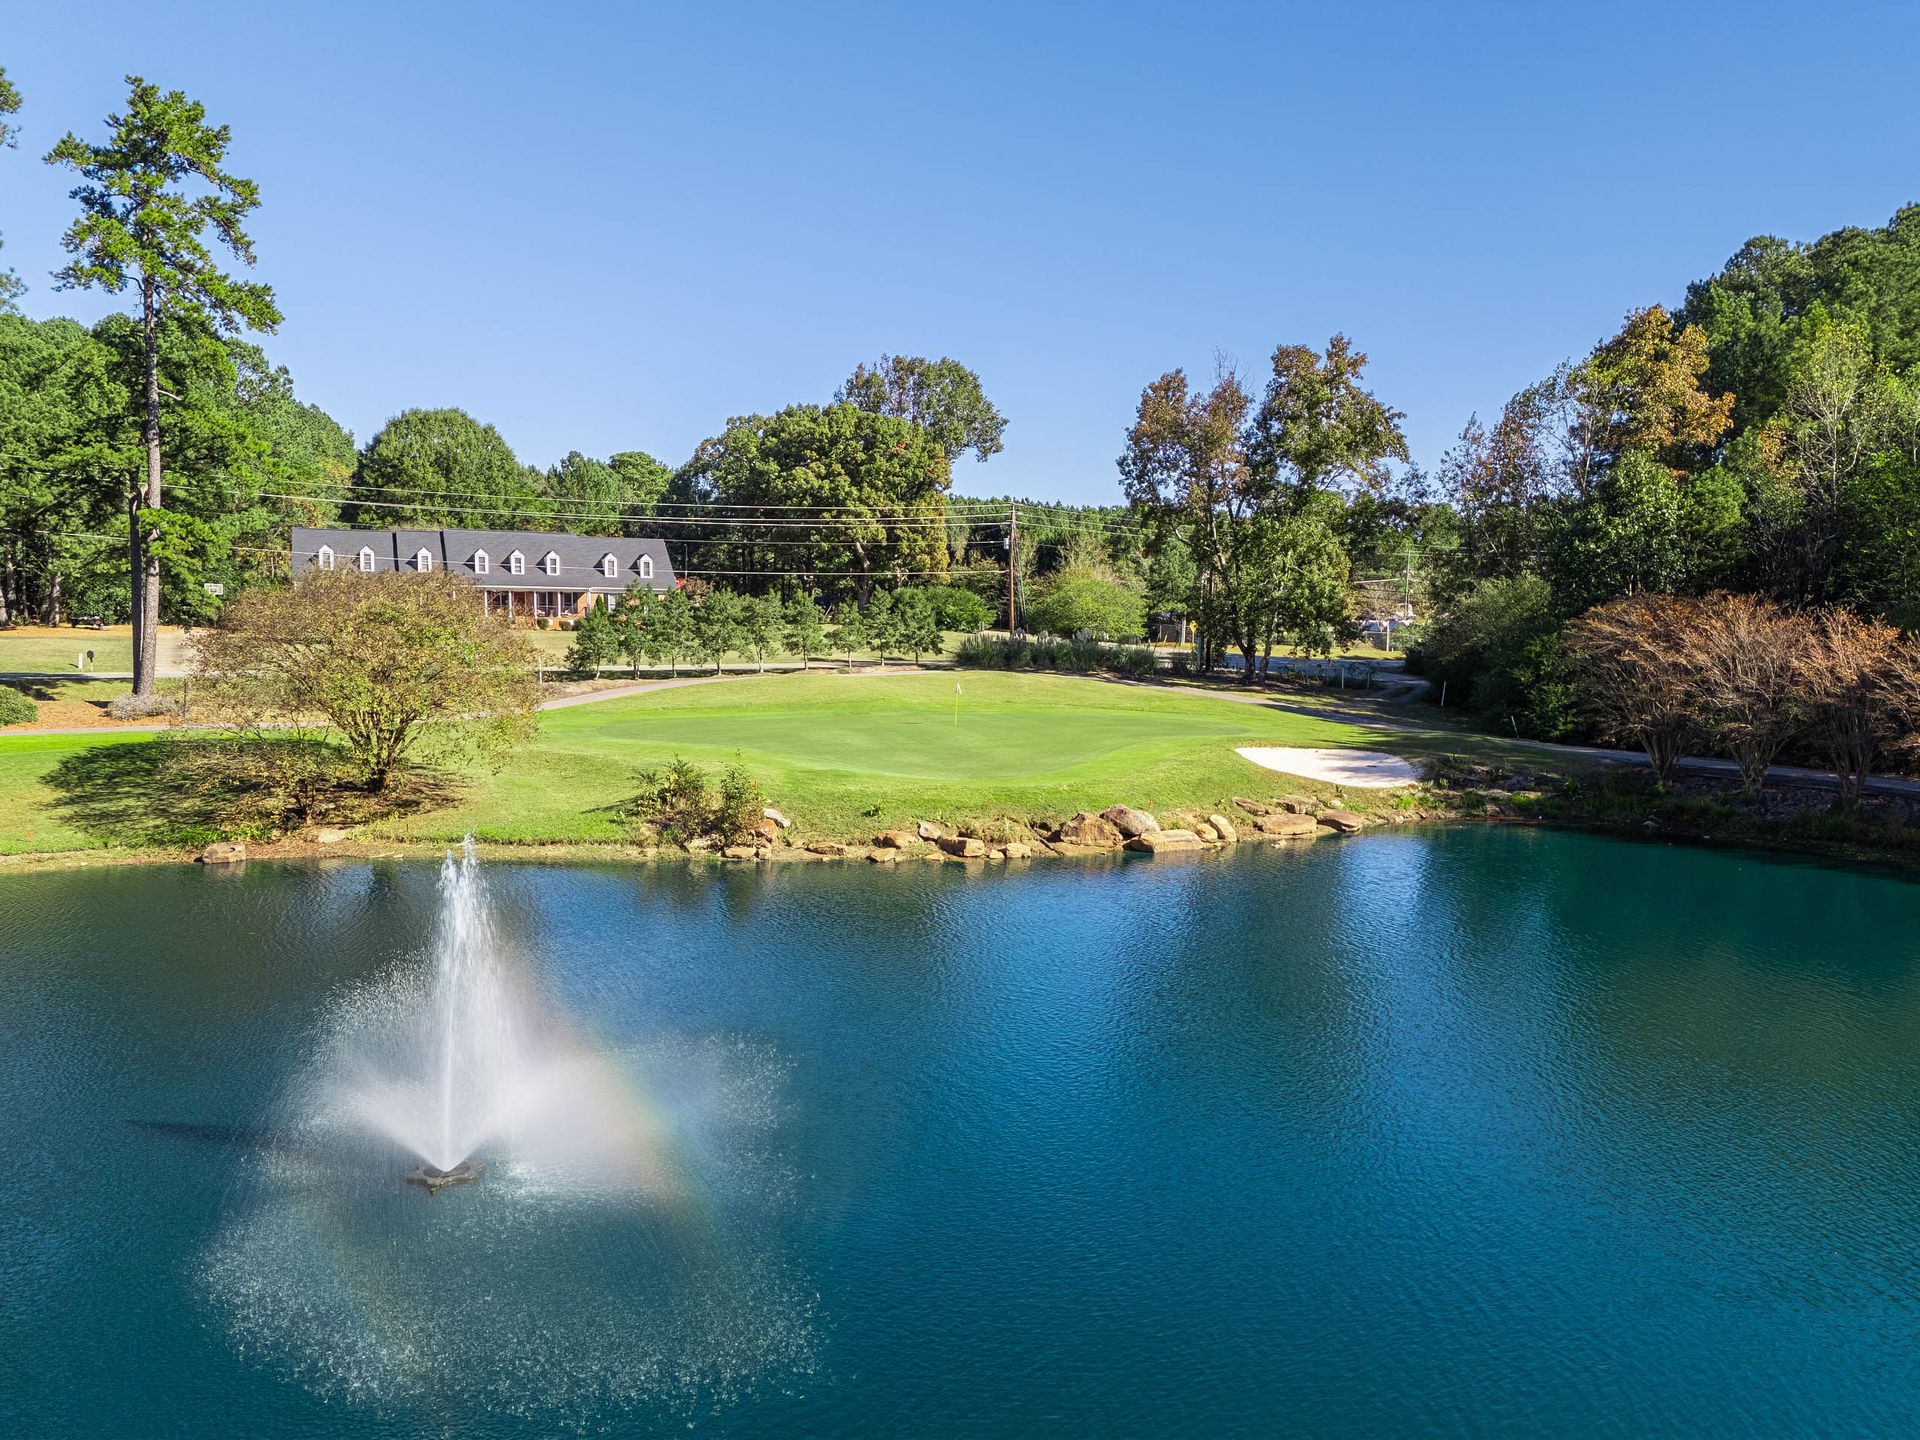
Club selection is critical! The wind seems to change directions continuously from this elevated tee box. Hit it short and you are in the water. Hit it long and you can go OB. The green is tricky and depending on the pin placement, three and four putts can become common. Penalty area extends up the entire right side of the hole and connects to out of bounds at the back right corner of the hole. Directly behind the green is out of bounds marked with white PVC pipe that runs the length of the road/#7. For any balls hit into the water, there are two drop zones provided, one to the left of the green and one to the right. You should use the drop zone furthest away from the flag for any balls hit into the water.
| PAR | BLUE | WHITE | YELLOW | GREEN | RED |
|---|---|---|---|---|---|
| 3 | 172 | 152 | 140 | 128 | 105 |

HOLE #7
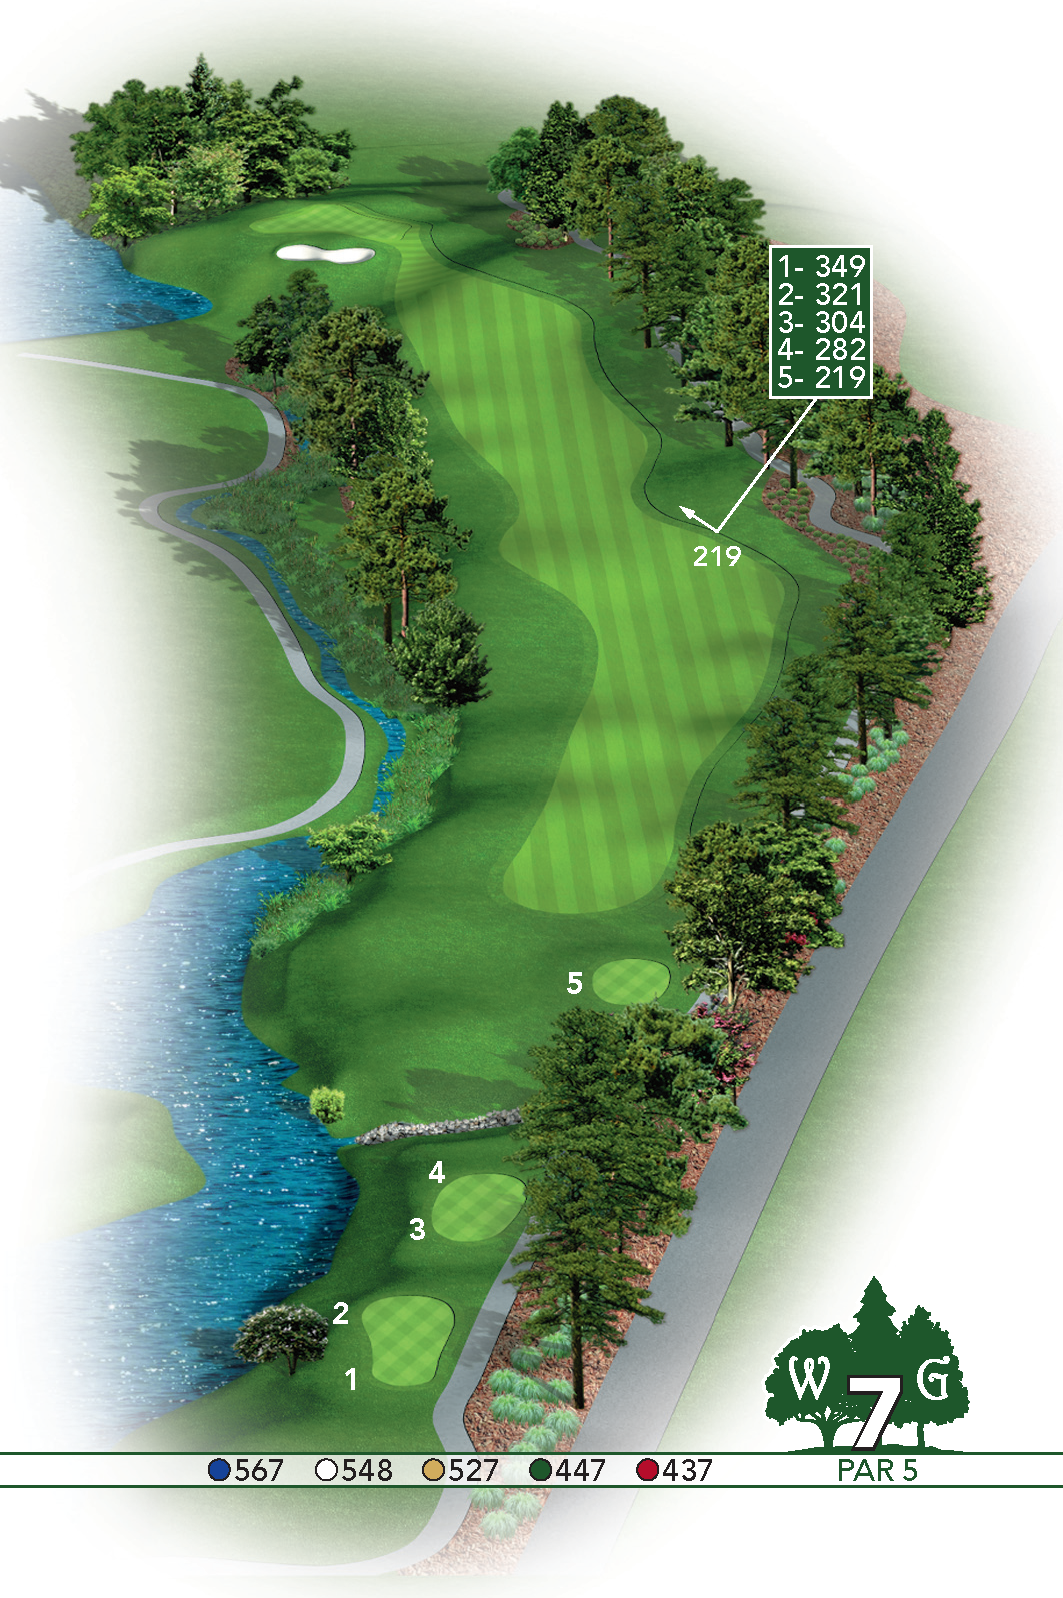
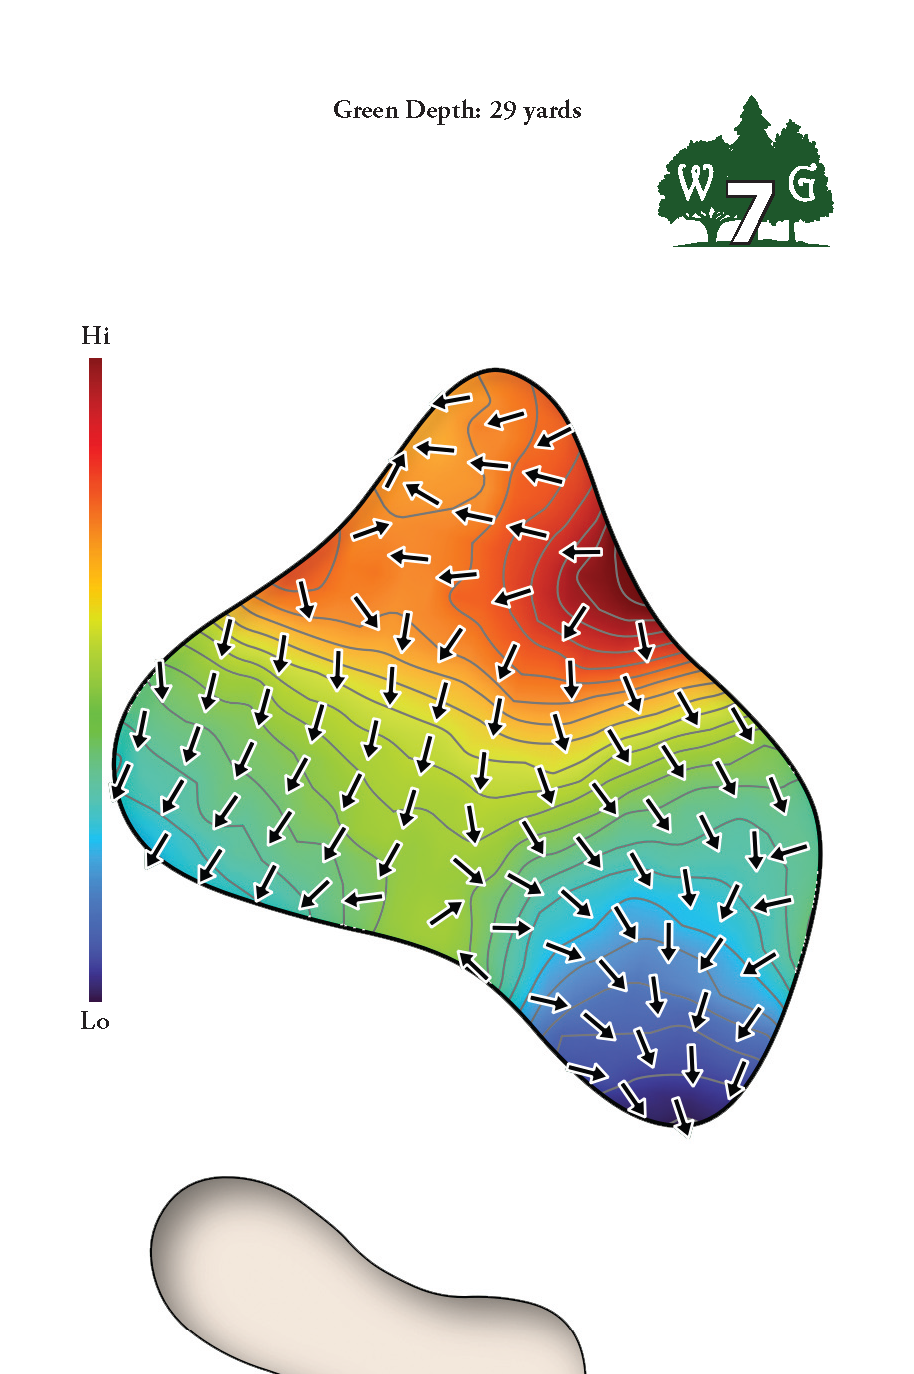
Long par 5 with a creek to the left and Out of Bounds right. This is a 3 shot hole for almost everyone. A deep, front green side bunker makes reaching this in two shots really difficult. Once again, the green has a lot of undulation, so hitting your approach shot to a specific spot on the green is critical.
| PAR | BLUE | WHITE | YELLOW | GREEN | RED |
|---|---|---|---|---|---|
| 5 | 567 | 548 | 527 | 447 | 437 |

HOLE #8
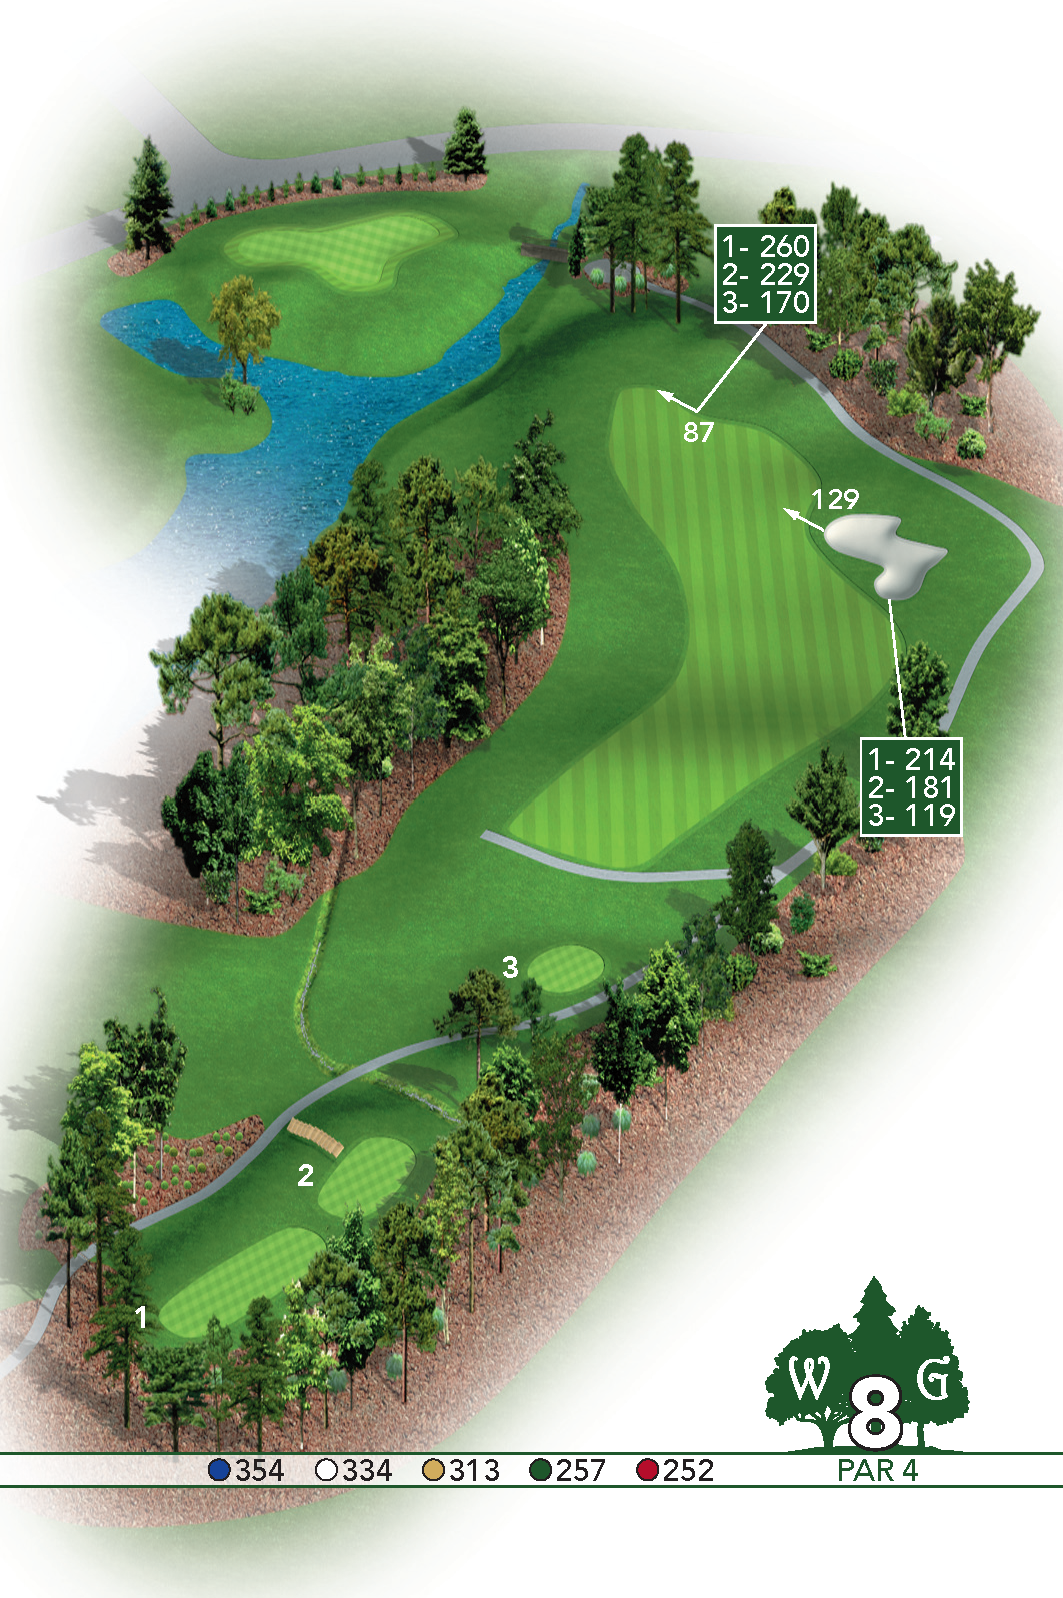
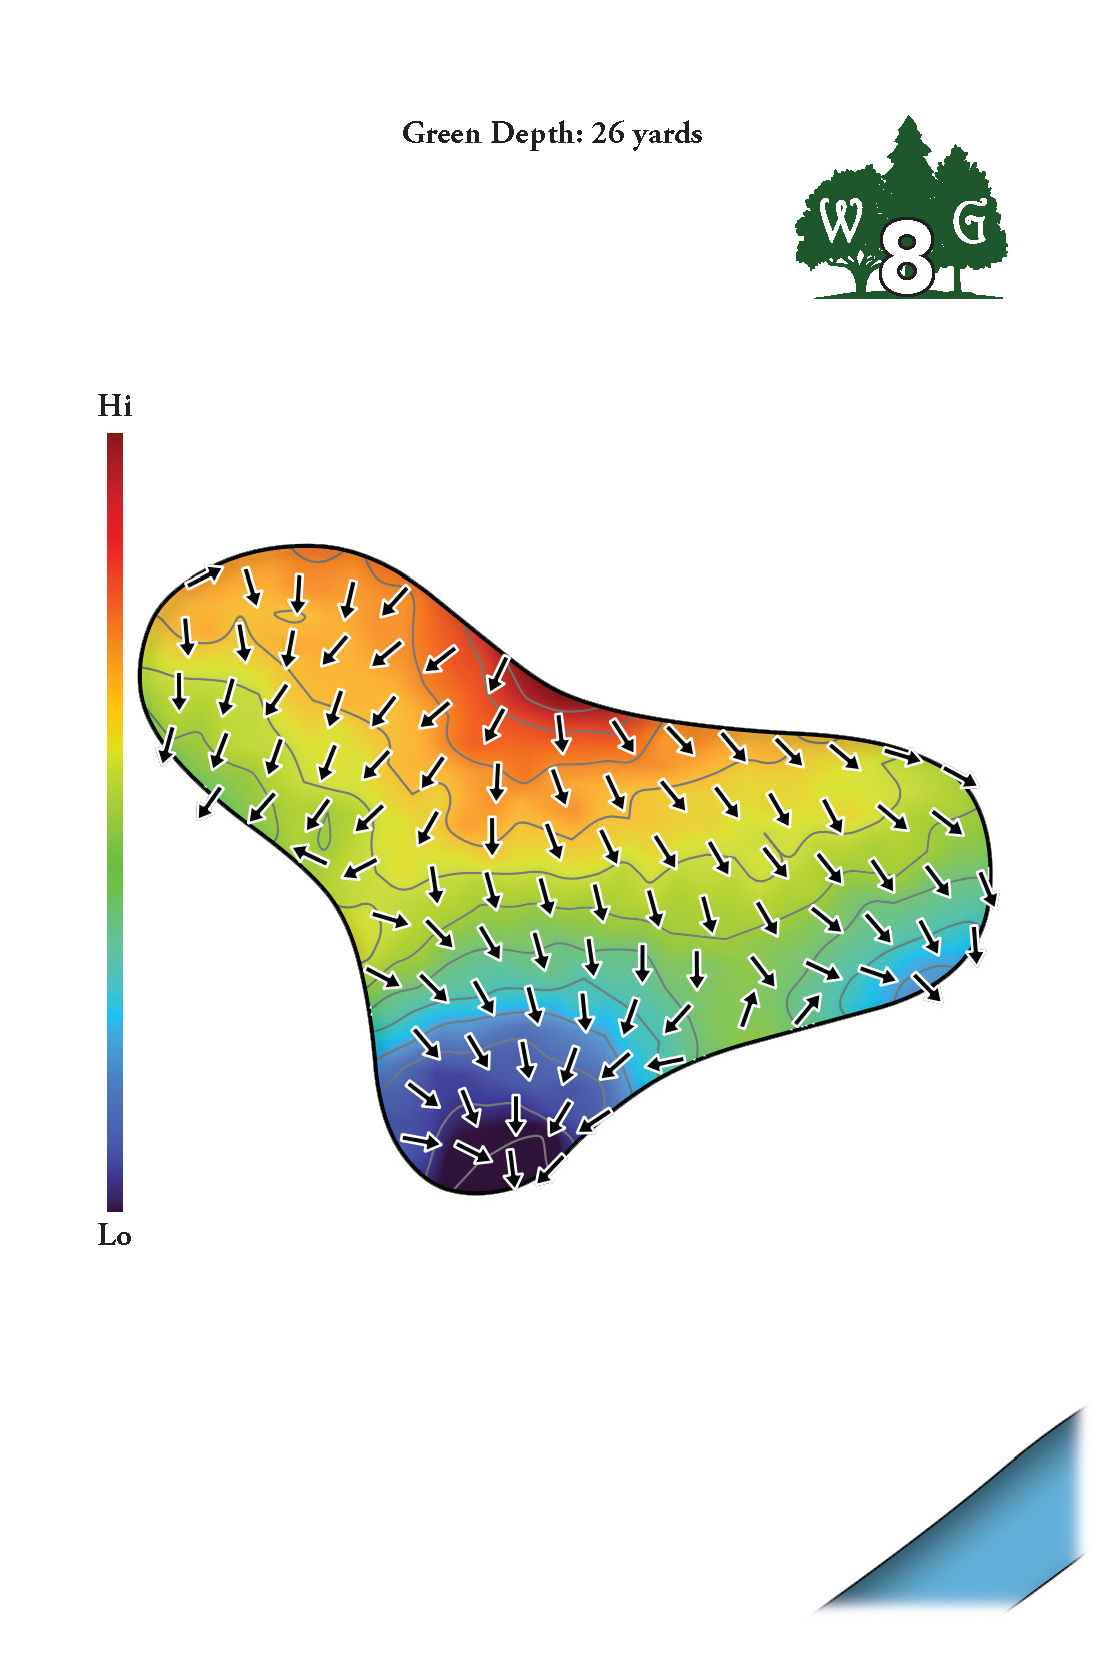
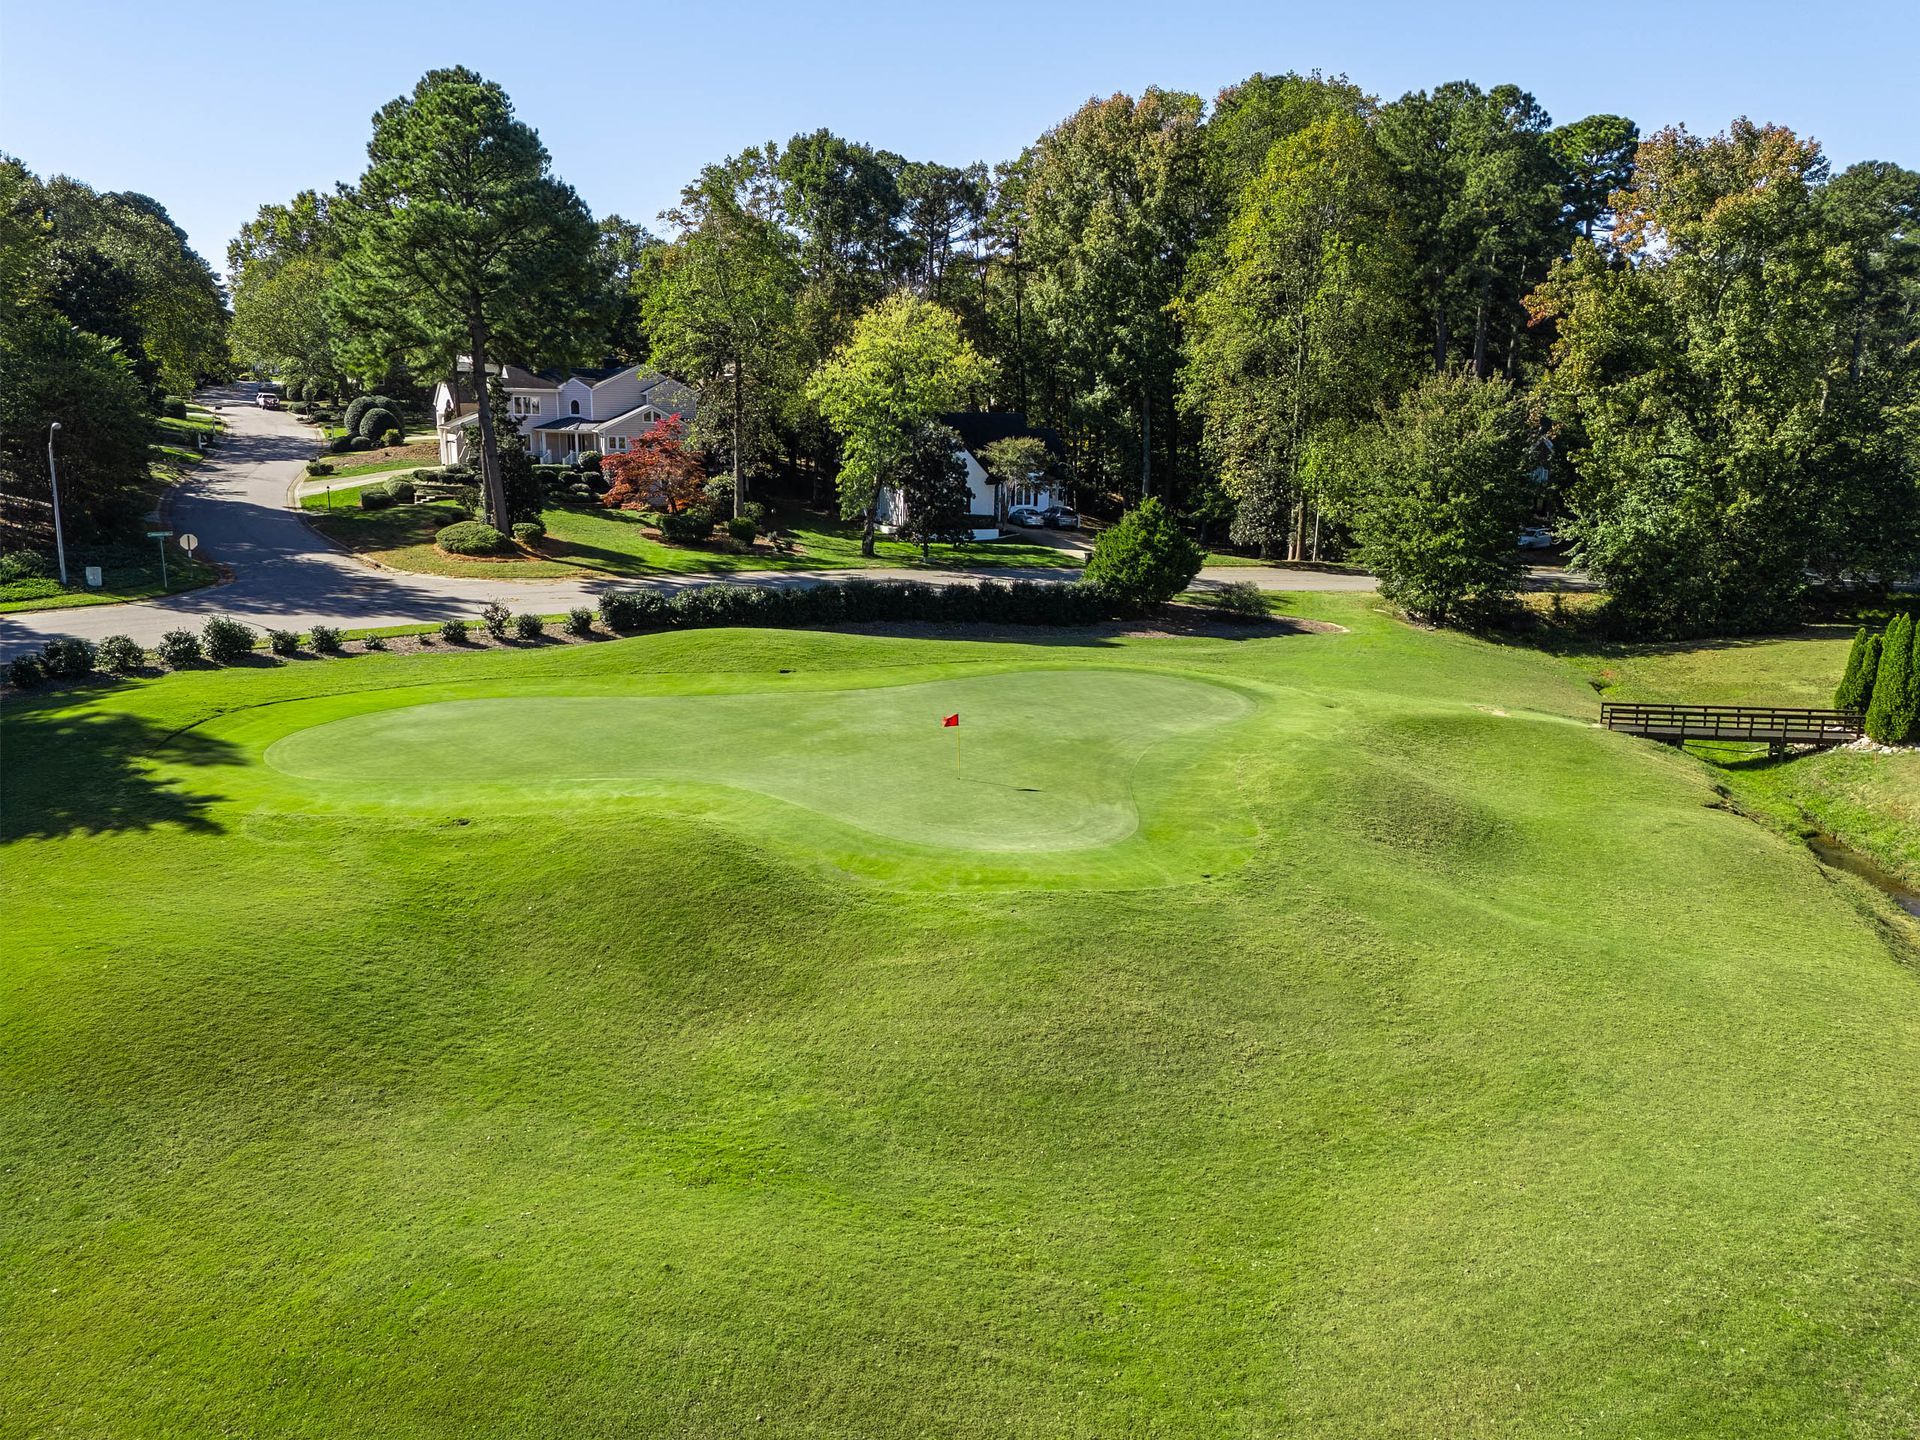
Dogleg left, as length off the tee is not as important as placement. If you avoid the trees on the left and the fairway bunker, you will have a nice approach from an elevated fairway. Trouble around the green is short and left. The trees to the left of the fairway are considered a penalty area and are marked with red stakes. Out of bounds extends the entire right-hand side of the hole.
| PAR | BLUE | WHITE | YELLOW | GREEN | RED |
|---|---|---|---|---|---|
| 4 | 354 | 334 | 313 | 257 | 252 |
HOLE #9
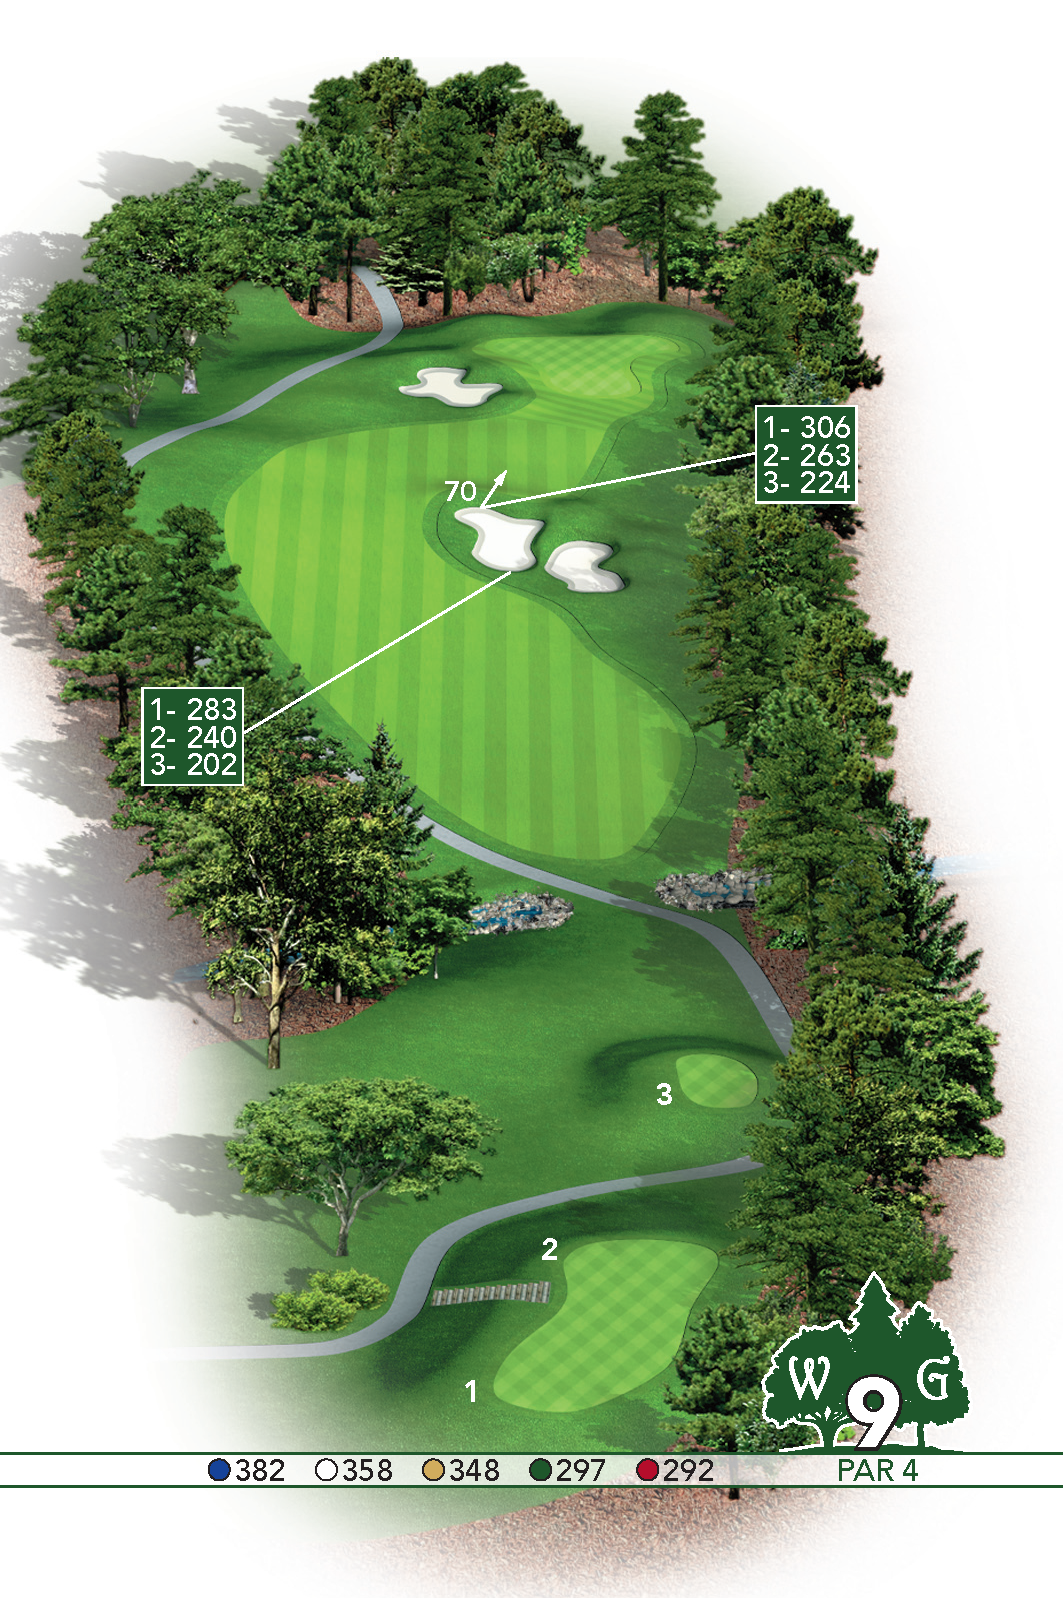
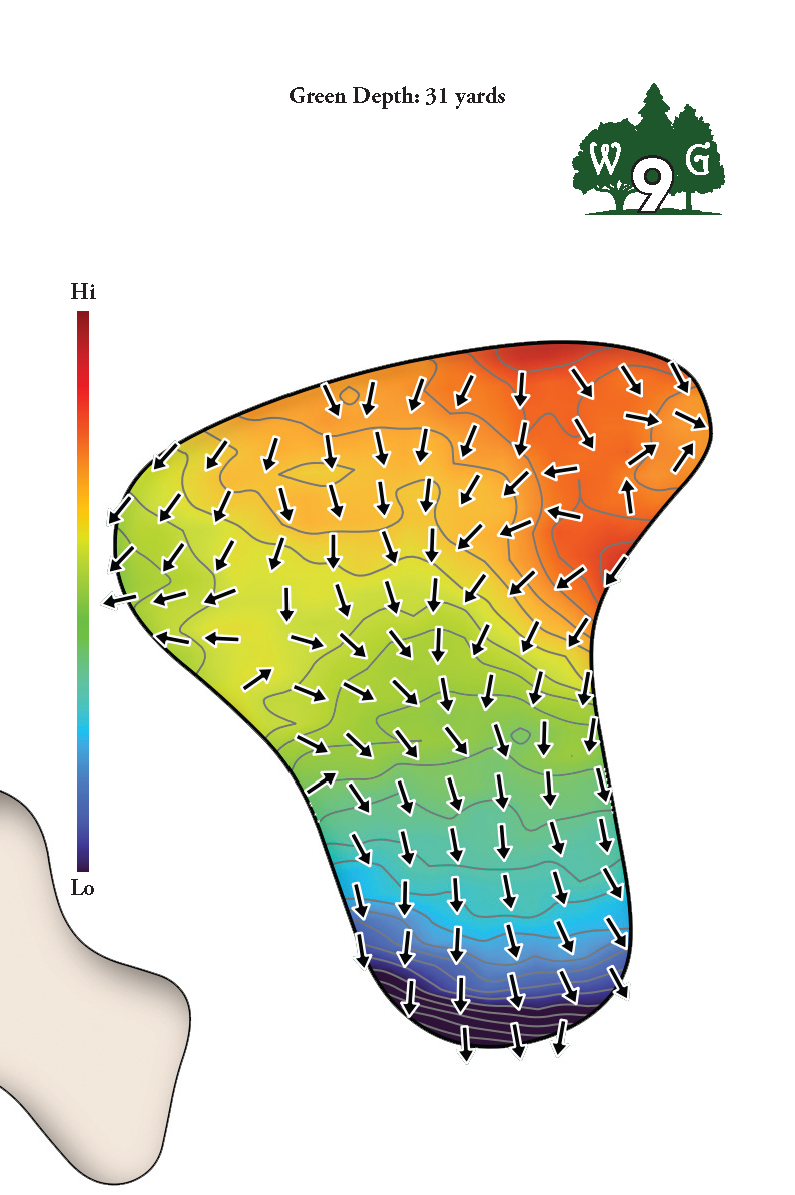
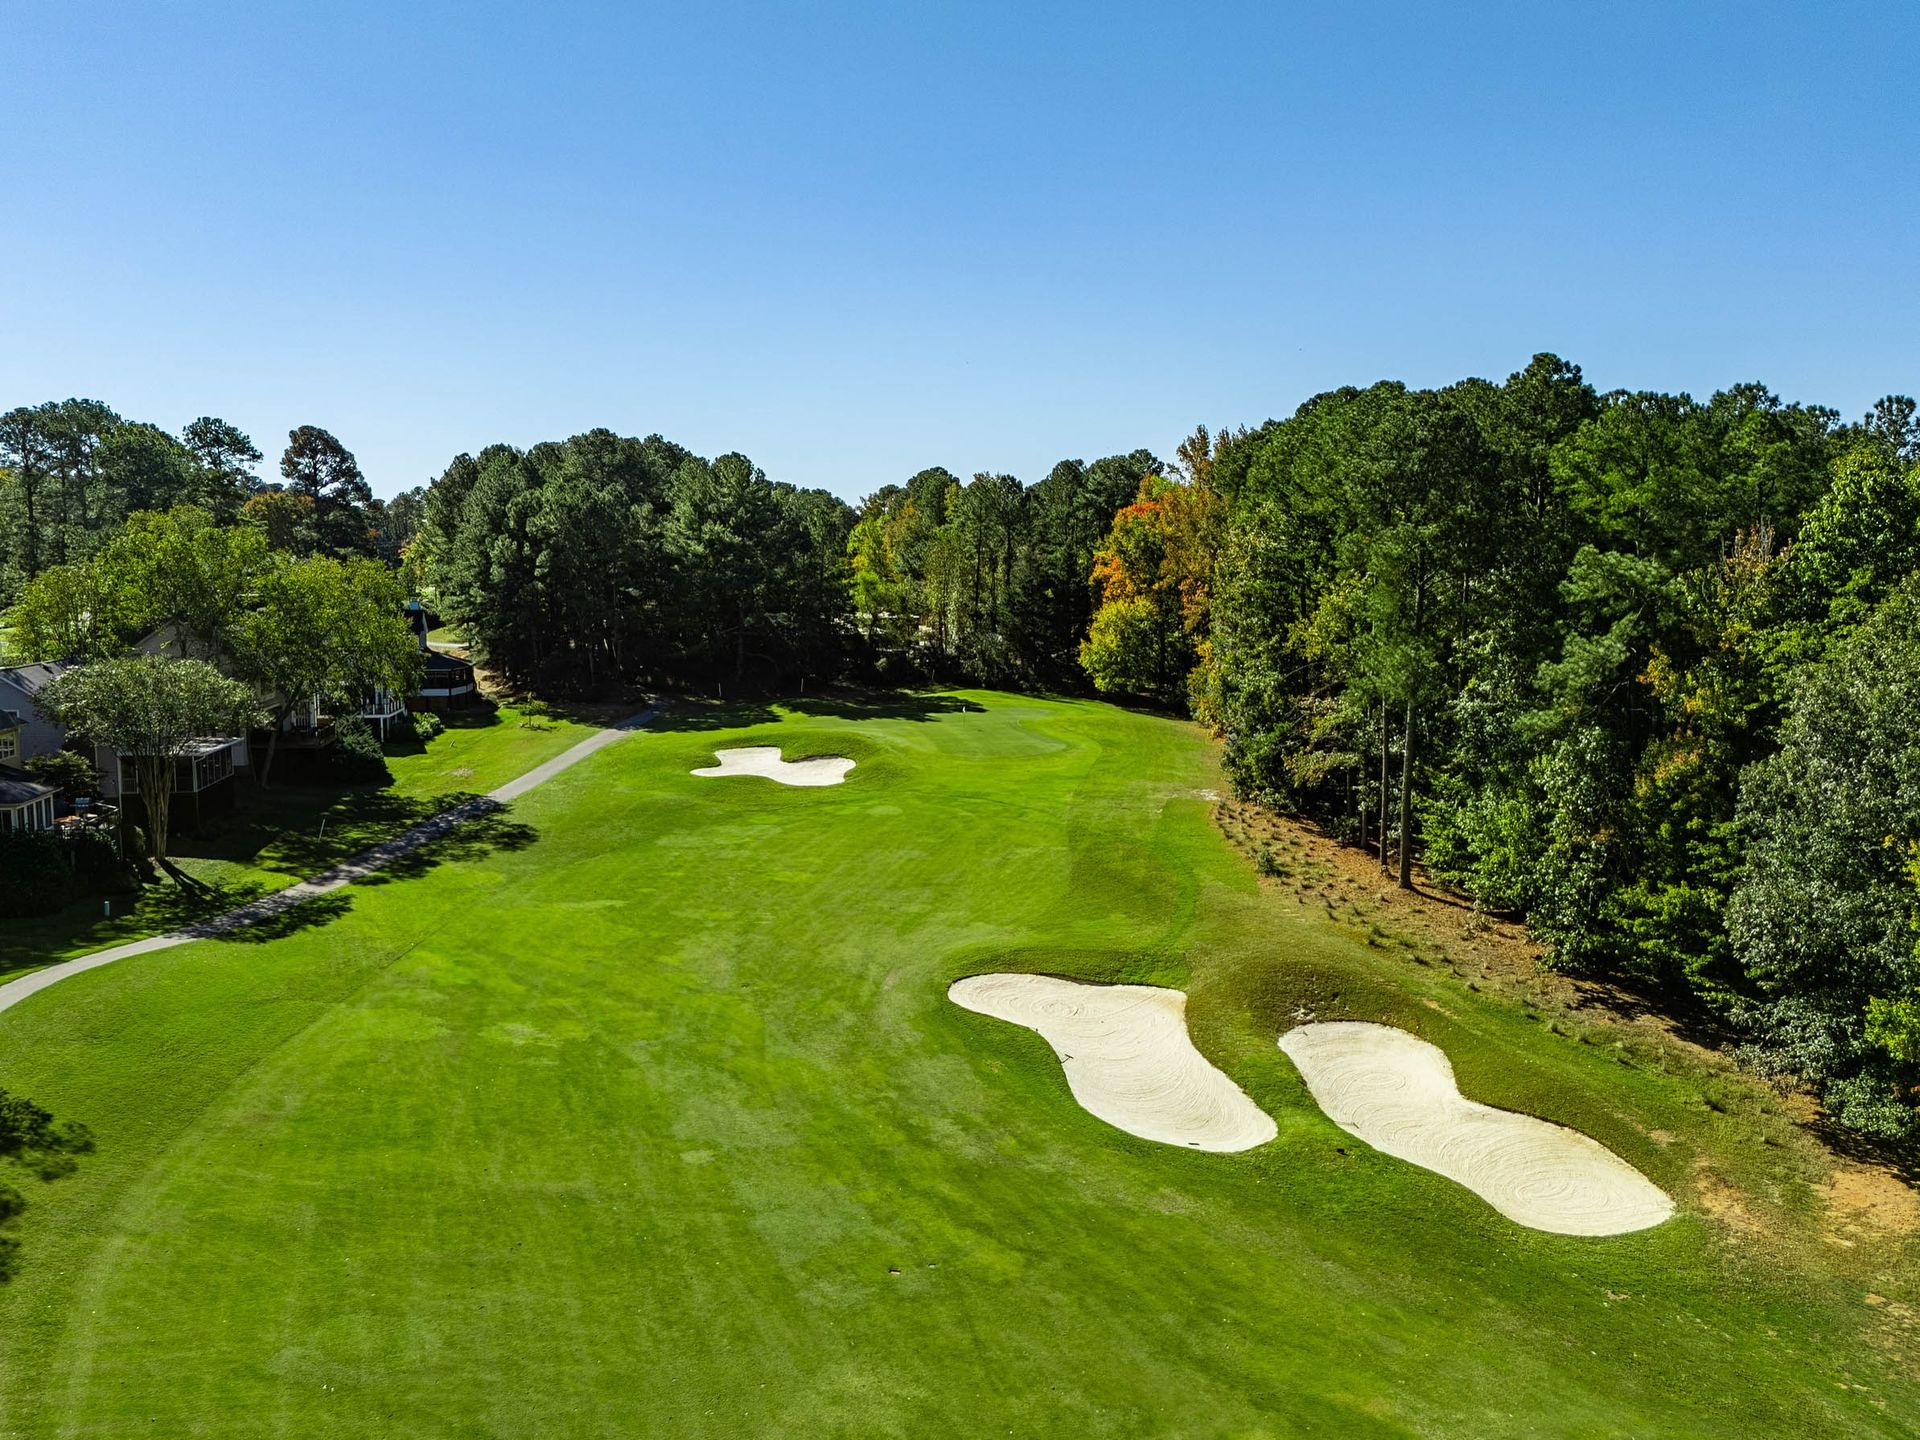
Elevated tee shot to a valley and back up the hill. Avoid the fairawy bunkers on the right. Once again trouble lurks on both the right and left side of the fairway. The green is elevated and it is tough to see exactly were the flag is positioned. Pay attention to the color of the flag and adjust your club selection, accordingly. The trees to the right of the fairway are marked as out of bounds and extend up the right side of the hole and then behind the green and then to the left toward the houses. The houses are marked as out of bounds as well.
| PAR | BLUE | WHITE | YELLOW | GREEN | RED |
|---|---|---|---|---|---|
| 4 | 382 | 358 | 348 | 297 | 292 |
#10
#11
#12
#13
#14
#15
#16
#17
#18
HOLE #10
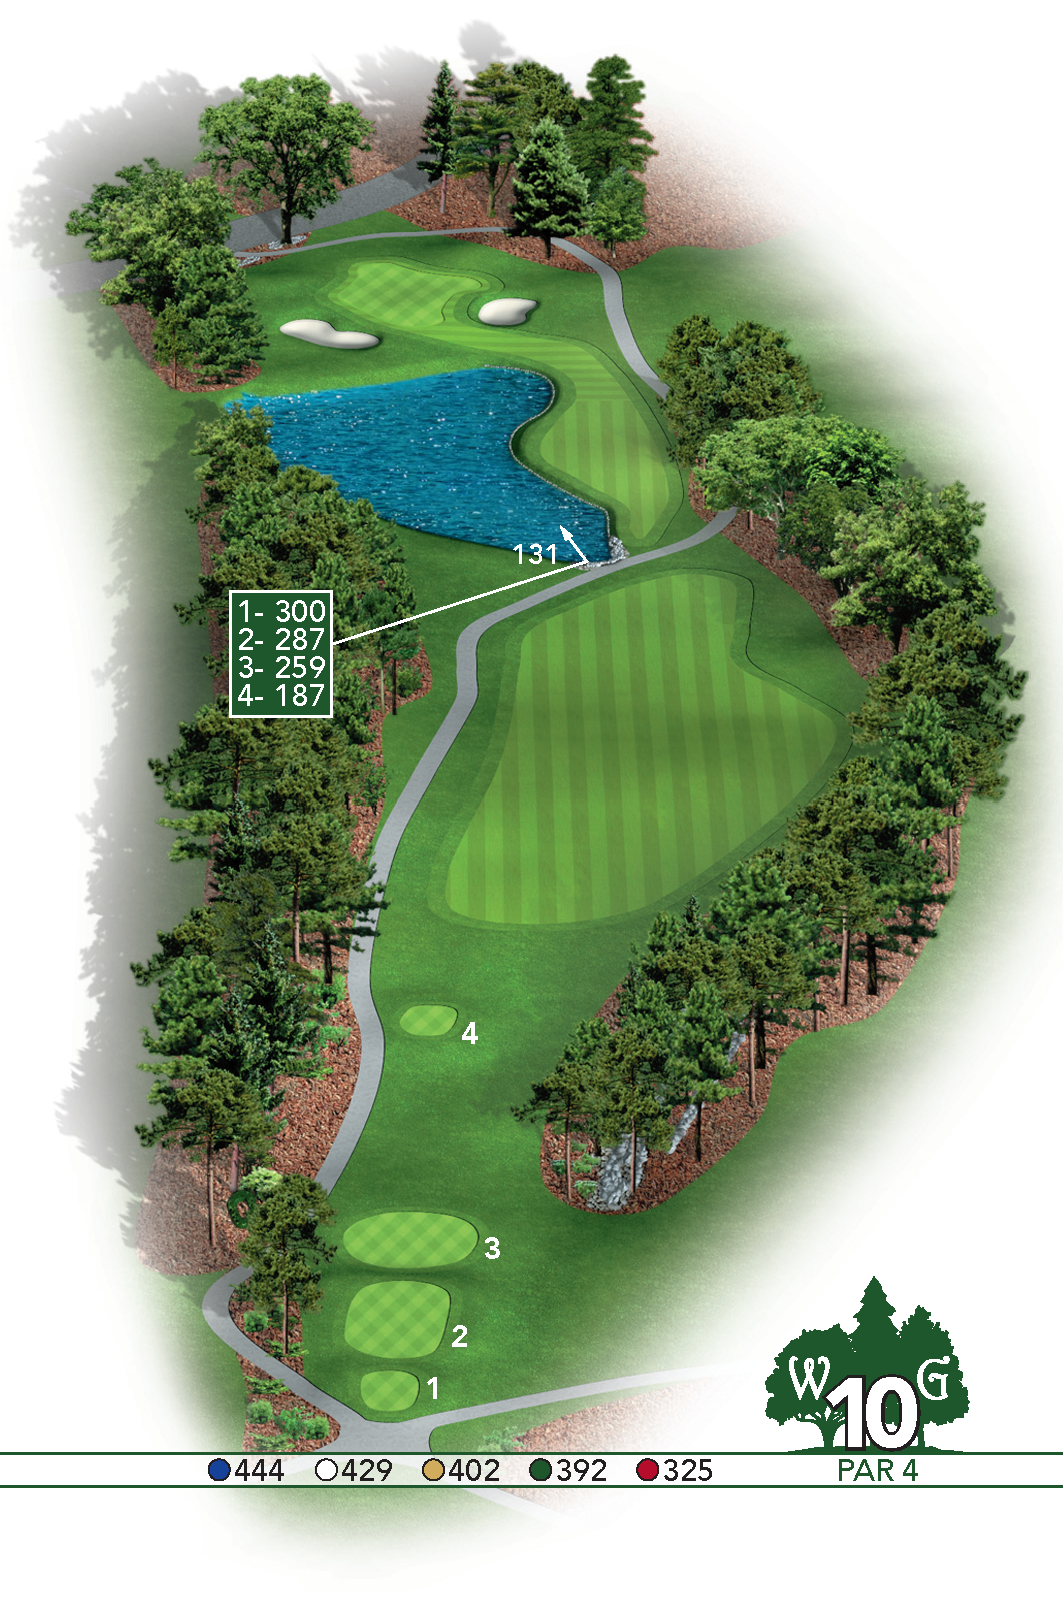
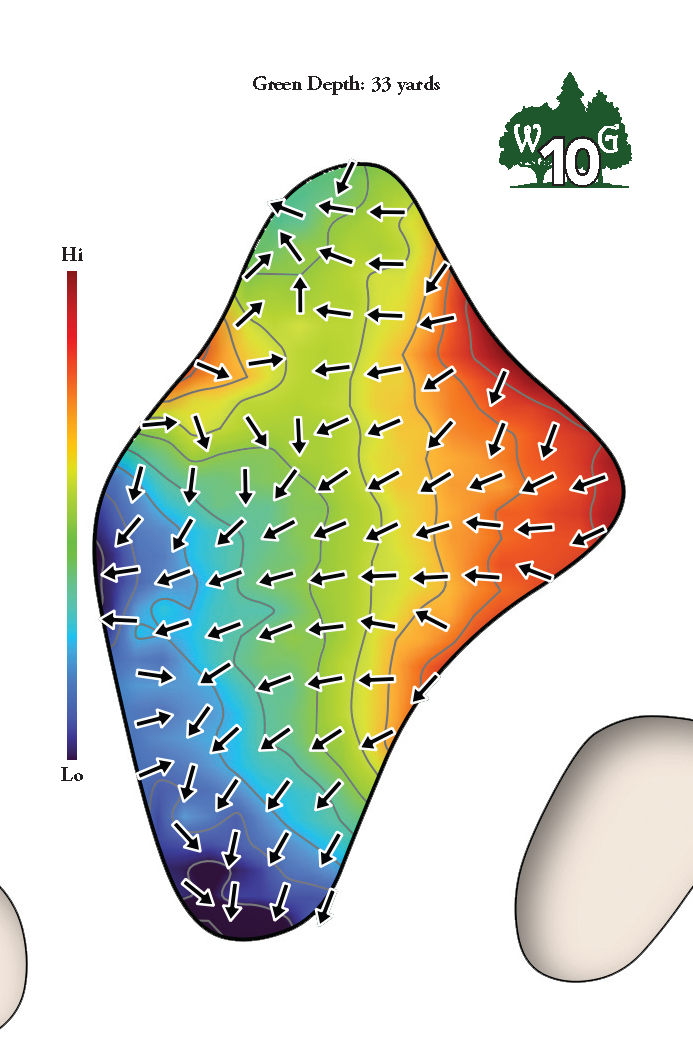
This is a demanding par 4…The tee shot is all downhill, long hitters need to be wary of the pond off the tee. The right side of the fairway is ideal for a good approach. The 2nd shot is all carry over the water and bunkers guard both sides of the green. The drainage ditch in between the 10th and 18th hole is marked as a penalty area. The rocks near the cart path behind the green are marked as a penalty area.
| PAR | BLUE | WHITE | YELLOW | GREEN | RED |
|---|---|---|---|---|---|
| 4 | 444 | 429 | 402 | 392 | 325 |
HOLE #11
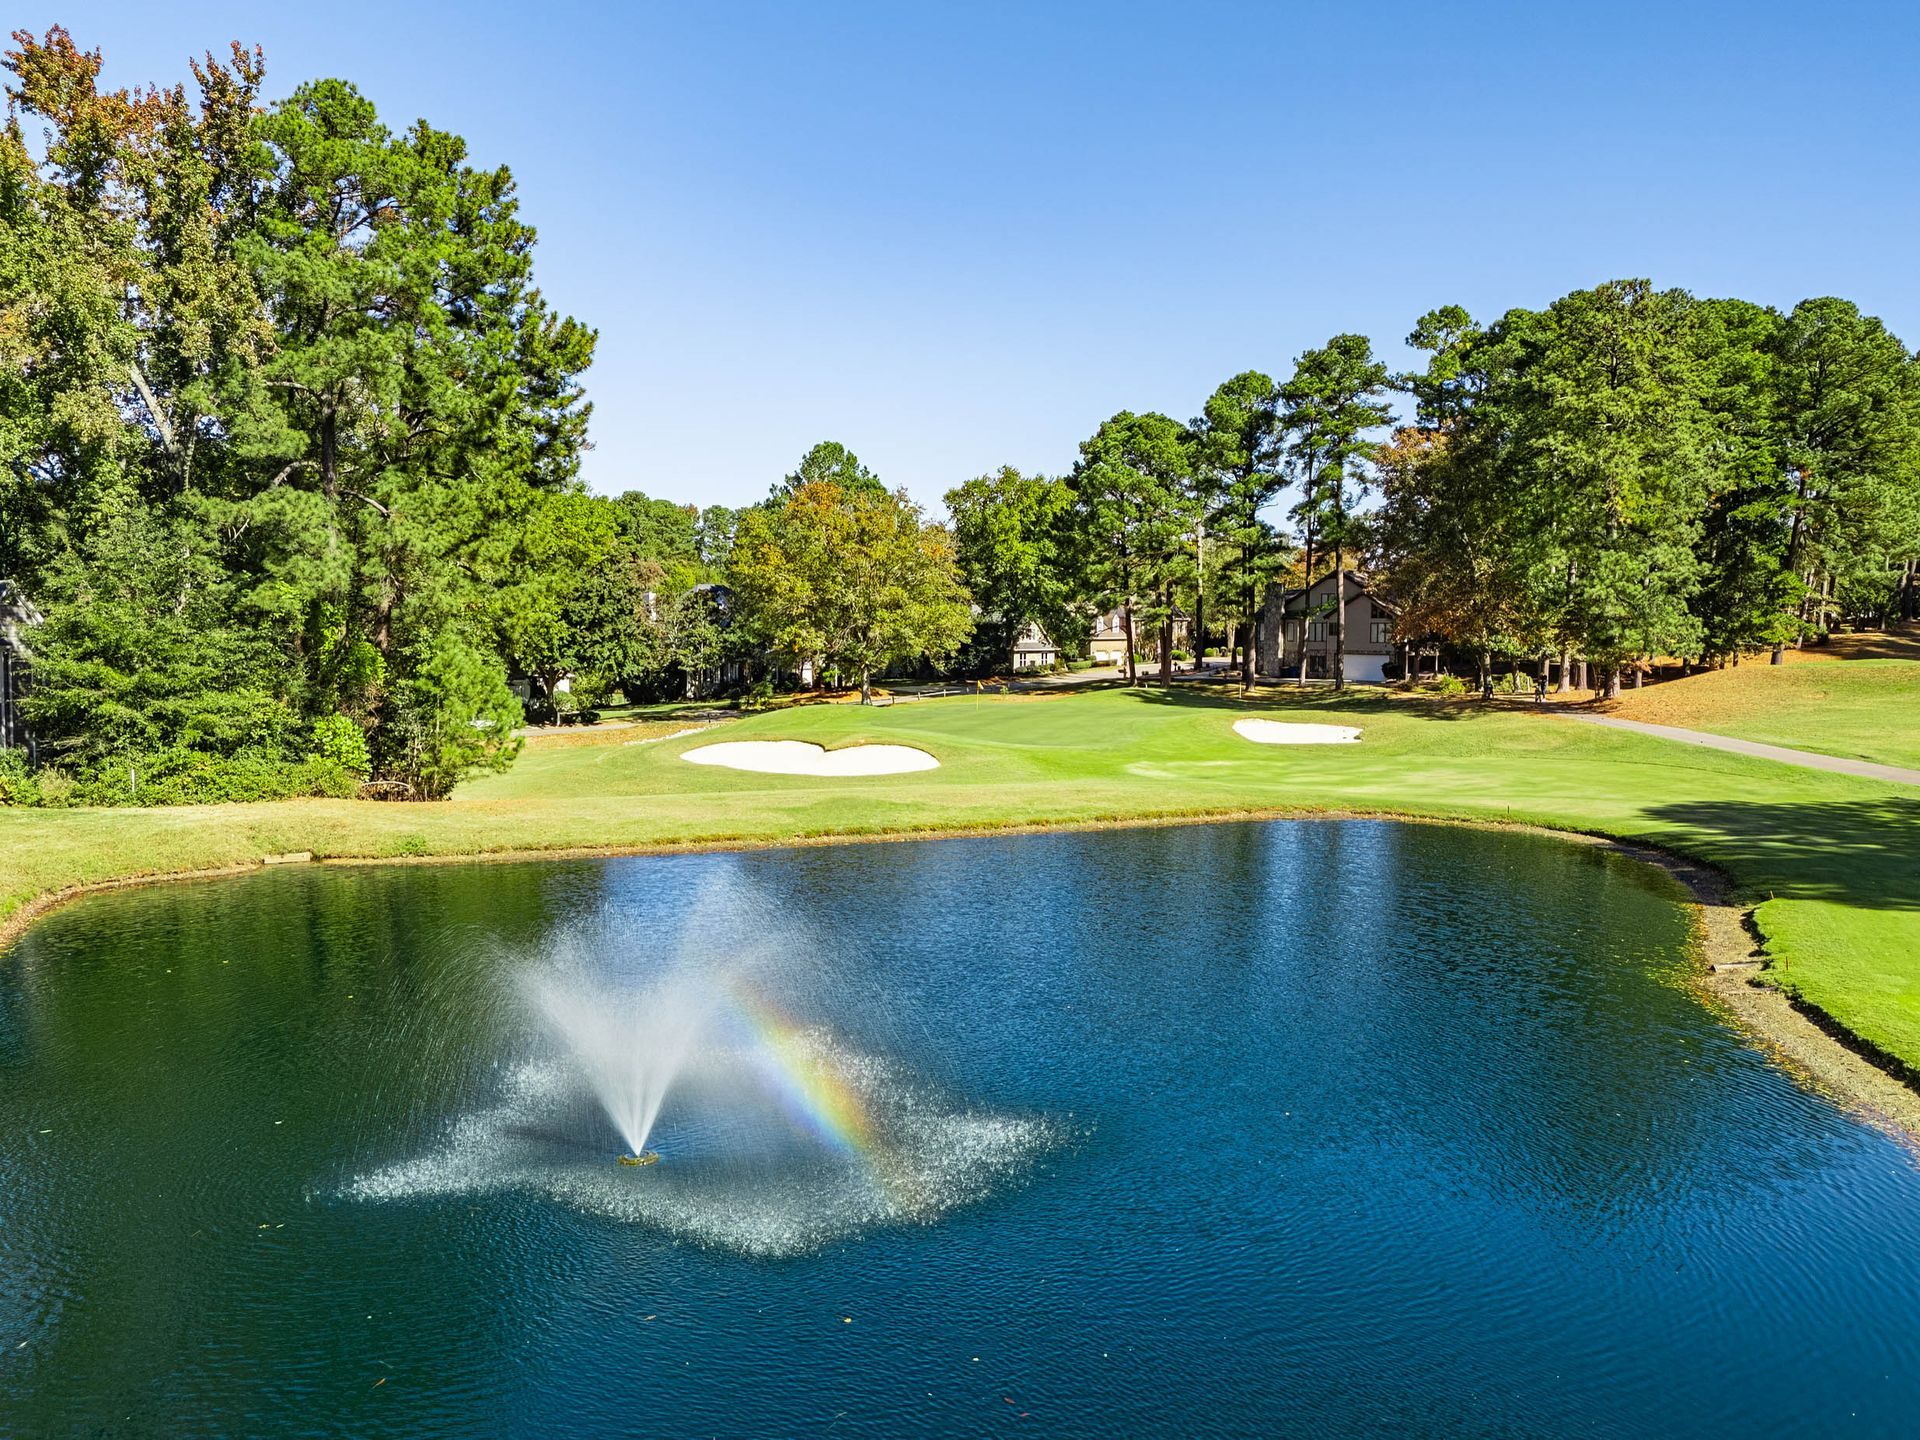
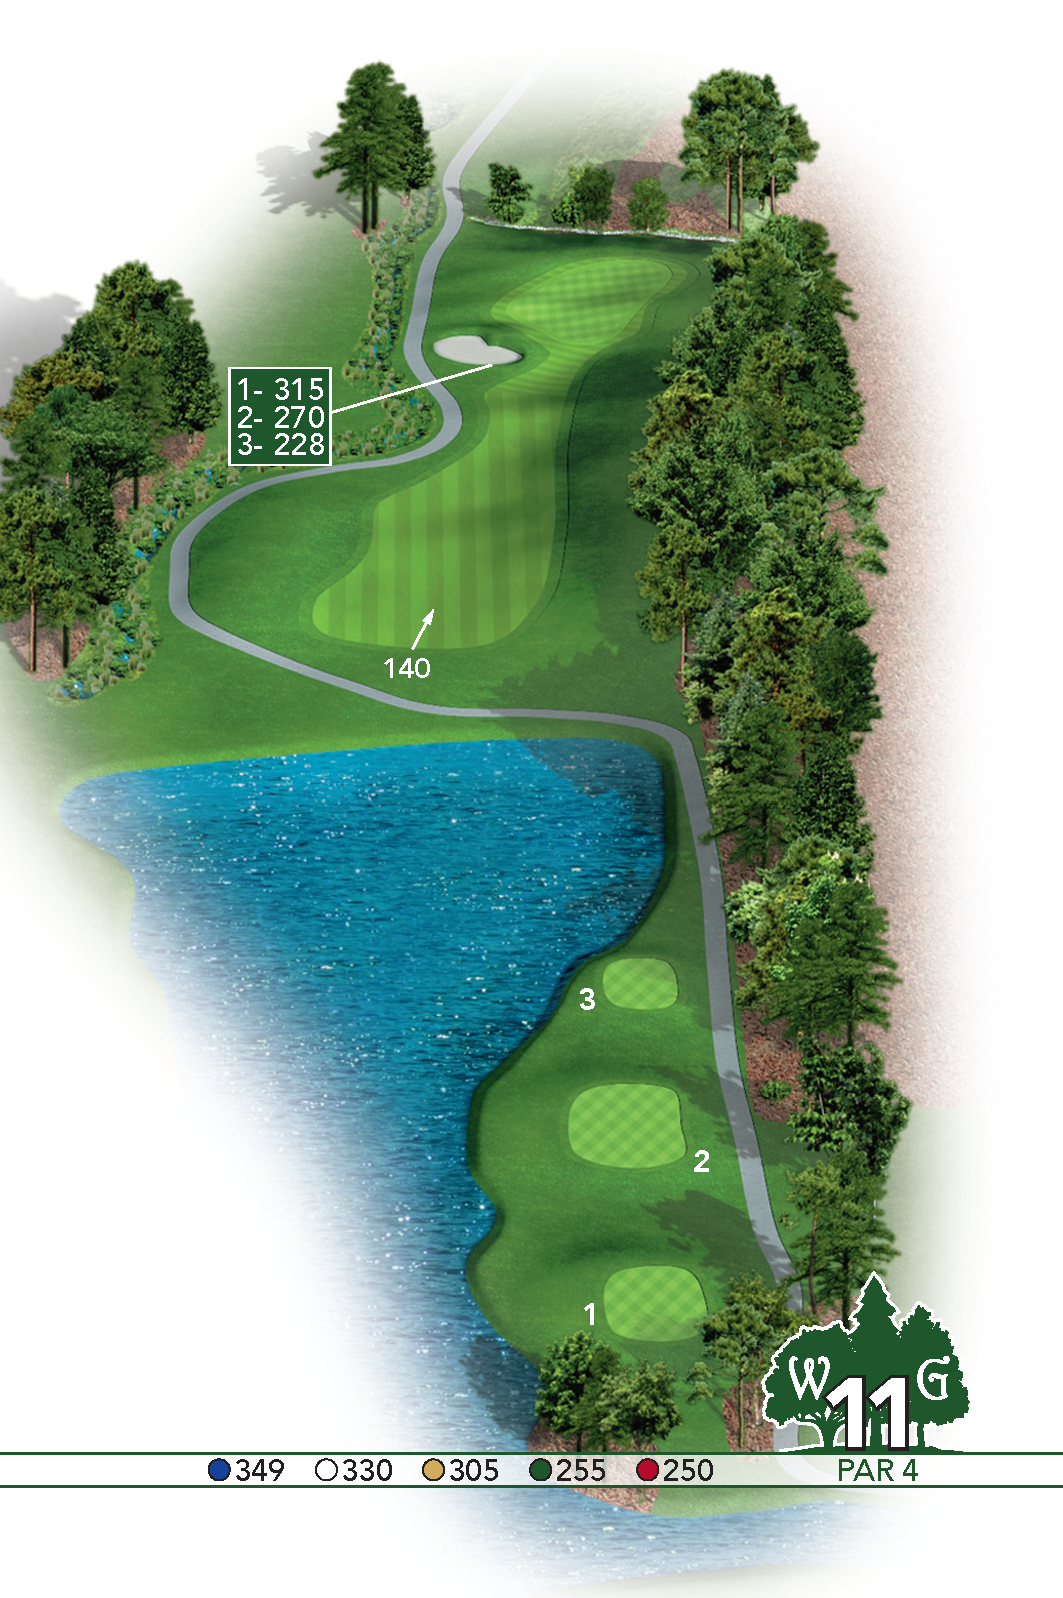
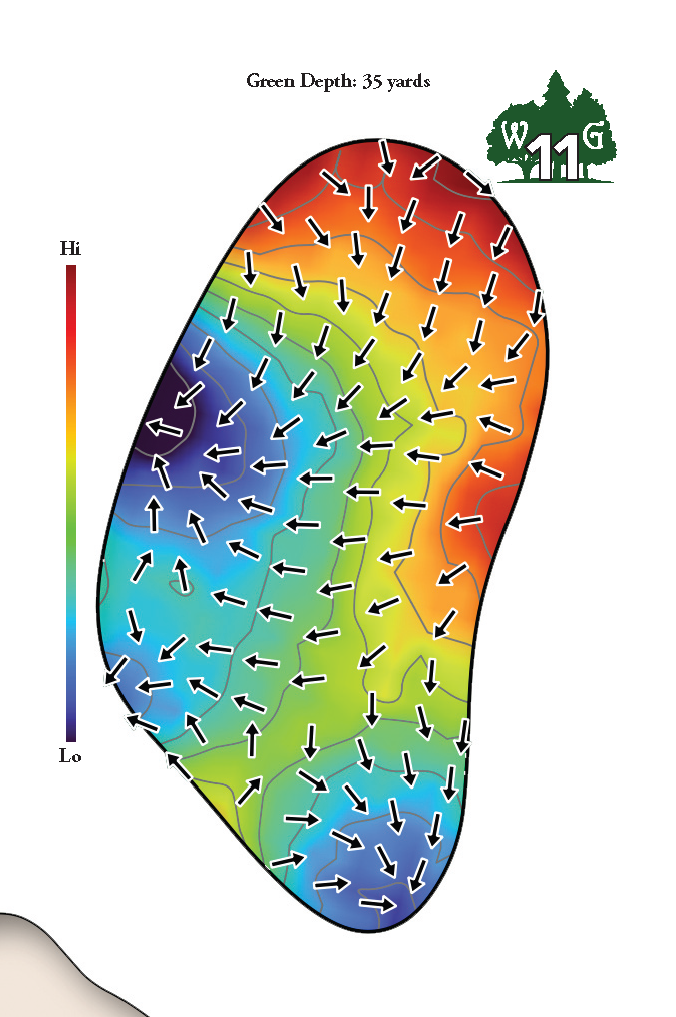
This par 4 is the shortest one on the course, but it can come out and bite you if you are too aggressive off the tee. If you carry the water in front of the tee box and avoid the creek on the left, a well placed tee shot will leave you with a wedge approach. Out of bounds runs the entire right side of the hole towards the back right corner near the green. The creek behind the green is marked as a penalty area. When there are two stakes present, both white and red, the line from white PVC pipe to white PVC pipe will define the end of the penalty area.
| PAR | BLUE | WHITE | YELLOW | GREEN | RED |
|---|---|---|---|---|---|
| 4 | 349 | 330 | 305 | 255 | 250 |
HOLE #12
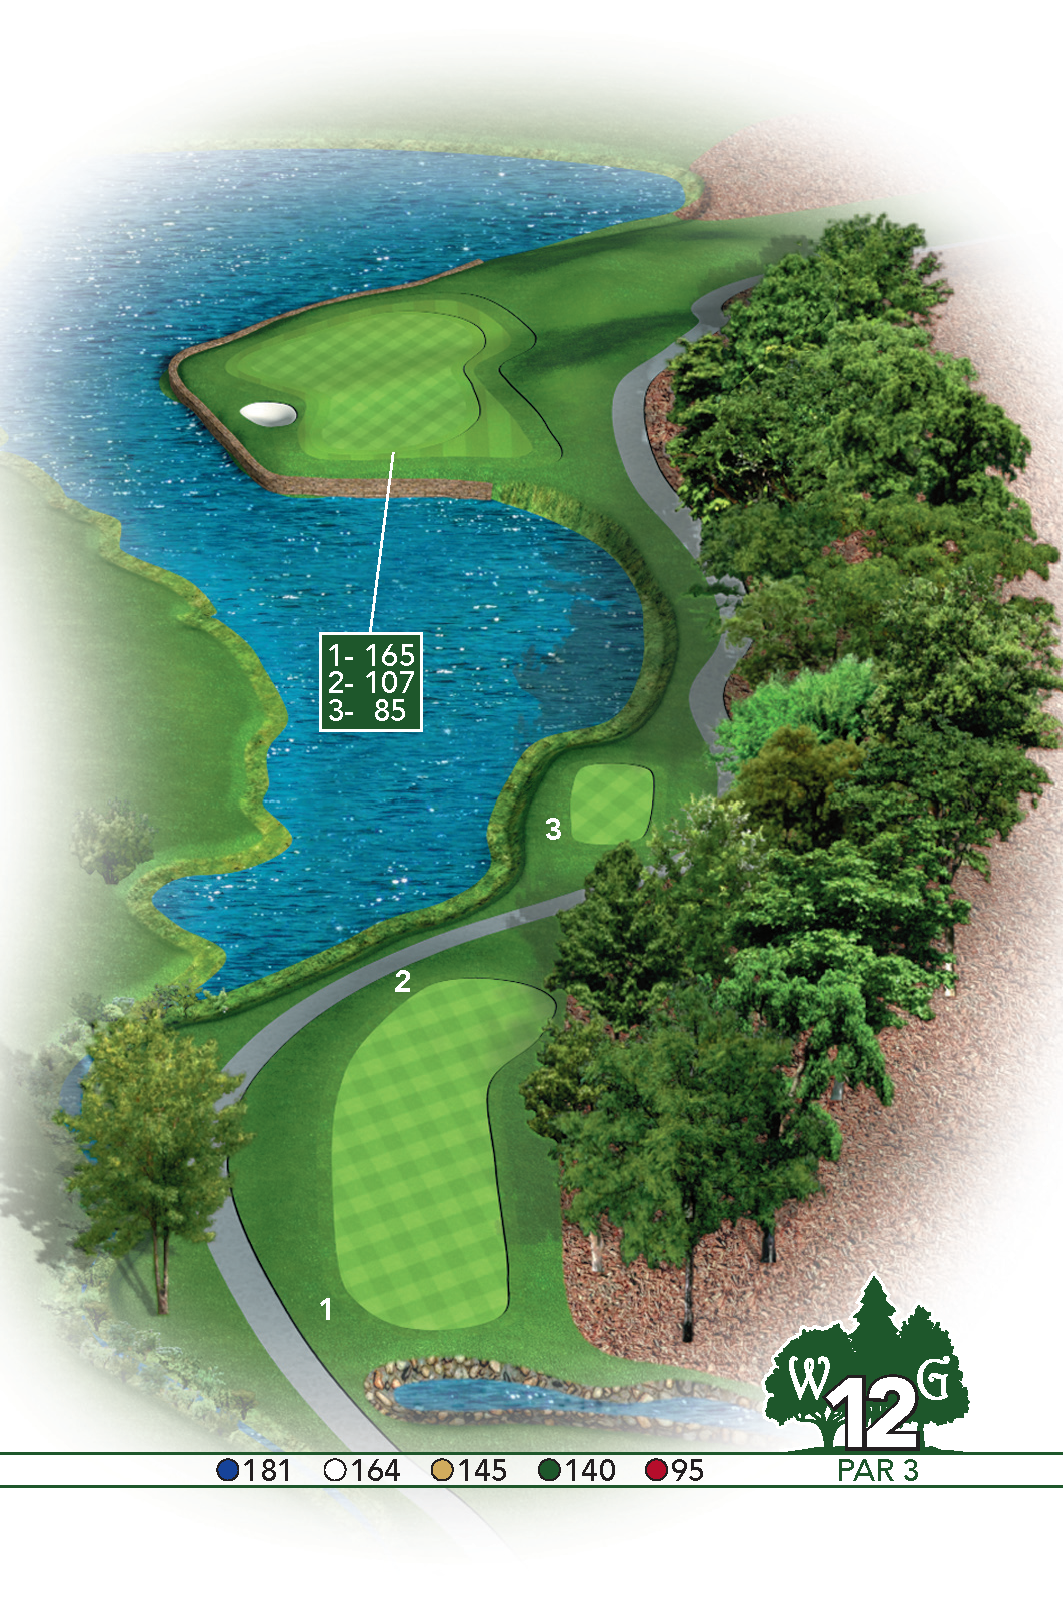
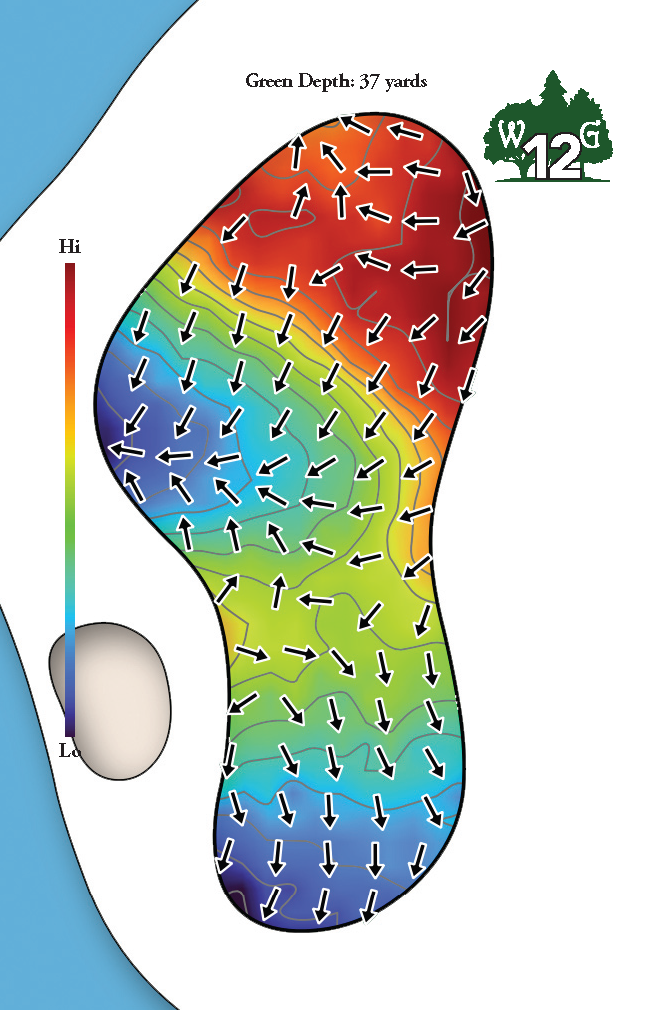
Another strong par 3 as water is everywhere. You need to carry your tee shot over water, avoid the water on the left and avoid the water long. A shot just right of the green may catch a favorable bounce. The creek directly behind the tee box is marked as a penalty area and will extend up the right-hand side of the tee box towards the green until a red/white stake combination is present. Out of bounds extends up the right-hand side of the hole through the woods toward hole #13. For any ball hit into the water, there are two drop zones provided, one in the front of the green and one behind the green. You should use the drop zone furthest away from the flag for any balls hit into the water.
| PAR | BLUE | WHITE | YELLOW | GREEN | RED |
|---|---|---|---|---|---|
| 3 | 181 | 164 | 145 | 140 | 95 |

HOLE #13
🚻
RESTROOM 💧 WATER STATION
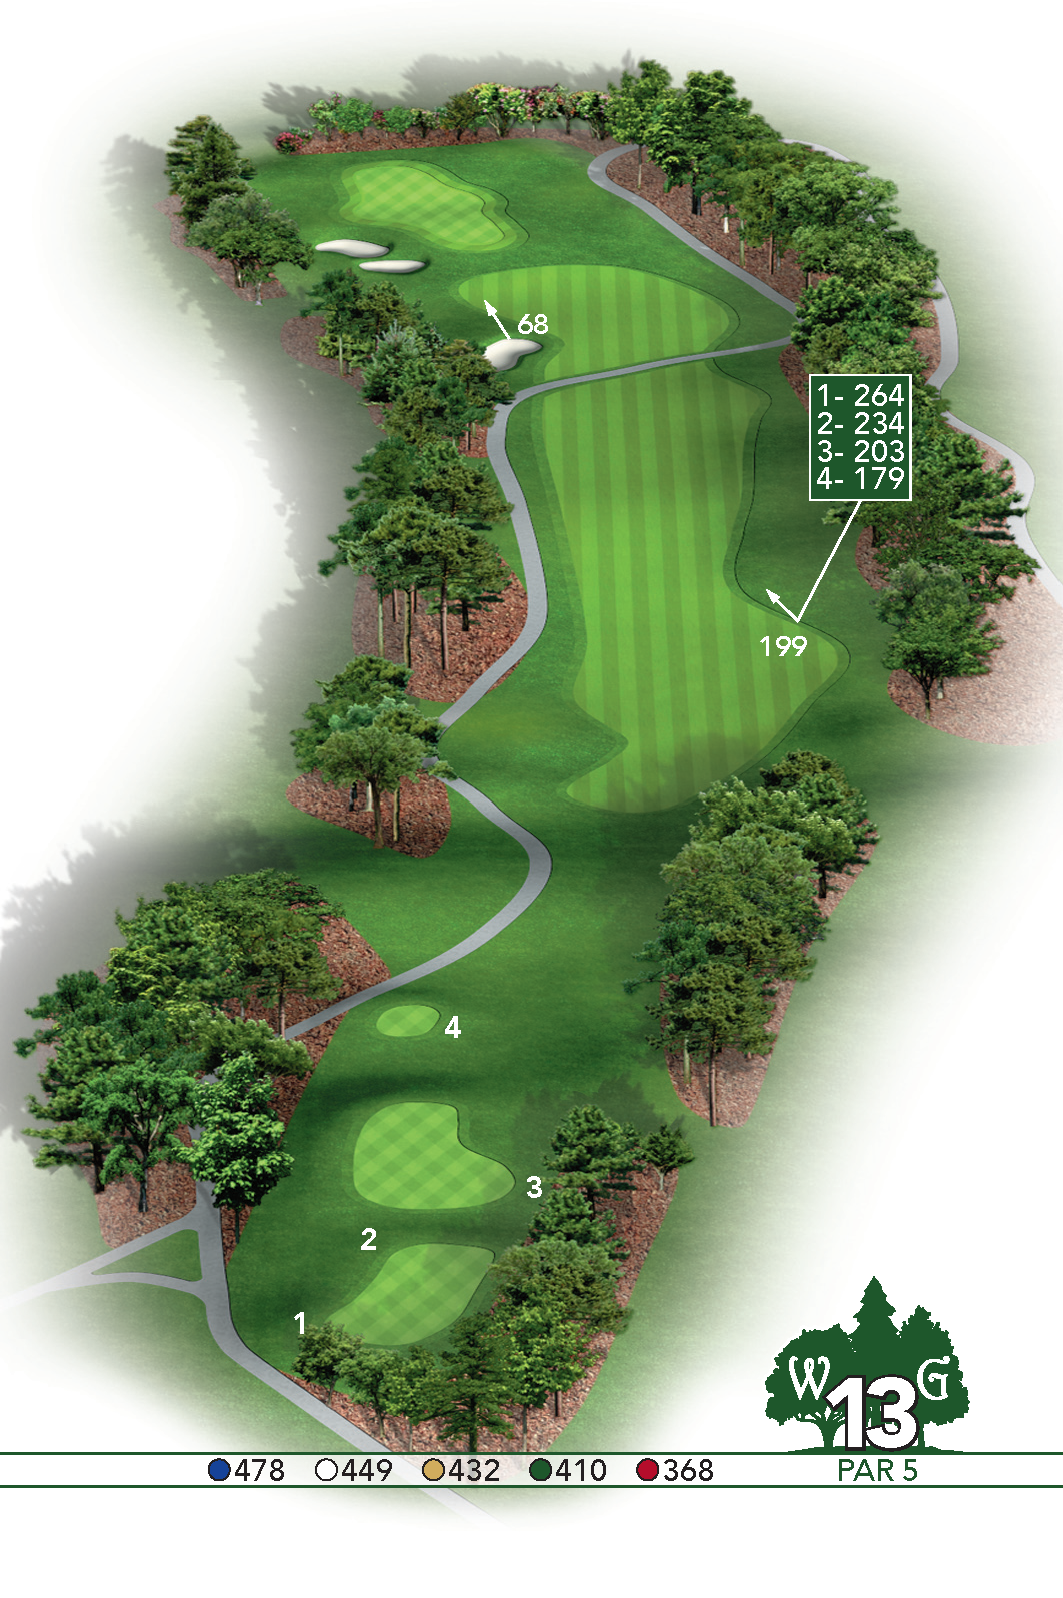
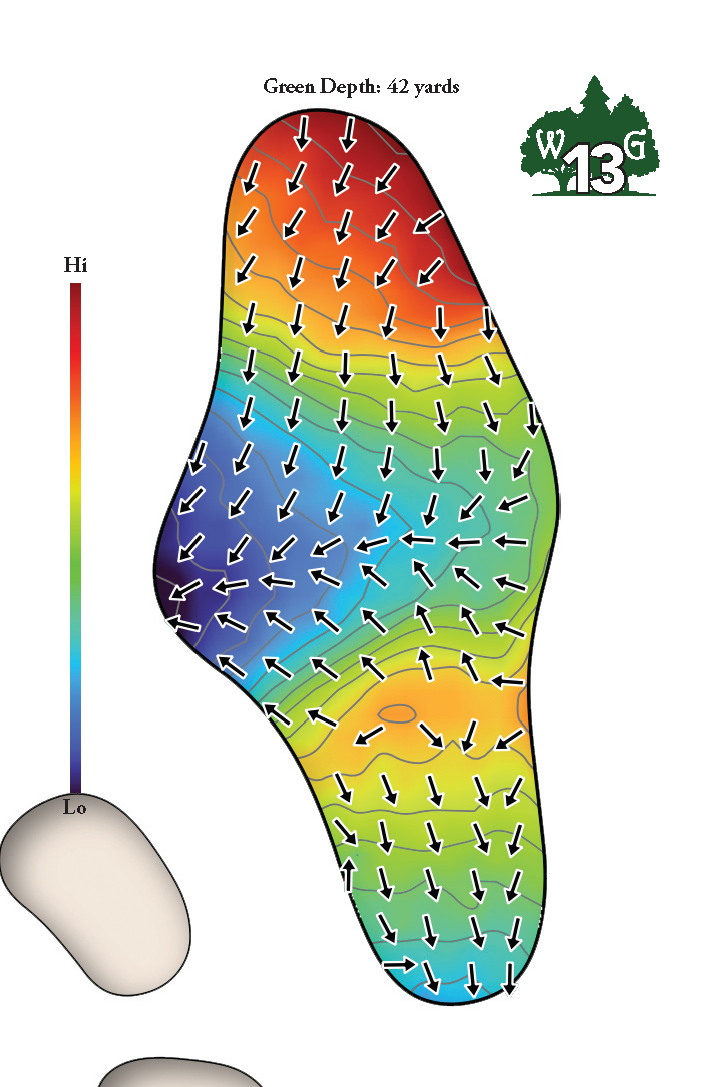
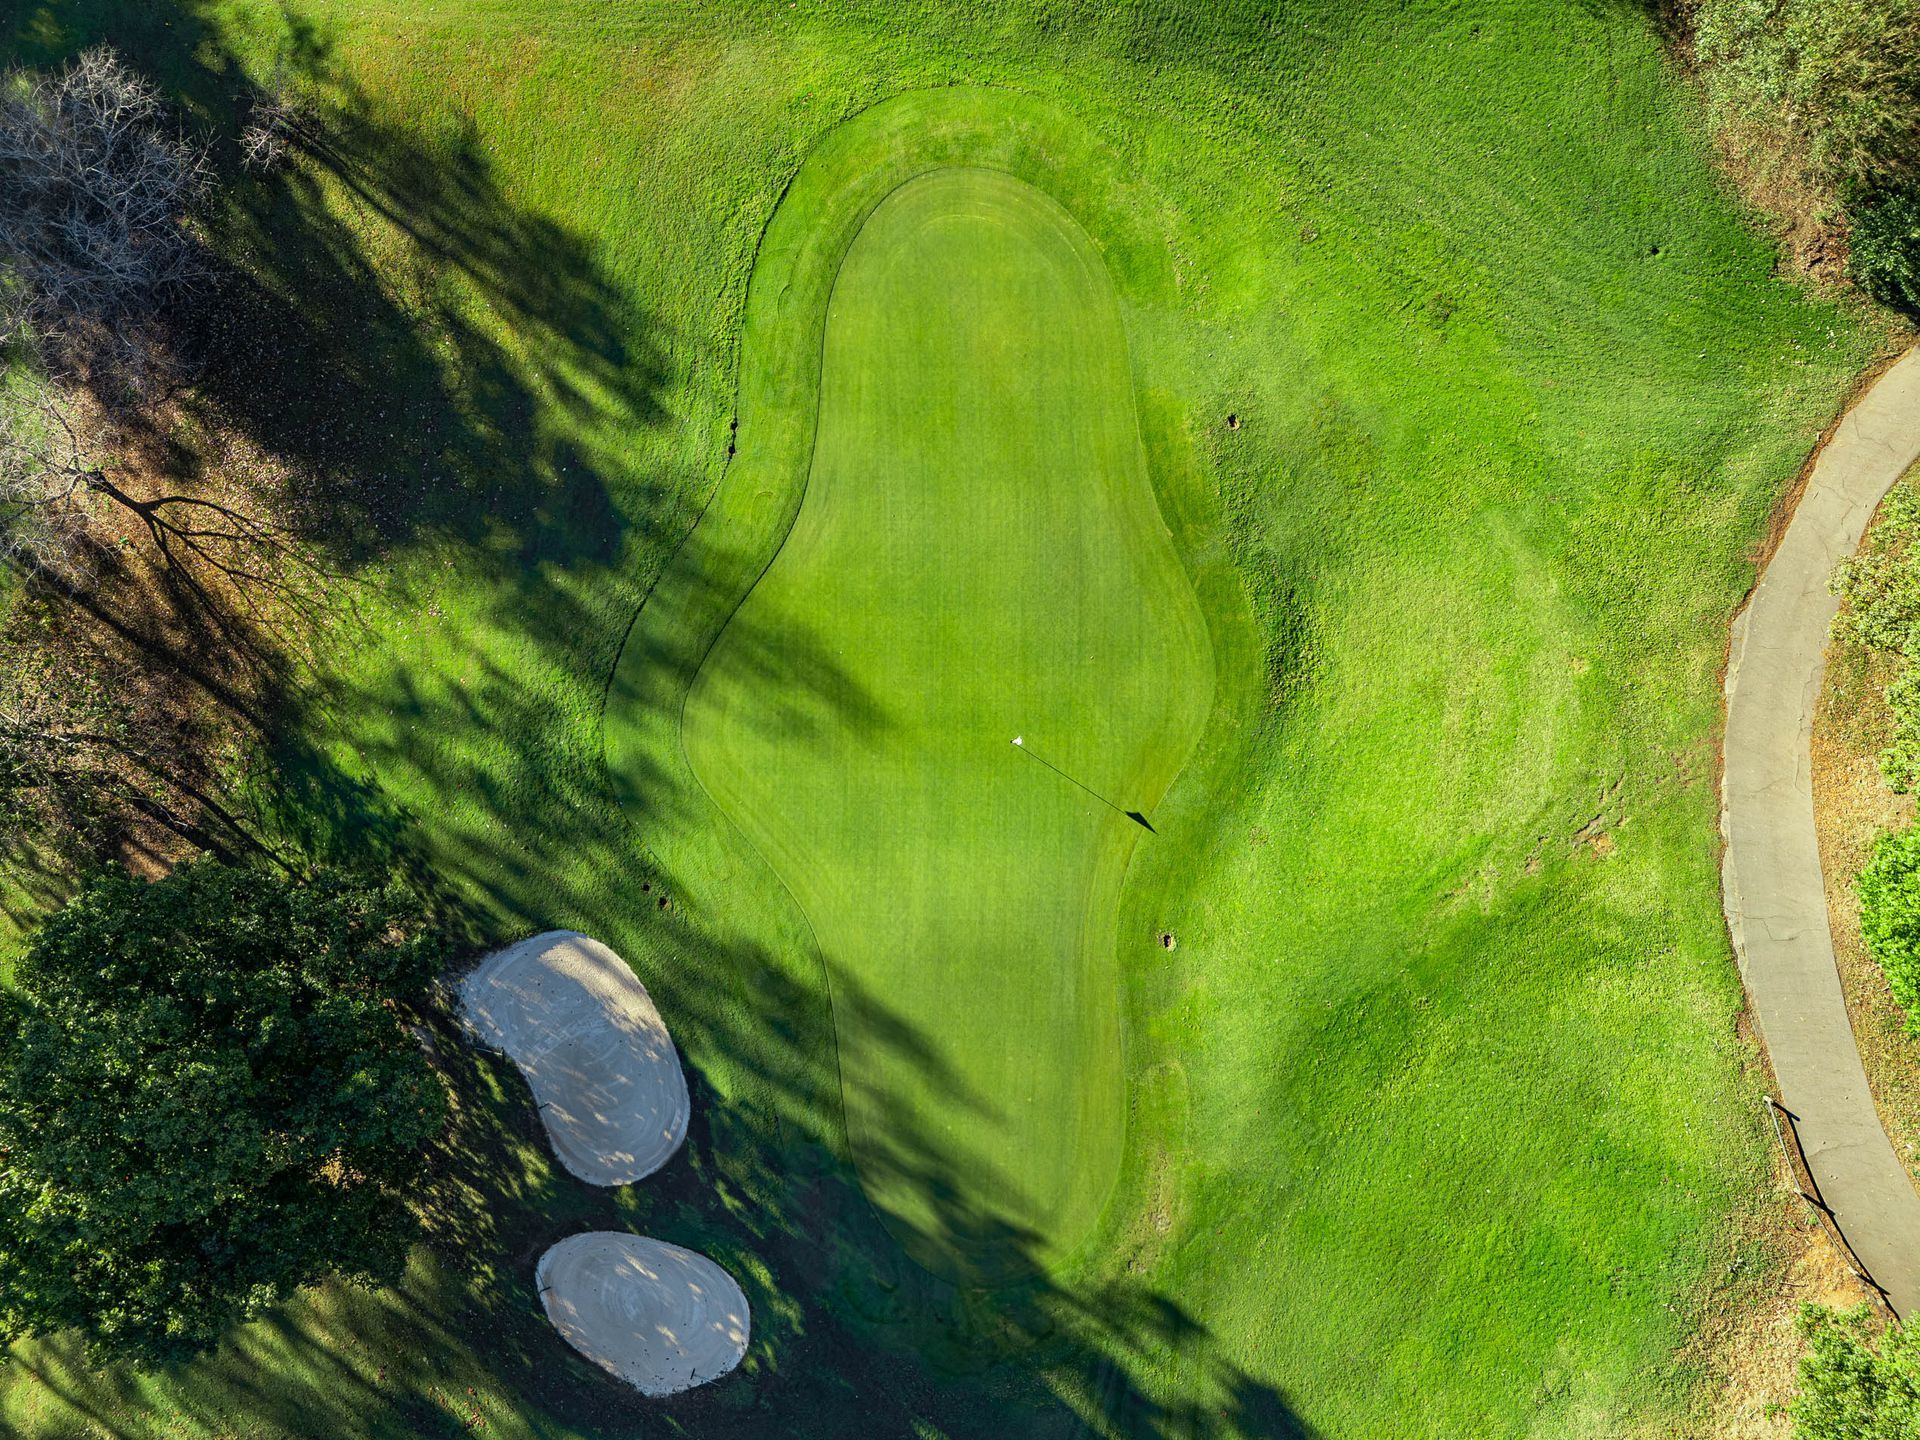
A reachable in two, par 5, if you avoid the tree lined trouble on both sides of the fairway. If you need to lay up avoid a grouping of bunkers on the left side of the fairway. The green is extremely long, a back pin location could be a 2 to 3 club difference. The drain in between #13 fairway and #5 fairway is marked as a penalty area. The grouping of trees on the left side roughly 50 yards from the green are marked as a penalty area.
| PAR | BLUE | WHITE | YELLOW | GREEN | RED |
|---|---|---|---|---|---|
| 5 | 478 | 449 | 432 | 410 | 368 |
HOLE #14
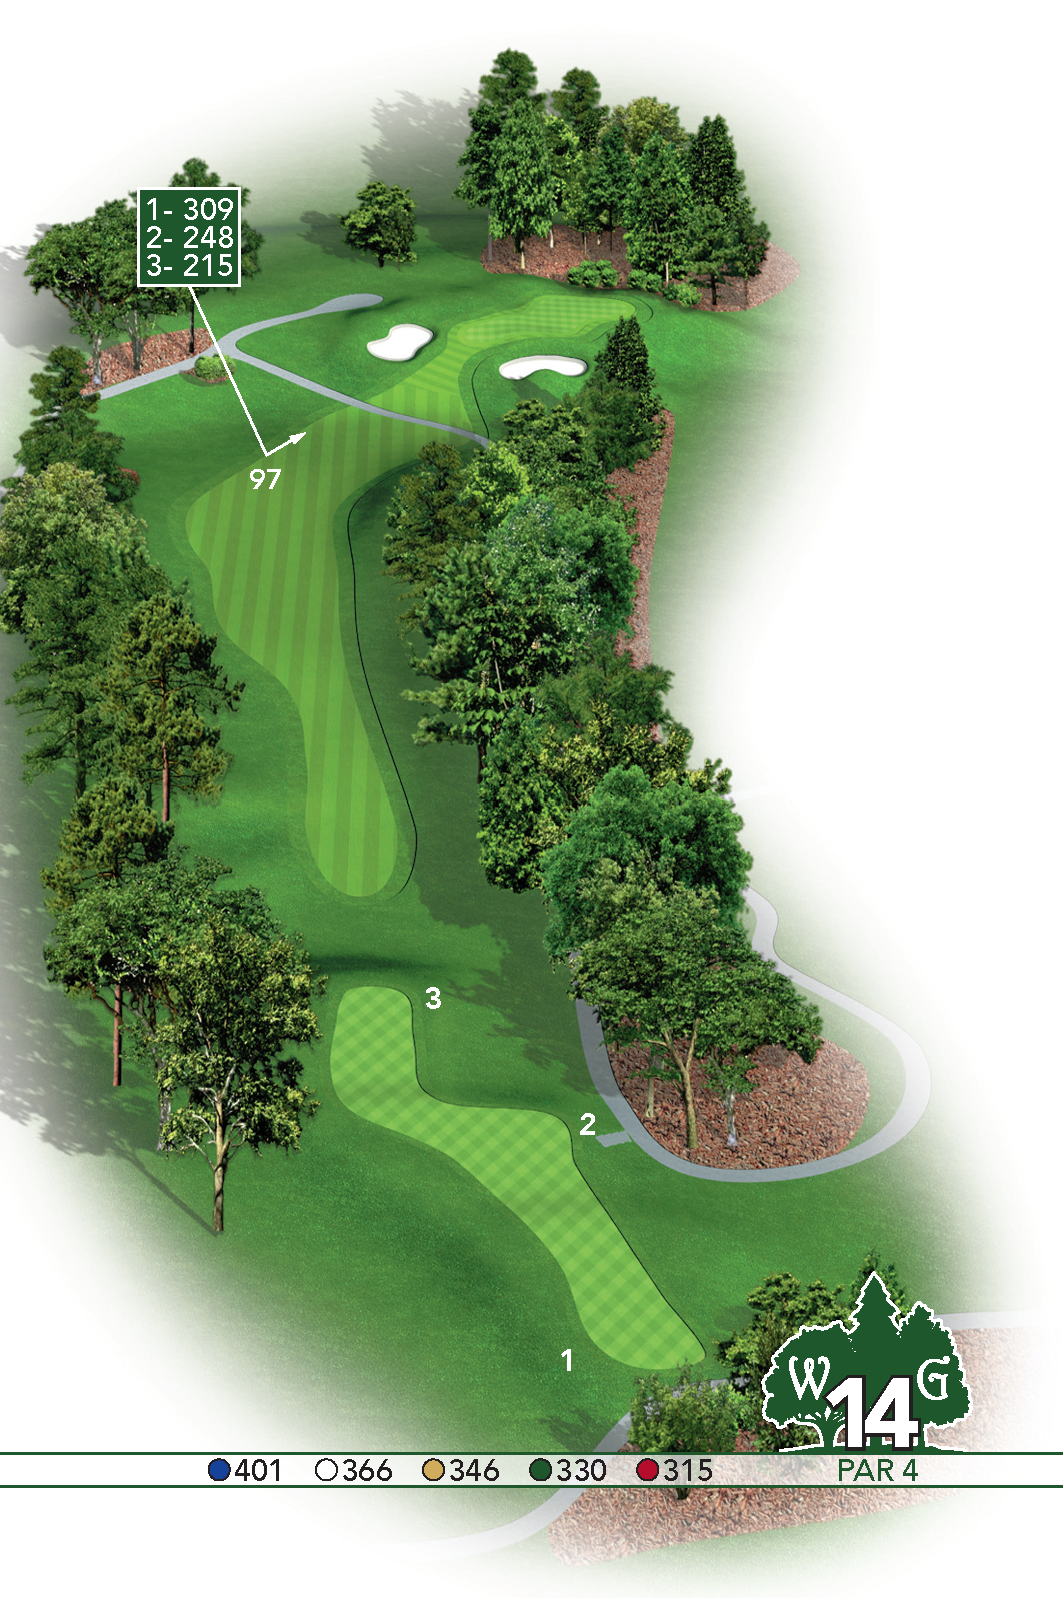
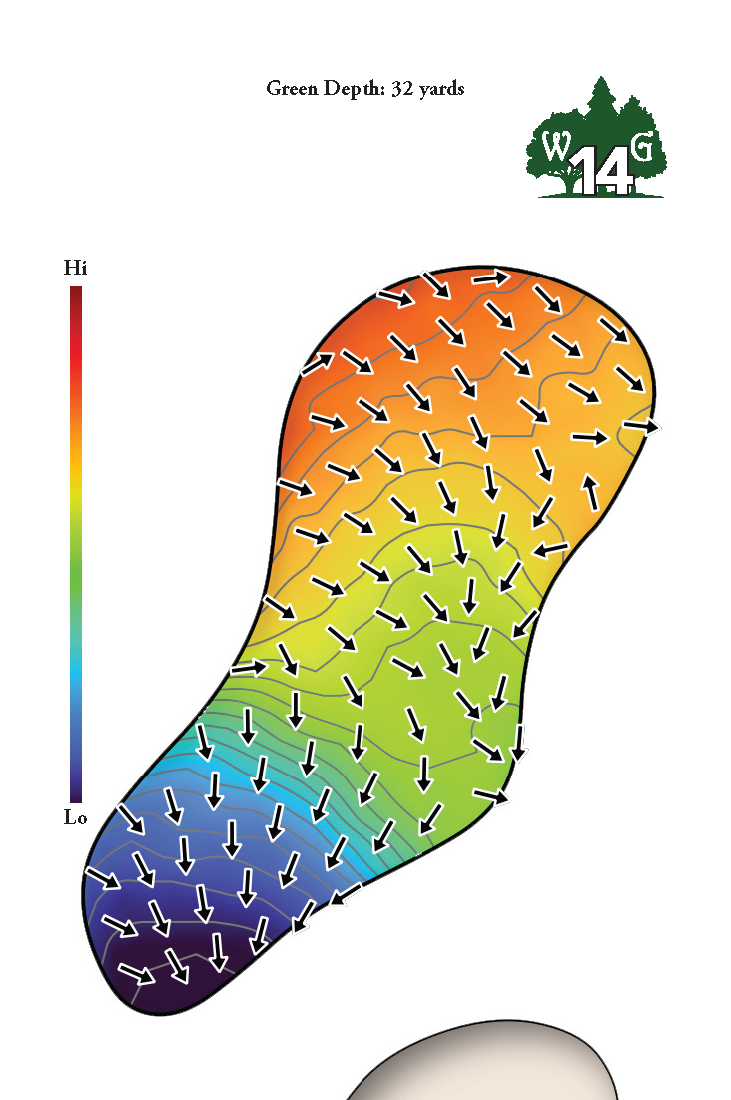
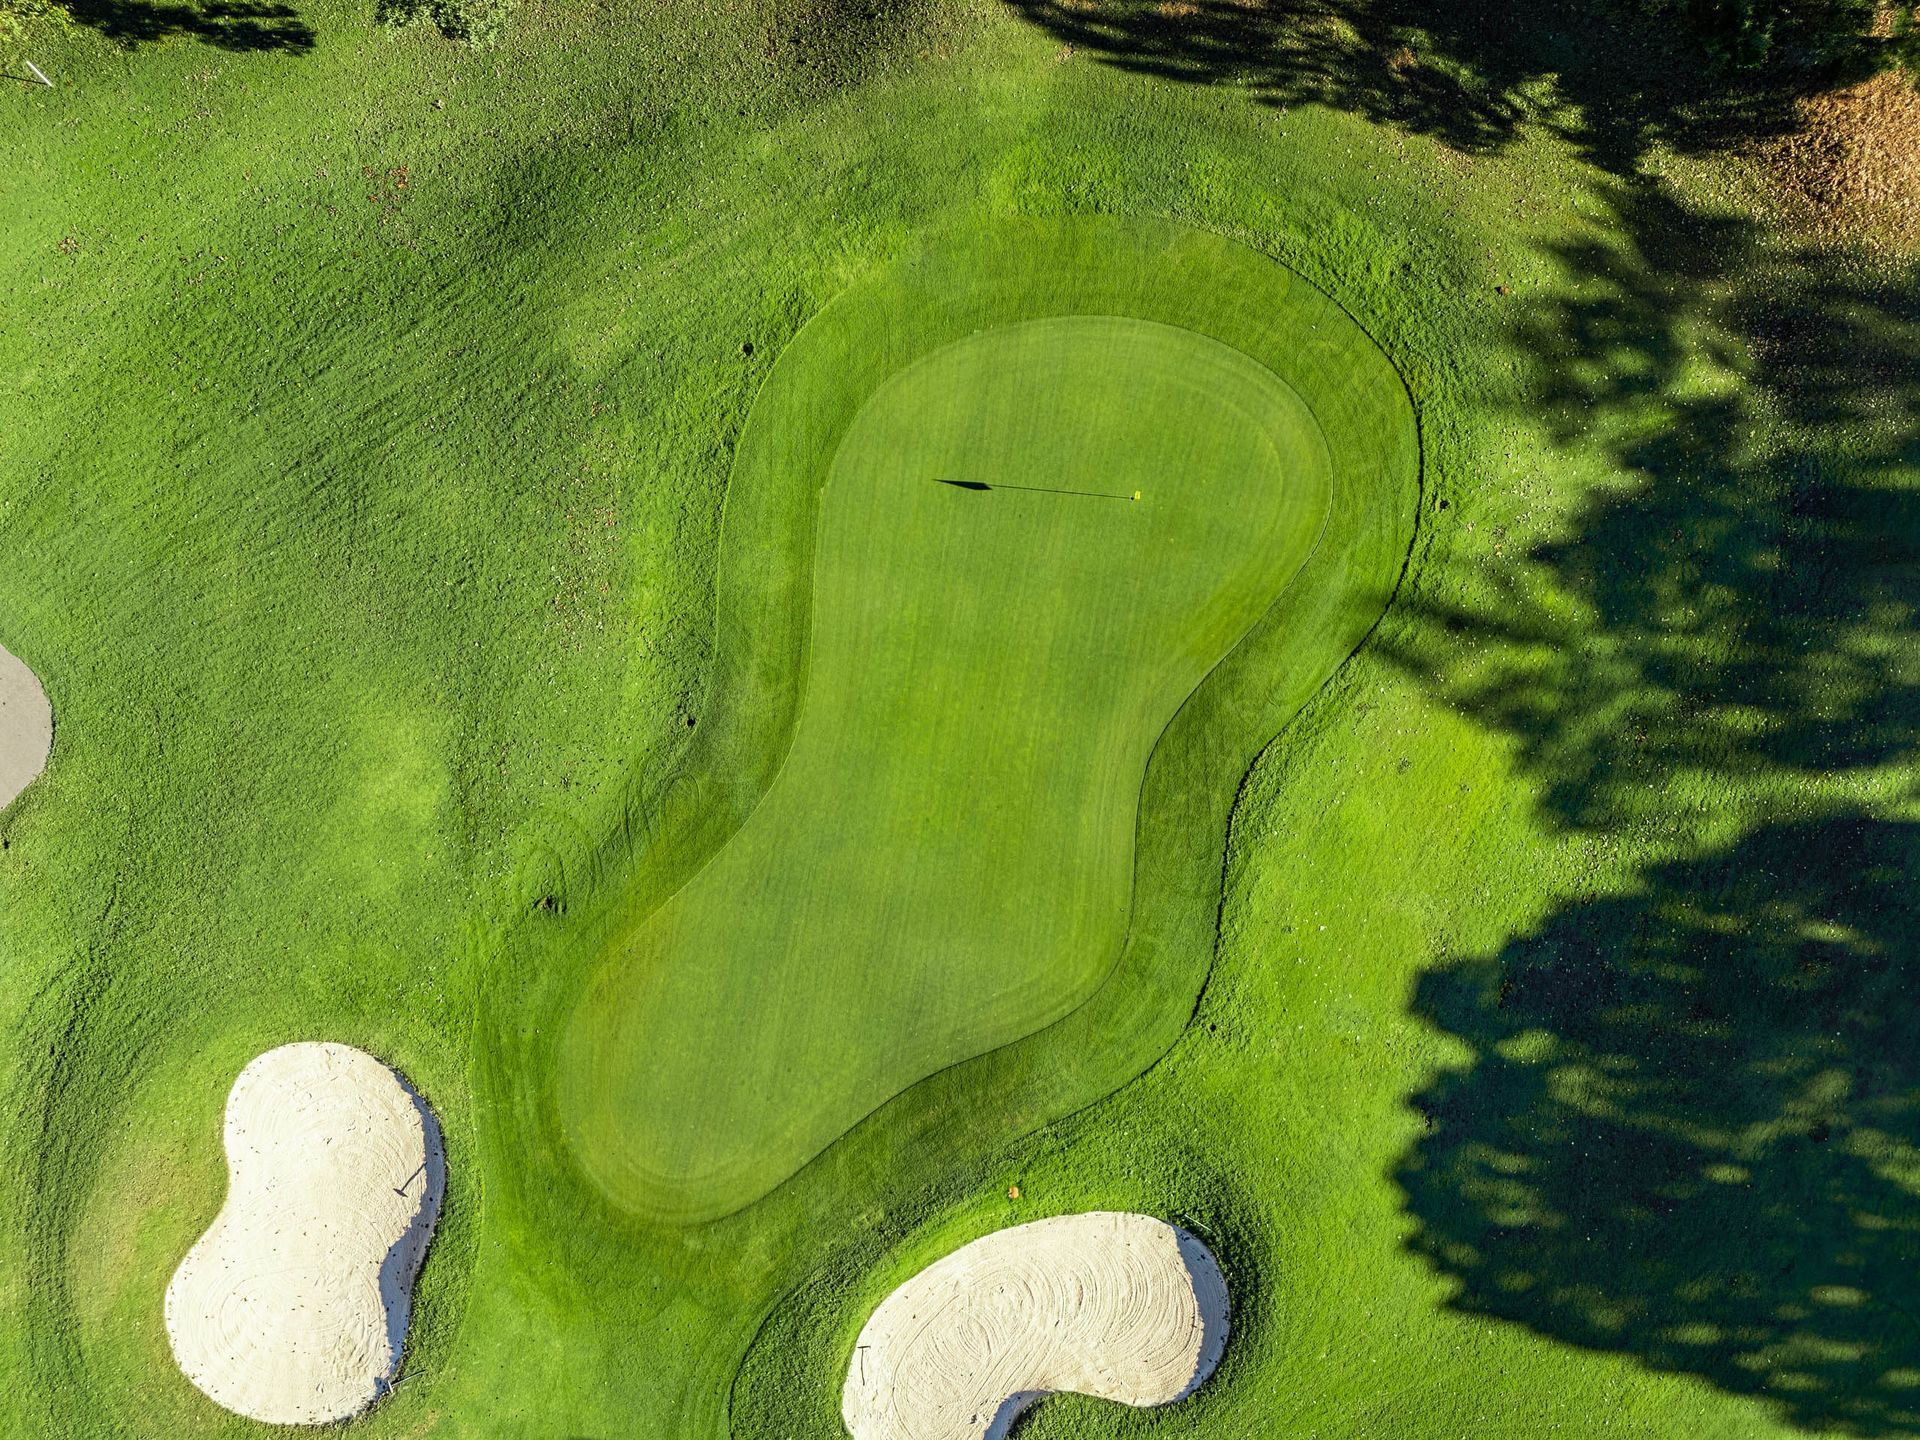
The fairway is all downhill off the tee and avoiding the right side is a must. The green is well protected with bunkers and is two-tiered. The approach is to an elevated green and the lie is usually a downhill one. The drain between #14 fairway and #15 tee box is marked as a penalty area. The drainage ditch near the cart path on the right side of the hole (roughly 50 yards from the green) is marked as a penalty area.
| PAR | BLUE | WHITE | YELLOW | GREEN | RED |
|---|---|---|---|---|---|
| 4 | 401 | 366 | 346 | 330 | 315 |
HOLE #15
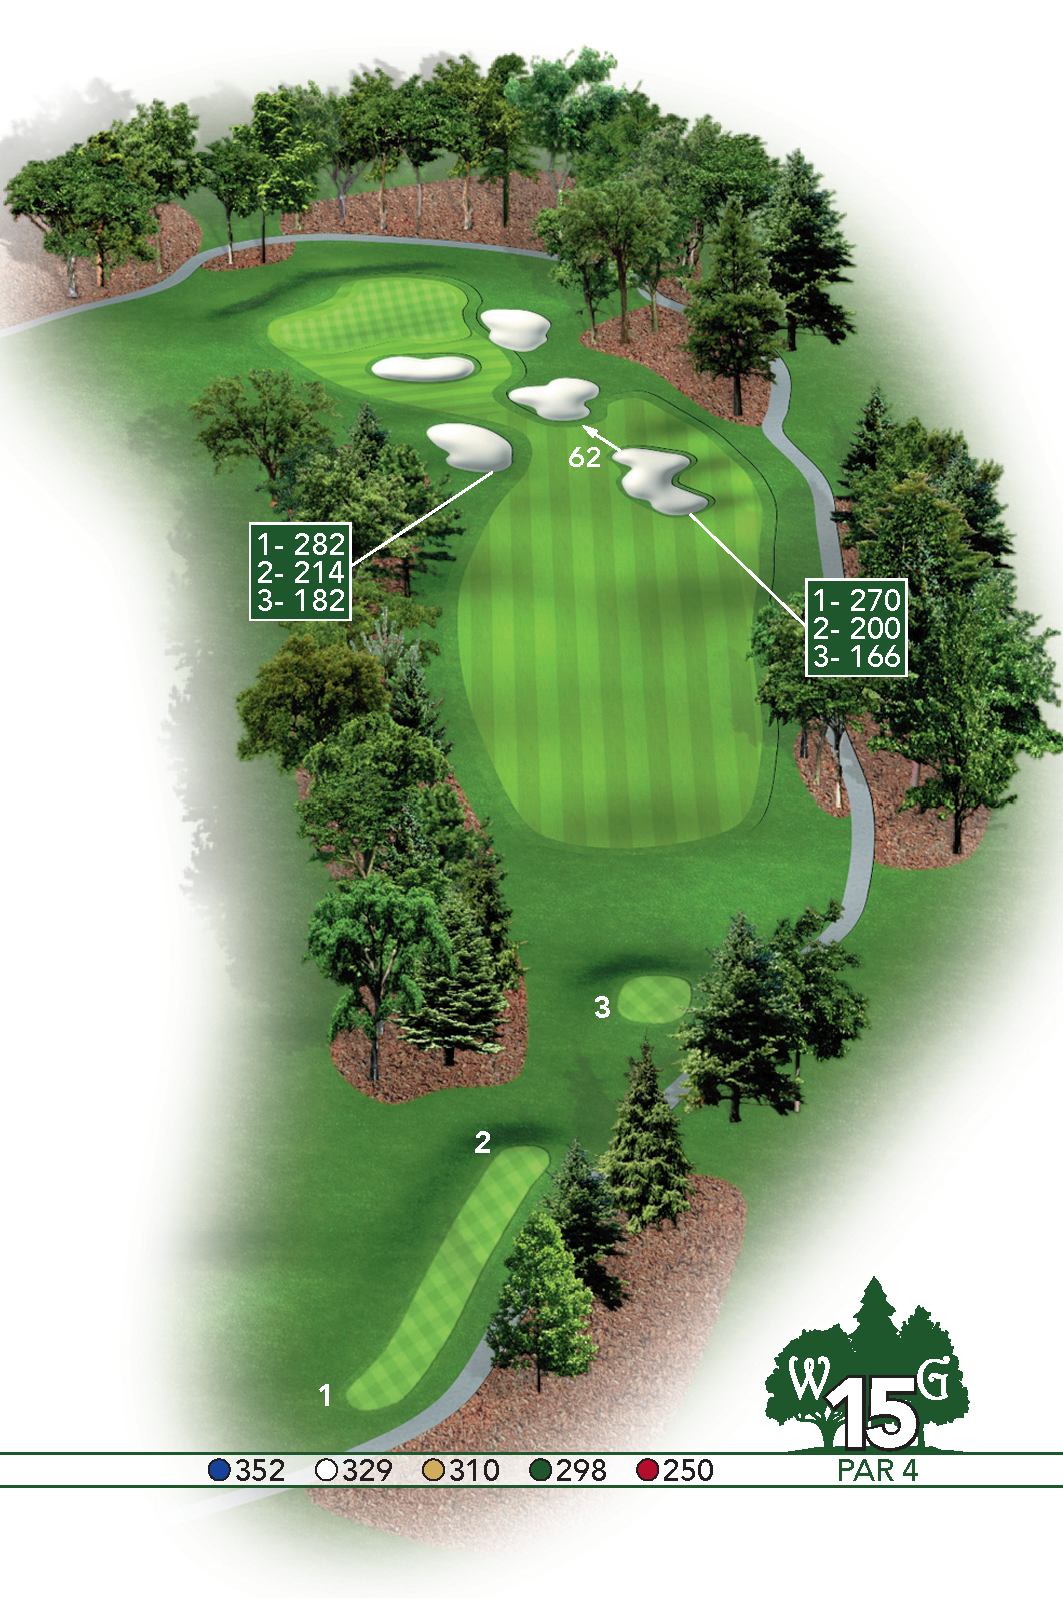
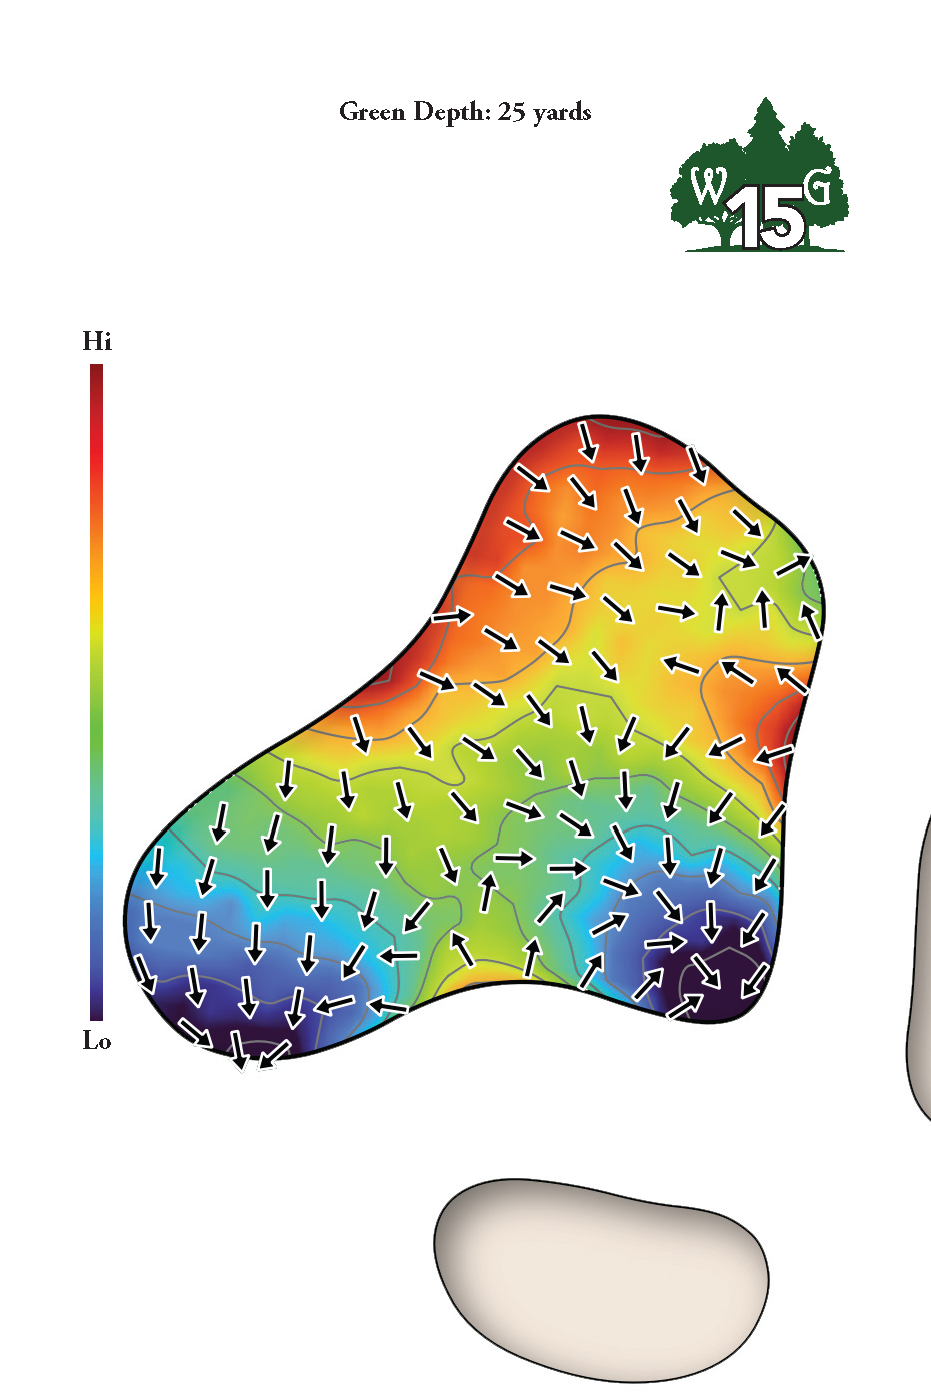
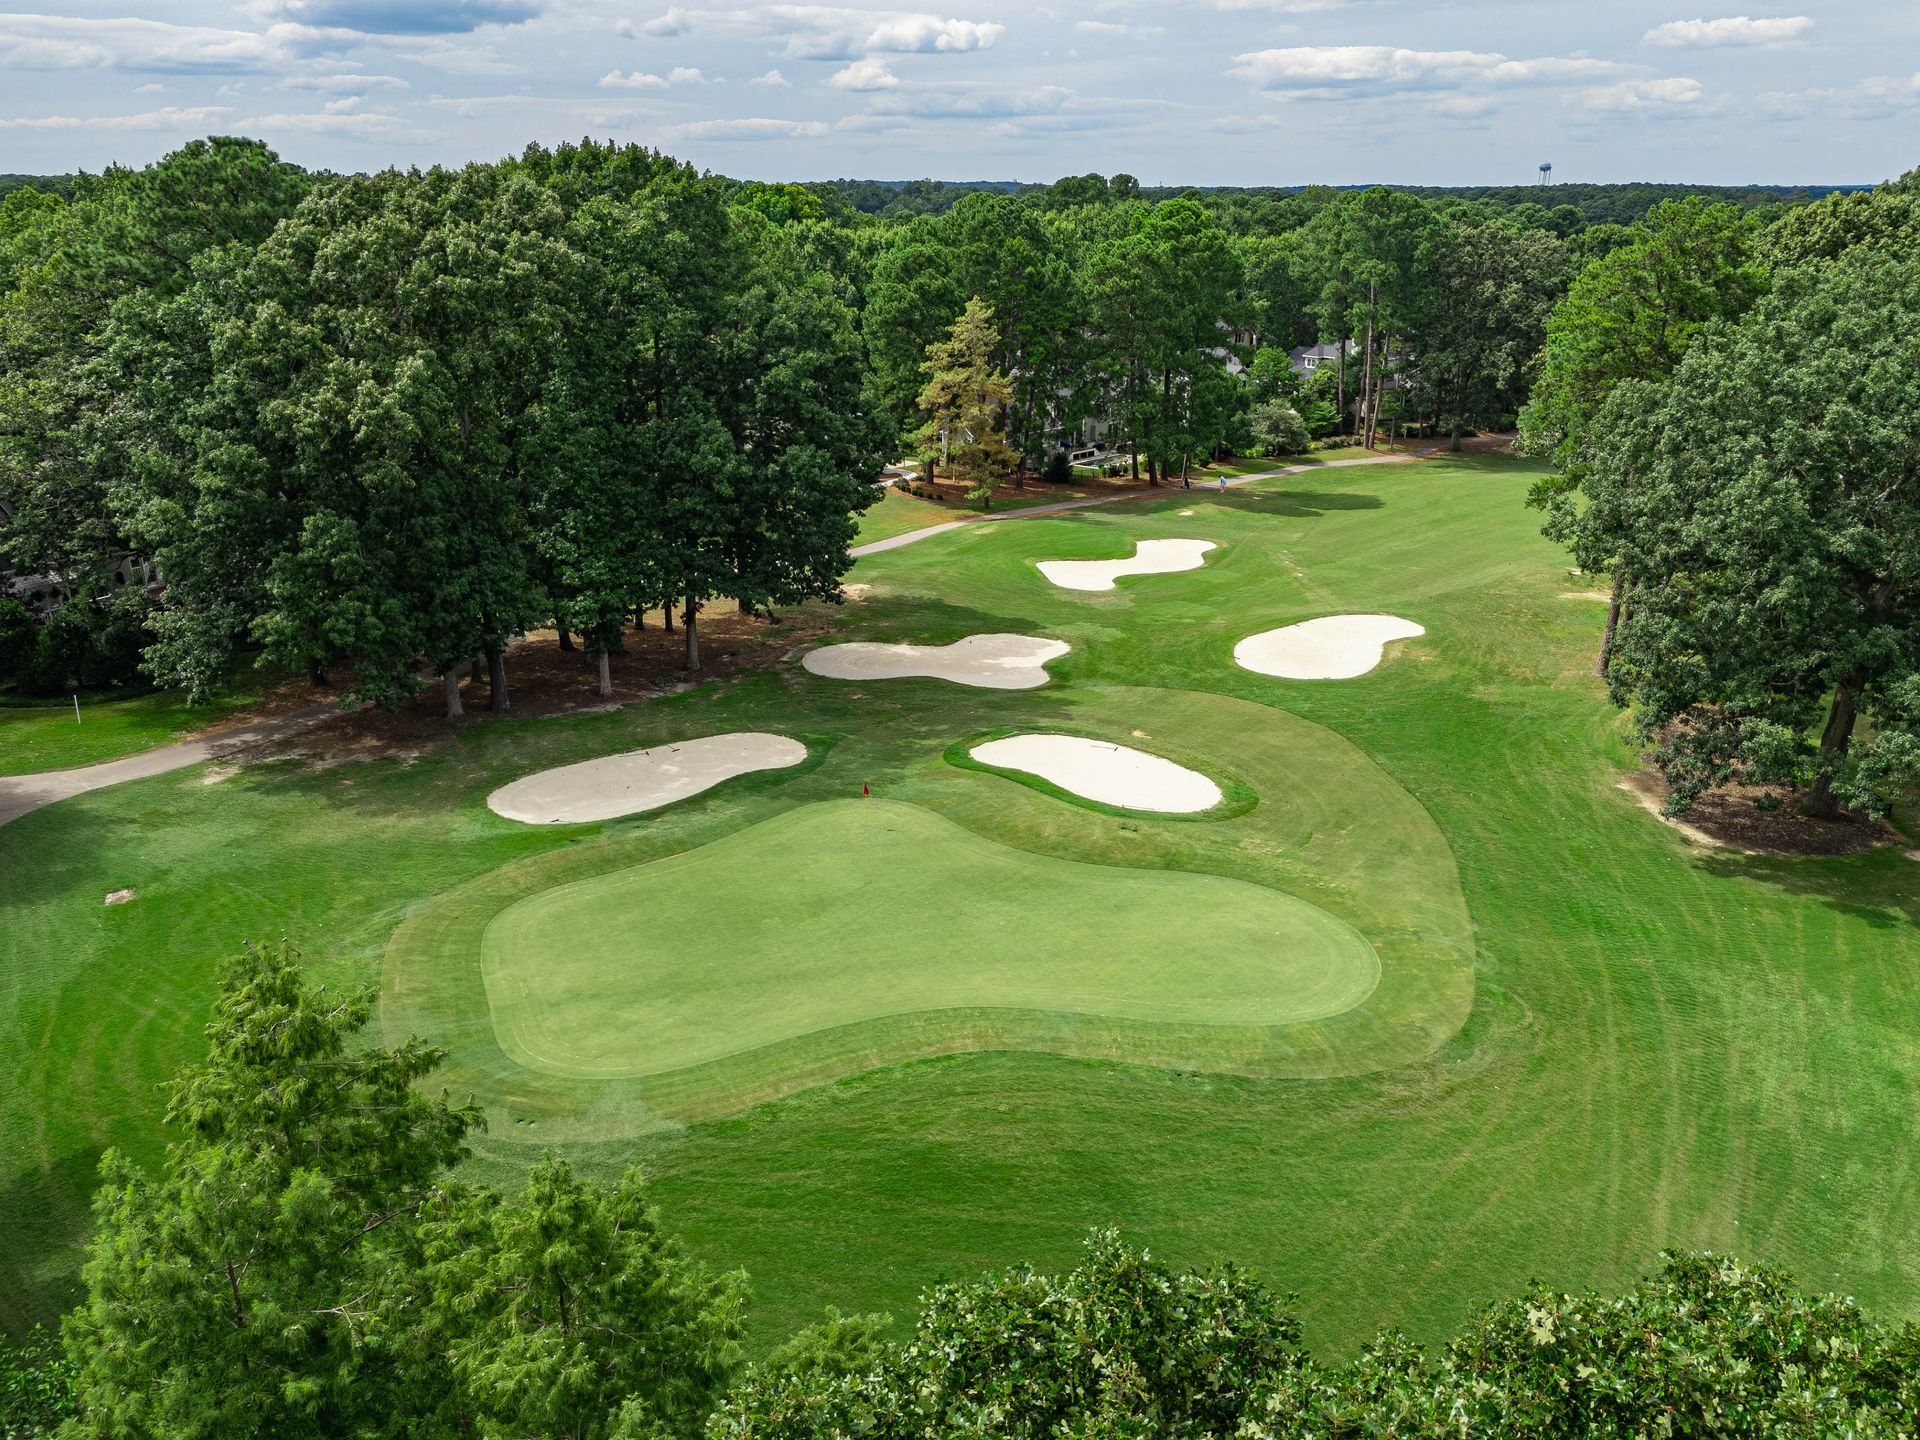
Precision is needed off of the tee as the best approach to the green is from the right side of the fairway. The fairway bunkers can come into play off of the tee and hitting it left could leave your approach blocked by tall trees. The green is also well protected by bunkers requiring a precise approach.
| PAR | BLUE | WHITE | YELLOW | GREEN | RED |
|---|---|---|---|---|---|
| 4 | 352 | 329 | 310 | 298 | 250 |
HOLE #16
💧 WATER STATION
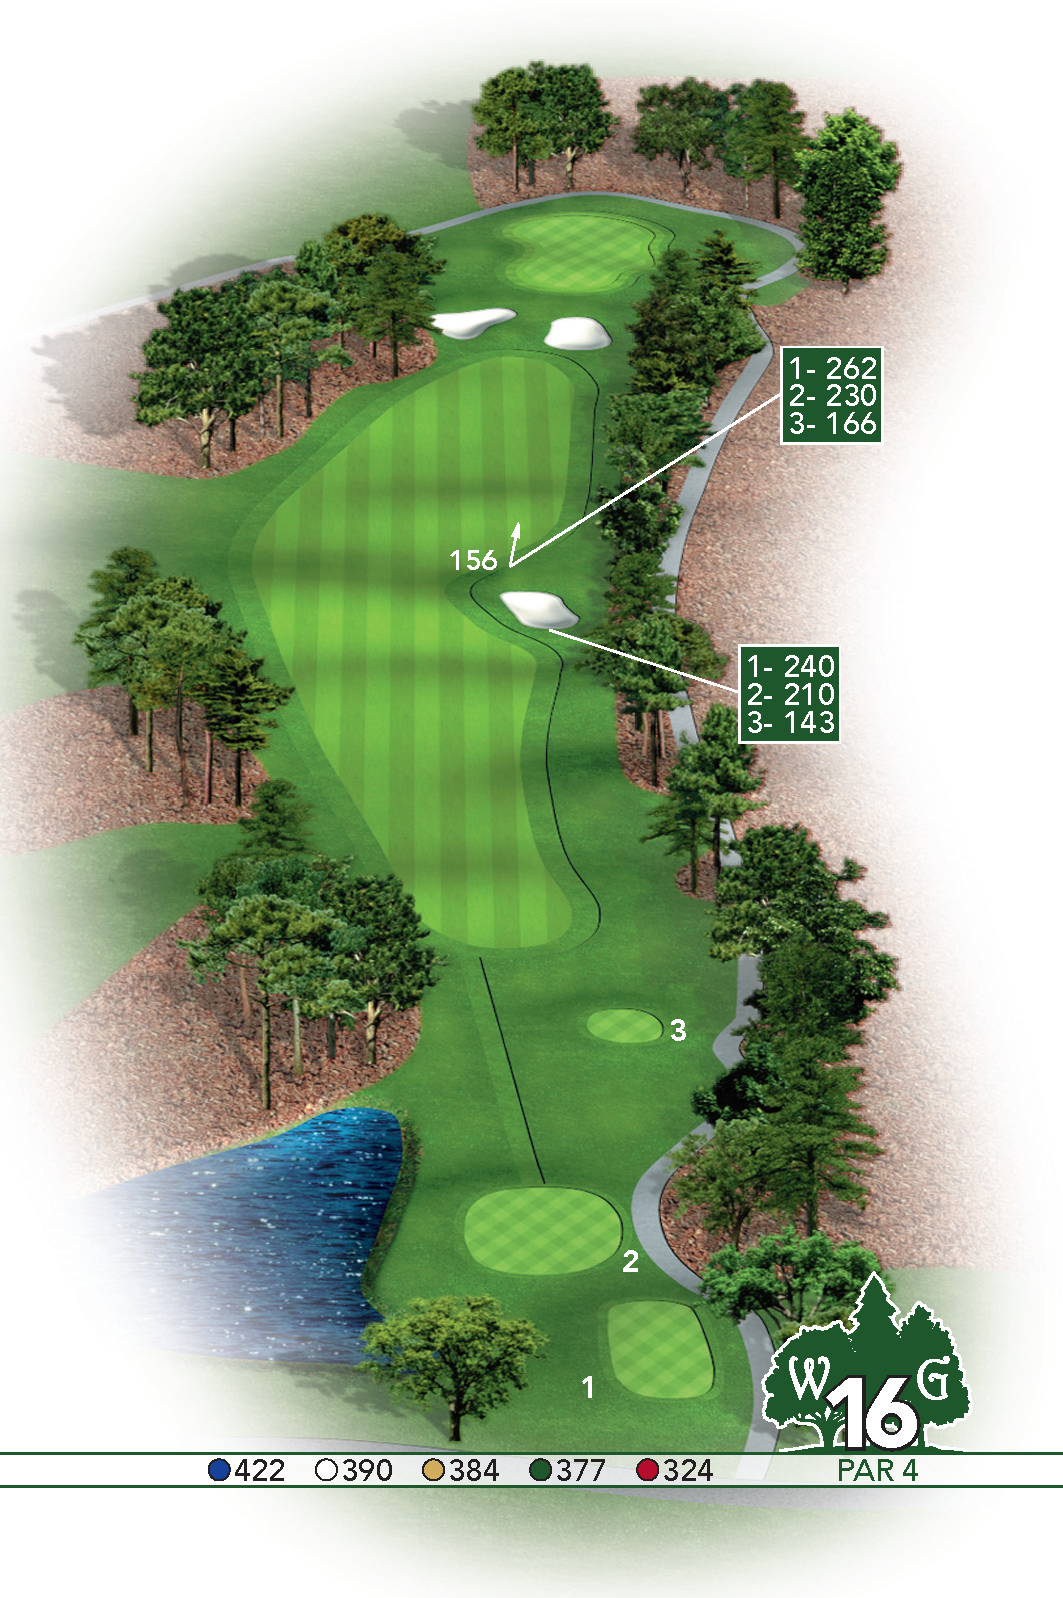
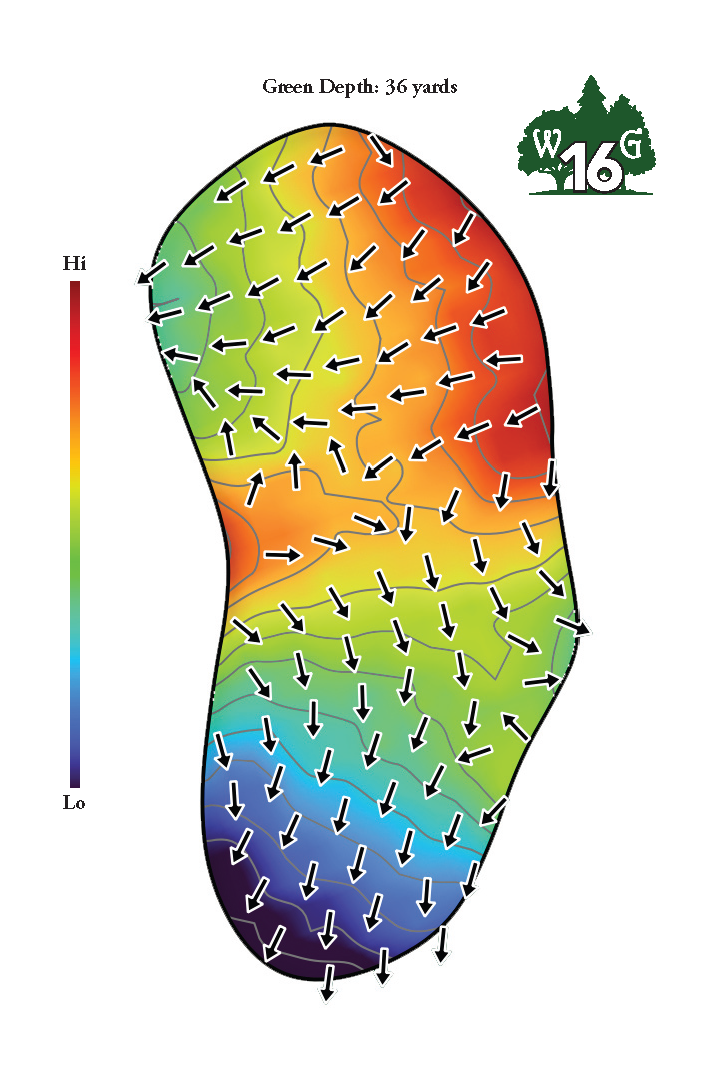
This one is a tough driving hole. It is a tree lined slight dogleg right and avoiding the fairway bunker is critical. Don’t think about the Out of Bounds right, it comes up on you quick! The approach isn’t much easier as you are hitting back into a chute lined by trees. Avoid the bunkers short of the green. The drainage area to the left of the fairway in the trees is marked as a penalty area.
| PAR | BLUE | WHITE | YELLOW | GREEN | RED |
|---|---|---|---|---|---|
| 4 | 422 | 390 | 384 | 377 | 324 |
HOLE #17
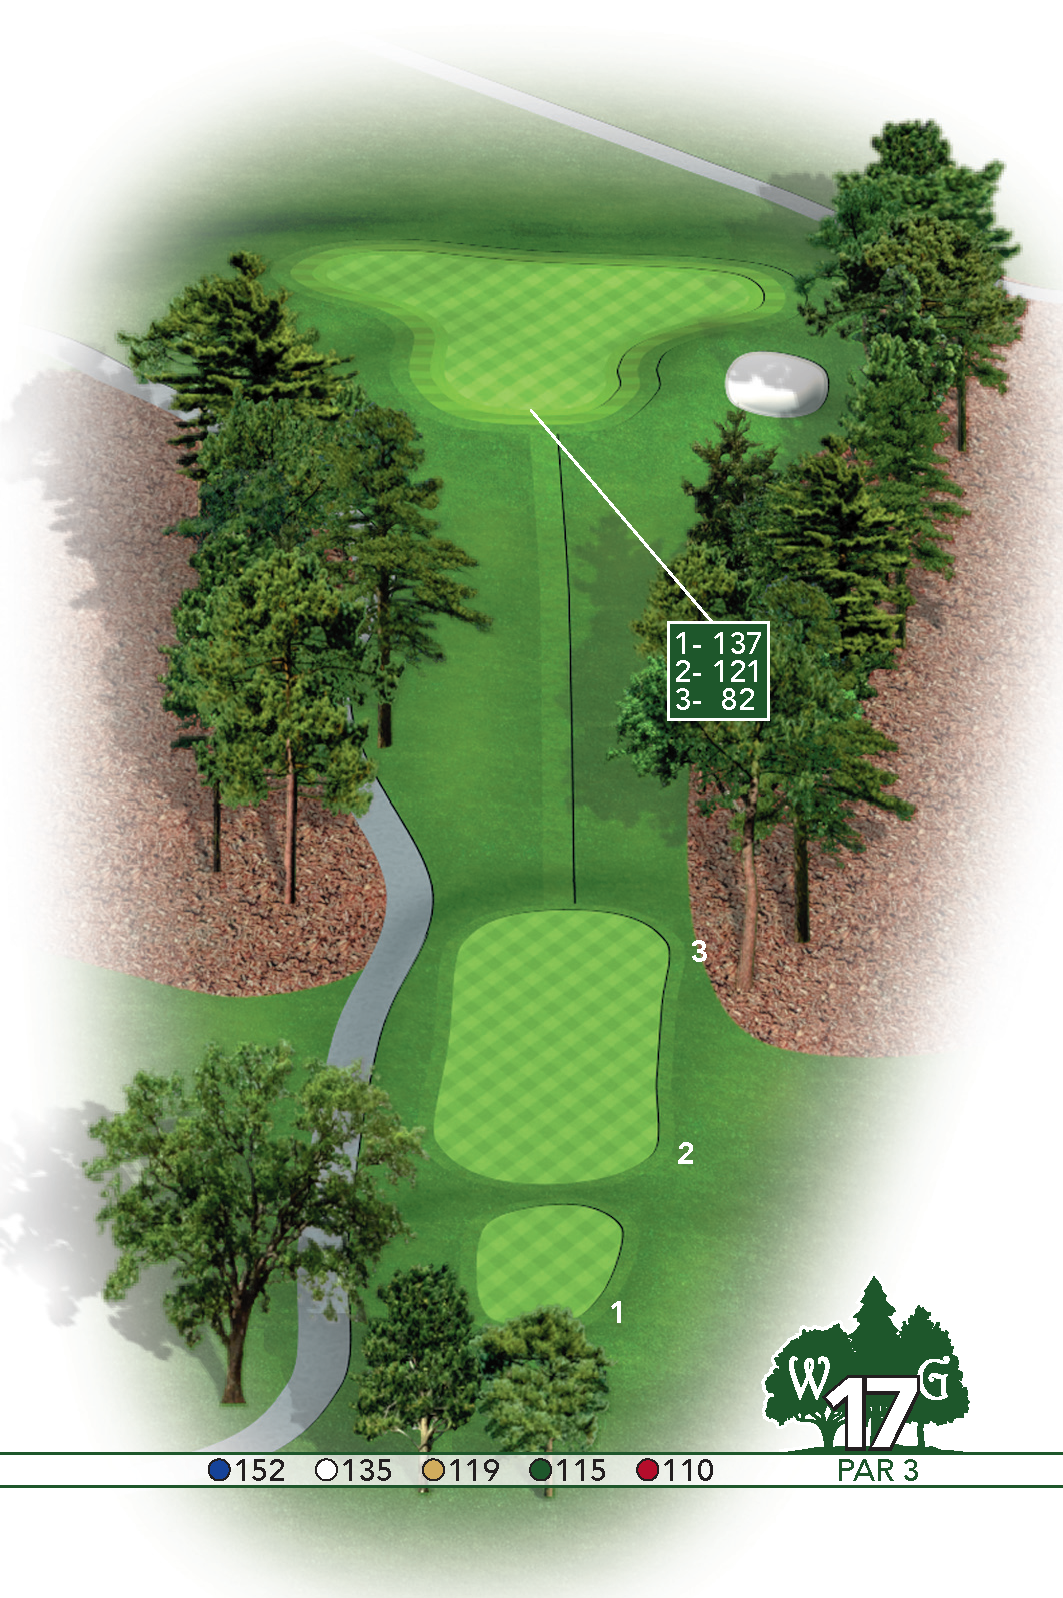
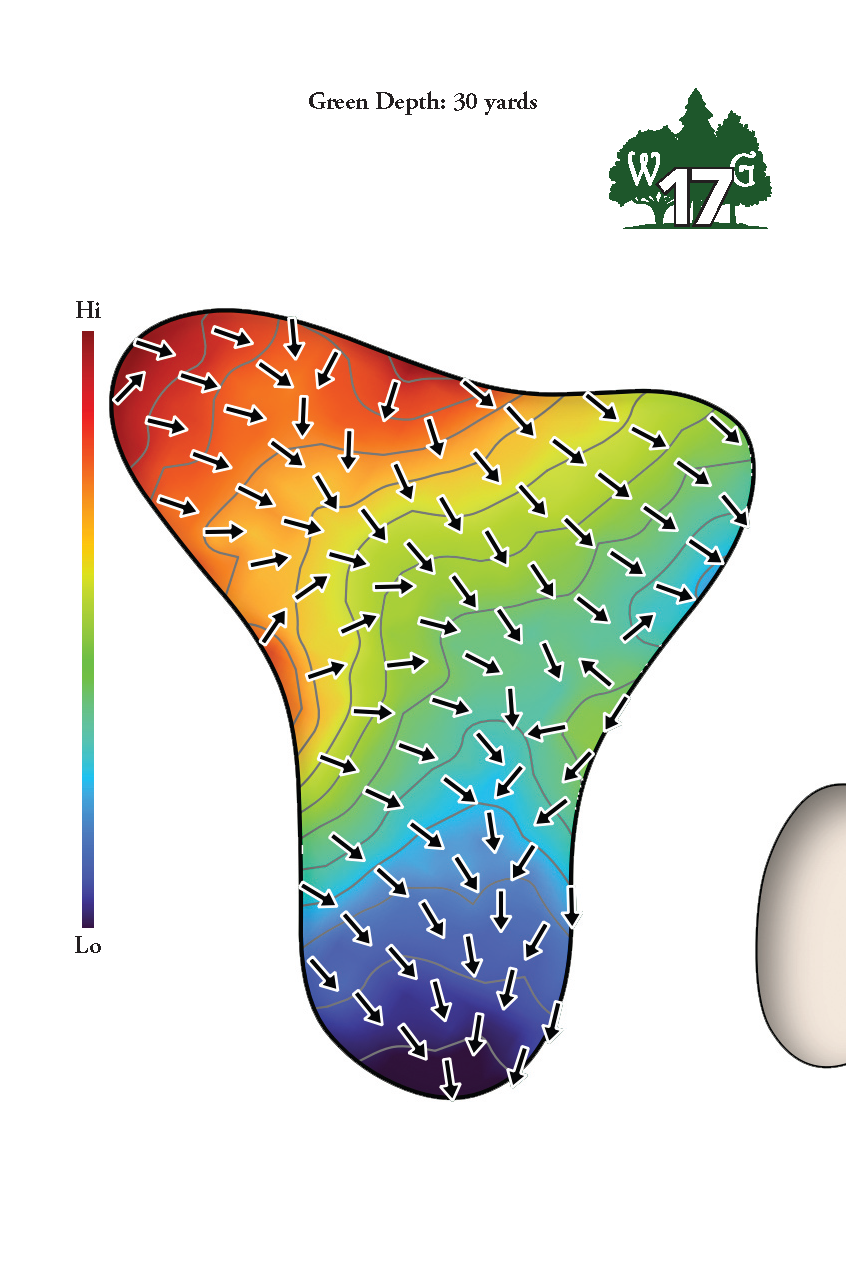
A par 3 with a beautiful background and an elevated tee. The bunker on the right side is very deep, it must be avoided.
| PAR | BLUE | WHITE | YELLOW | GREEN | RED |
|---|---|---|---|---|---|
| 3 | 152 | 135 | 119 | 115 | 110 |
HOLE #18
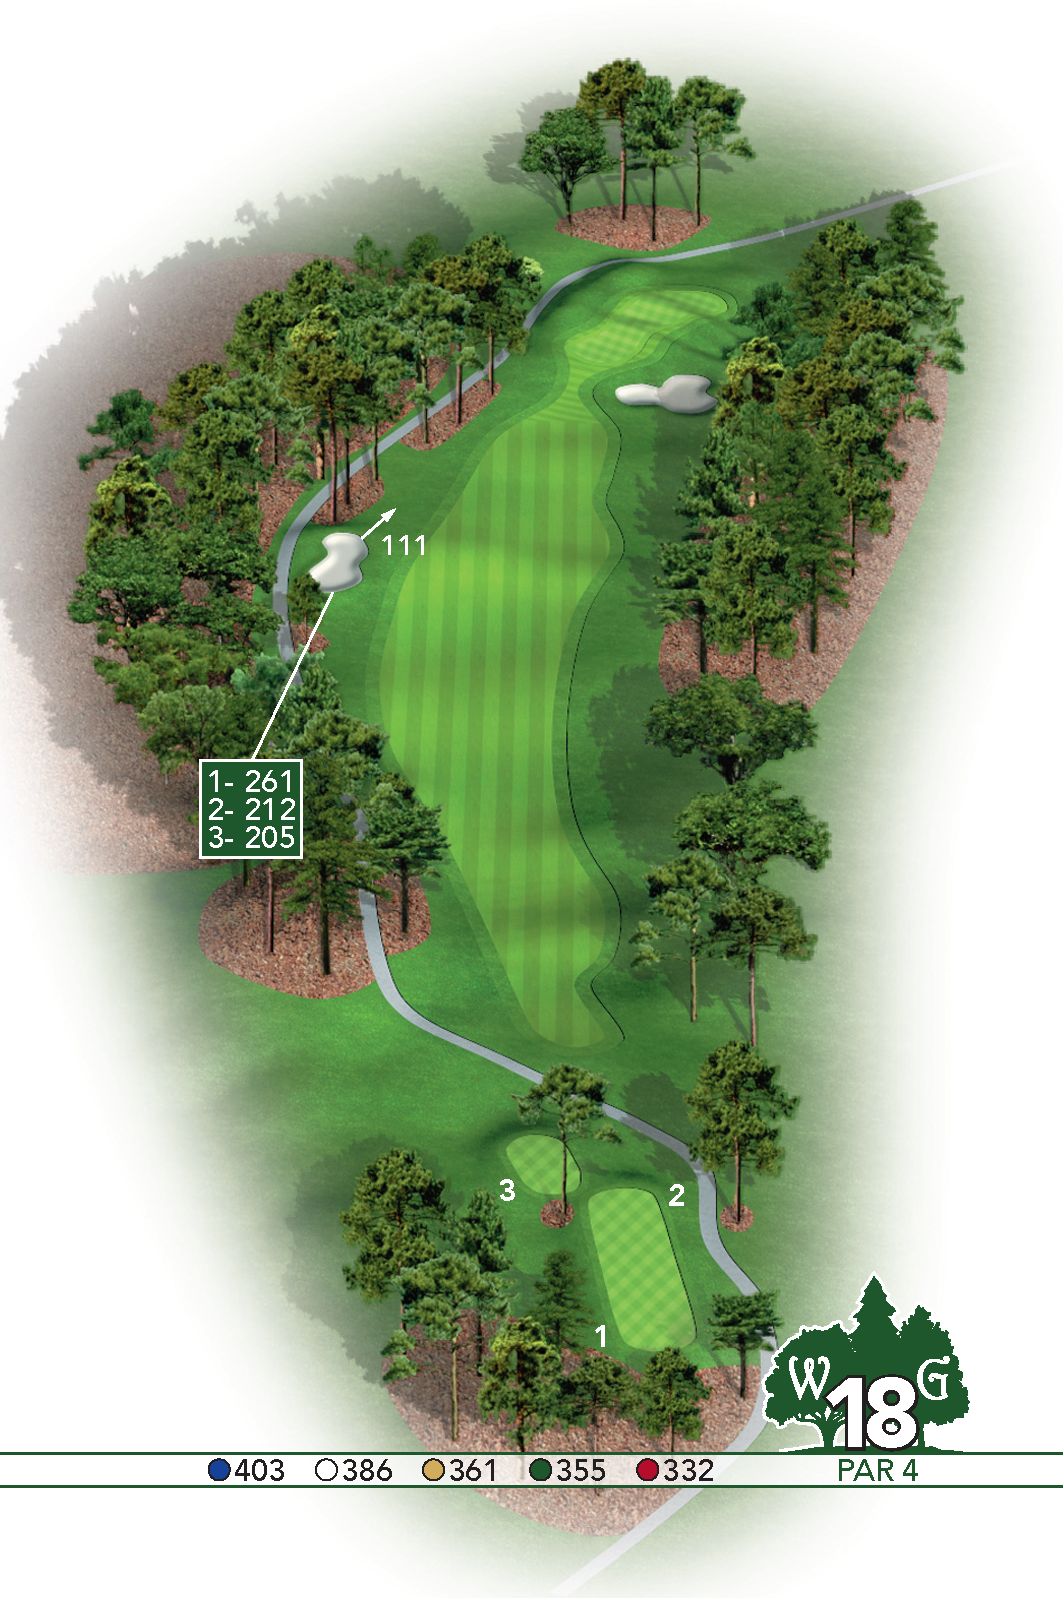
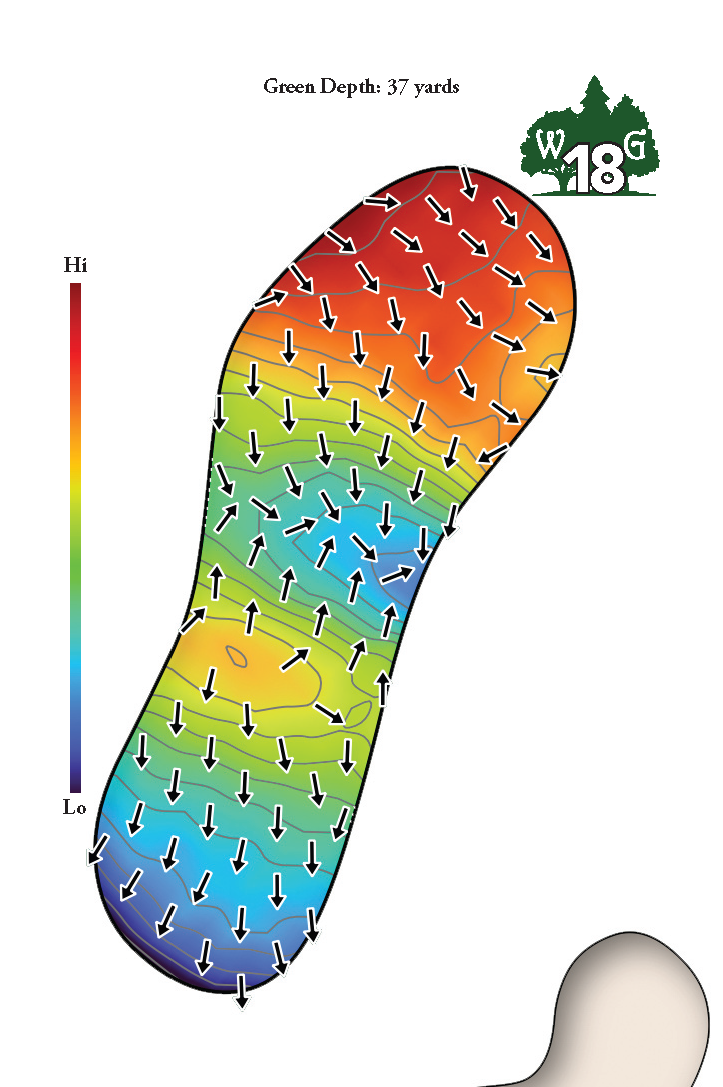
This is a demanding finishing hole. A slight dogleg right with large Carolina Pines lining the right side. The bunker on the left gives the hole a nice definition, but don’t sneek your tee shot into this trouble. The approach shot is all uphill and the green is very deep and undulated. Precision is key again with this blind shot. Trouble lurks to the right with a deep greenside bunker. The flower bed directly behind the green and to the left is a mandatory free drop.
| PAR | BLUE | WHITE | YELLOW | GREEN | RED |
|---|---|---|---|---|---|
| 4 | 403 | 386 | 361 | 355 | 332 |
scorecard
| Hole | 1 | 2 | 3 | 4 | 5 | 6 | 7 | 8 | 9 | OUT | 10 | 11 | 12 | 13 | 14 | 15 | 16 | 17 | 18 | IN | TOT |
|---|---|---|---|---|---|---|---|---|---|---|---|---|---|---|---|---|---|---|---|---|---|
| Blue Tees | 413 | 409 | 349 | 204 | 441 | 172 | 567 | 354 | 382 | 3291 | 444 | 349 | 181 | 478 | 401 | 352 | 422 | 152 | 403 | 3182 | 6473 |
| White Tees | 394 | 371 | 321 | 186 | 408 | 152 | 548 | 334 | 358 | 3072 | 429 | 330 | 164 | 449 | 366 | 329 | 390 | 135 | 386 | 2978 | 6050 |
| Gold Tees | 382 | 354 | 301 | 161 | 388 | 140 | 527 | 313 | 348 | 2914 | 402 | 305 | 145 | 432 | 346 | 310 | 384 | 119 | 361 | 2804 | 5718 |
| Men's Handicap | 9 | 5 | 17 | 11 | 1 | 15 | 3 | 13 | 7 | 2 | 16 | 10 | 14 | 12 | 8 | 4 | 18 | 6 | |||
| Green Tees | 370 | 342 | 279 | 144 | 372 | 128 | 447 | 257 | 297 | 2636 | 392 | 255 | 140 | 410 | 330 | 298 | 377 | 115 | 355 | 2672 | 5308 |
| Green/Red Tees | 323 | 329 | 279 | 119 | 324 | 128 | 447 | 257 | 297 | 2503 | 325 | 255 | 95 | 368 | 330 | 298 | 324 | 115 | 332 | 2442 | 4945 |
| Red Tees | 323 | 329 | 273 | 119 | 324 | 105 | 437 | 252 | 292 | 2454 | 325 | 250 | 95 | 368 | 315 | 250 | 324 | 110 | 332 | 2369 | 4823 |
| Ladies' Handicap | 9 | 2 | 11 | 15 | 1 | 17 | 5 | 13 | 7 | 4 | 14 | 16 | 12 | 10 | 8 | 6 | 18 | 2 | |||
| Par | 4 | 4 | 4 | 3 | 4 | 3 | 5 | 4 | 4 | 35 | 4 | 4 | 3 | 5 | 4 | 4 | 4 | 3 | 4 | 35 | 70 |
ABOUT THE COURSE
FRONT 9 RULES
BACK 9 RULES
ADDITIONAL LOCAL RULES
DRESS CODE
COURSE DESIGN
Wildwood Green is a 18-hole course designed by architect John LaFoy. LaFoy is a highly respected American golf course architect and past president of the American Society of Golf Course Architects (ASGCA). Based in Greenville, South Carolina, he is widely recognized for his original golf course layouts and extensive restoration work on classic courses designed by legendary figures like Donald Ross, A.W. Tillinghast, and Alister MacKenzie.
WATER + RESTROOM LOCATIONS
🚻 On-course restrooms are located on holes #6 and #13. 💧 On-course water stations are located on holes #4, #6, #13 and #16.
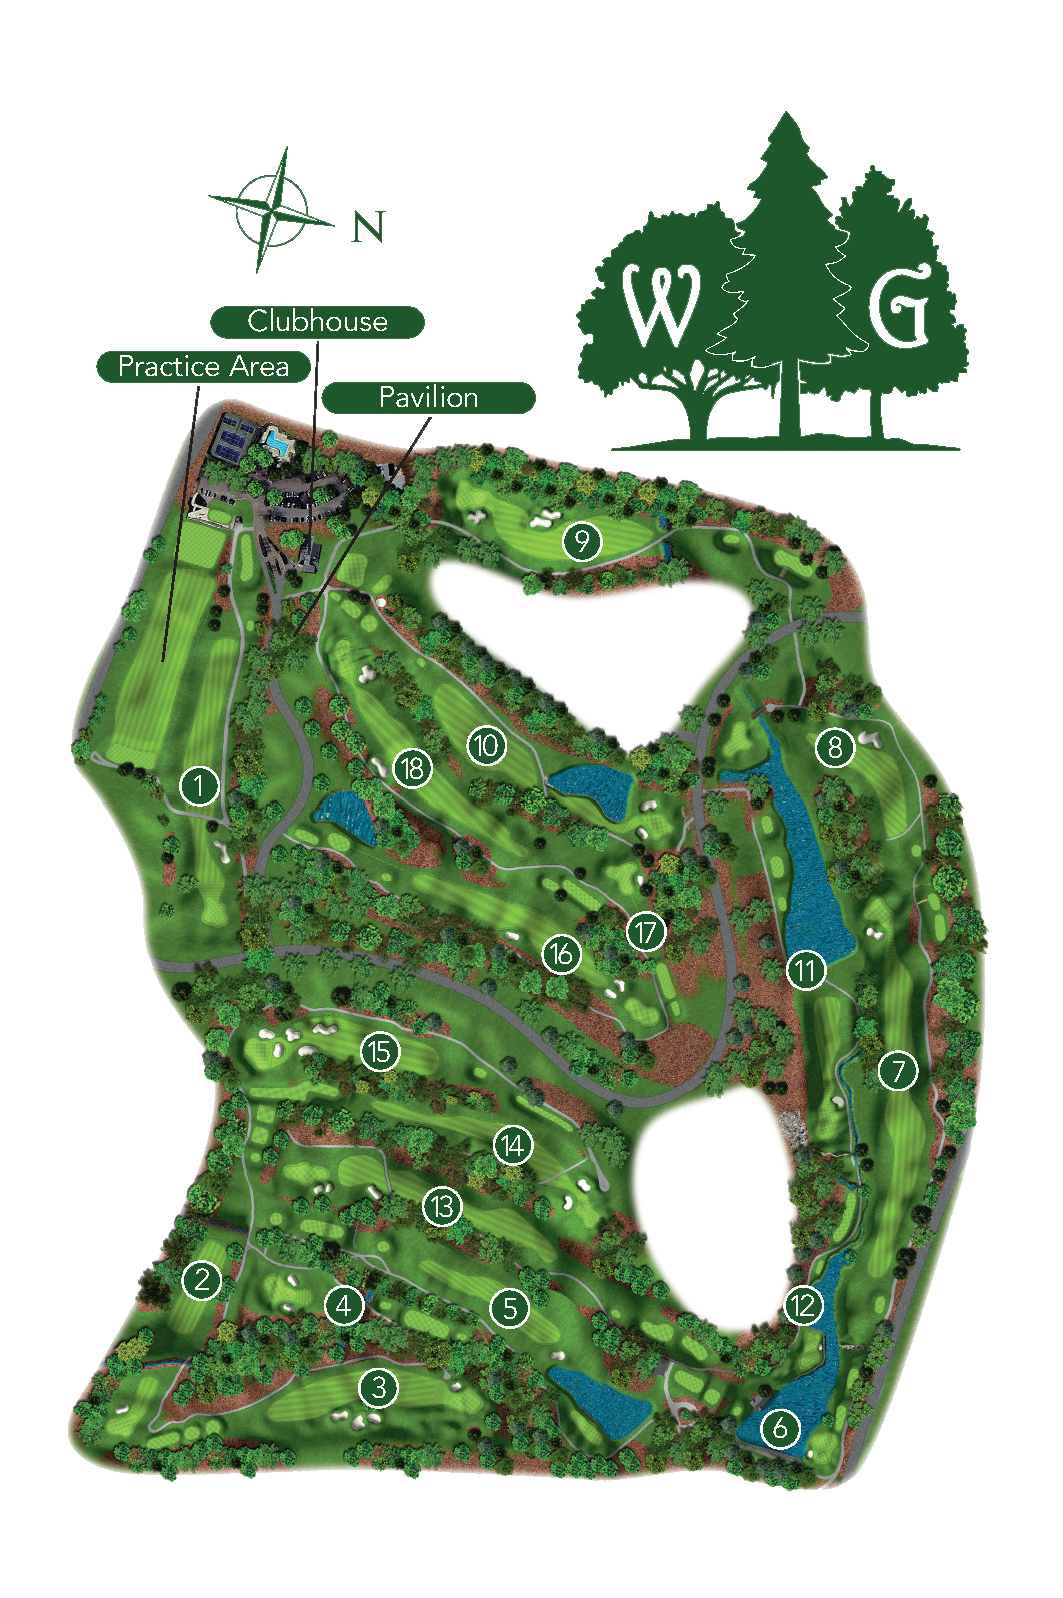
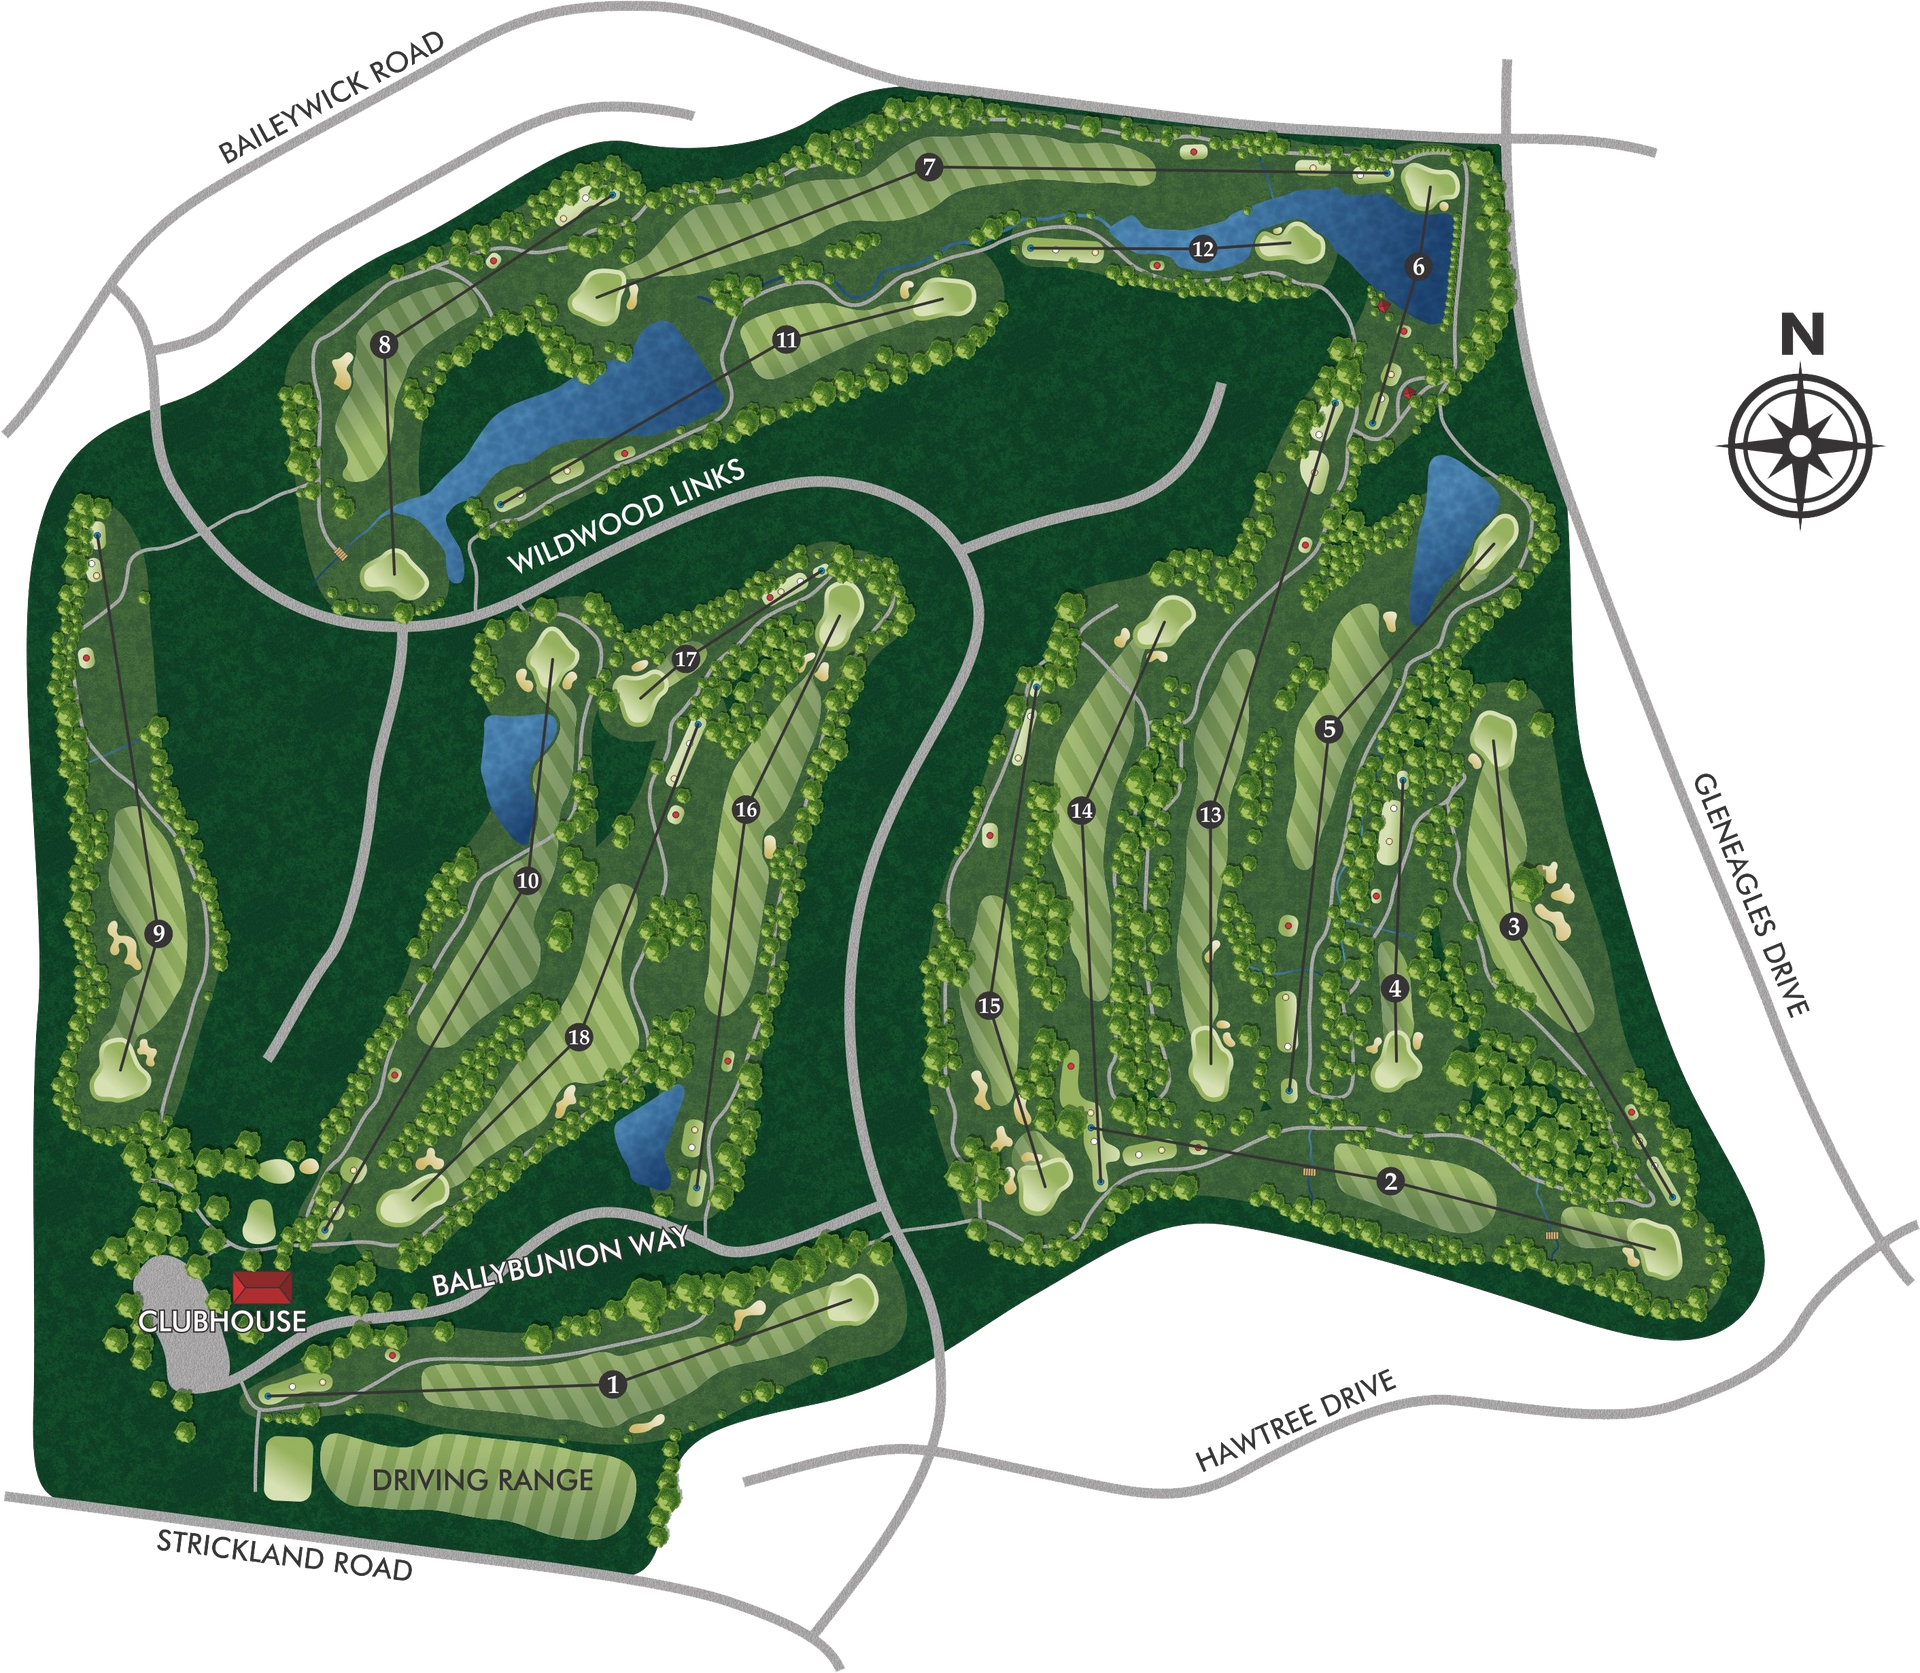
- Hole #1: The driving range is considered out of bounds. White PVC pipe defines the out of bounds along the nets.
- Hole #2: Out of bounds runs the entire right-hand side of the hole and is marked with white stakes or white PVC pipe. When the creek(s) meets out of bounds, two stakes will be present. When there are two stakes present, both white and red, the line from red stake to red stake will define the end of the penalty area.
- Hole #3: Out of bounds runs the entire right-hand side of the hole meeting a penalty area that begins at the back-right hand corner of the hole behind the green. The penalty area extends into the woods towards #5 green and to the left towards #4 tee. When the penalty area meets out of bounds, two stakes will be present. When there are two stakes present, both white and red, the line from red stake to red stake will define the end of the penalty area.
- Hole #5: Penalty area begins near the tee and runs the length of the entire right side of the hole. The drain in between #5 fairway and #13 fairway is deemed as ground under repair.
- Hole #6: Penalty area extends up the entire right side of the hole and connects to out of bounds at the back right corner of the hole. Directly behind the green is out of bounds marked with white PVC pipe that runs the length of the road/#7. For any balls hit into the water, there are two drop zones provided, one to the left of the green and one to the right. You should use the drop zone furthest away from the flag for any balls hit into the water.
- Hole#8: The trees to the left of the fairway are considered a penalty area and are marked with red stakes. Out of bounds extends the entire right-hand side of the hole.
- Hole #9: The trees to the right of the fairway are marked as out of bounds and extend up the right side of the hole and then behind the green and then to the left toward the houses. The houses are marked as out of bounds as well.
FRONT 9 RULES
- Hole #10: The drainage ditch in between the 10th and 18th hole is deemed ground under repair. The drain next to the cart path in the middle of the fairway near the edge of the water is deemed as ground under repair. The rocks near the cart path behind the green are marked as hazard.
- Hole #11: Out of bounds runs the entire right side of the hole towards the back right corner near the green. The creek behind the green is marked as a penalty area. When there are two stakes present, both white and red, the line from white PVC pipe to white PVC pipe will define the end of the penalty area.
- Hole #12: The creek directly behind the tee box is marked as a penalty area and will extend up the right-hand side of the tee box towards the green until a red/white stake combination is present. Out of bounds extends up the right-hand side of the hole through the woods toward hole #13. For any ball hit into the water, there are two drop zones provided, one in the front of the green and one behind the green. You should use the drop zone furthest away from the flag for any balls hit into the water.
- Hole #13: The drain in between #13 fairway and #5 fairway is deemed as ground under repair. The grouping of trees on the left side roughly 50 yards from the green are marked as a penalty area.
- Hole #14: The drain between #14 fairway and #15 tee box is deemed as ground under repair. The drainage ditch near the cart path on the right side of the hole (roughly 50 yards from the green) is deemed as ground under repair.
- Hole #16: The drainage area to the left of the fairway in the trees is deemed as ground under repair.
- Hole #18: The drain between the 10th and 18th fairways is deemed as ground under repair. The drainage ditch in between the 10th and 18th hole is deemed as ground under repair. The flower bed directly behind the green and to the left is a mandatory free drop.
BACK 9 RULES
- No personal coolers, outside food or beverages are permitted on the course. Food/beverages are available for purchase at the Clubhouse and at beverage carts.
- Please do not probe for golf balls in our neighbor’s yards and always respect their property.
- Out of Bounds is defined by white stakes, white PVC pipe, and by the inside edges of the street curb or the roads meandering through the neighborhood.
- Penalty areas are defined by red stakes and lines.
- Drop zones are provided on the following holes and are defined by white circles: #6 and #12. It is not mandatory to use a drop zone on either of these holes however, if the drop zone is not used, relief should be taken at the last point the golf ball entered the penalty area and/or by following all USGA guidelines.
- When a ball is hit into a mulched area it should be played as it lies. If the ball is in a maintained flower bed free relief is mandatory. Relief should be taken at the nearest point, no closer to the hole.
- Any ball deemed to be lost or out of bounds may take stroke and distance relief or dropped on the edge of the fairway no closer to the hole with 2 penalty strokes (Local Rule E-5) PLEASE NOTE: If a provisional ball is hit you will no longer be allowed to take the relief under Local Rule E-5.
- USGA Model Local Rule F-5 is a relief rule for immovable obstructions near the putting green. It allows players to take free relief from immovable obstructions on their line of play if the obstruction is within two club-lengths of the putting green, and the ball is also within two club-lengths of the obstruction.
- If a ball is within 1 Club length of the cart path, free relief may be taken.
ADDITIONAL LOCAL RULES
Based off of CGA/USGA Dress Code Policy: This dress code must be followed at all times at Wildwood Green Golf Club. This means on all practice greens (behind range and behind clubhouse), on the driving range, and on the golf course.
- CLOTHING REQUIREMENTS:
- Collared shirts, mock turtlenecks, plain golf shirts, golf-appropriate athletic shirts, golf-appropriate outerwear
- All shirts must have sleeves and collars or a collar band
- Appropriate-length bottoms (shorts, skirts, skorts, etc.)
- Compression clothing must be appropriate length and covered (leggings, compression shirts, etc.)
- Shirts must cover stomach and go down to waist length
- It is preferred for shirts to be tucked-in while playing golf
- RESTRICTED CLOTHING:
- Tee Shirts (allowed for ages 16 and under)
- Denim (jeans, jean jackets, shorts, etc.)
- Torn or frayed clothing (intentional or not)
- Cargo Shorts / Pants
- Athletic Shorts / Sweatpants / Swimsuits / Sports Bras
- Metal Spikes
- T-Shirts with writing or imagery